- Part 1: How to Make Voice Messages Stay on iPhone Forever
- Part 2: How to Save Voice Text Messages on iPhone Manually
- Part 3: How to Save Voice Messages on iPhone with iCloud
- Part 4: How to Save Voice Messages on iPhone via Email
- Part 5: How to Save Audio Messages on iPhone to Windows Computer
- Part 6: How to Save Audio Messages on iPhone to Mac
- Part 7: How to Save Audio Messages from iPhone to Computer with FoneTrans for iOS
- Part 8: FAQs About How to Save Audio Message on iPhone
How to Save Voice Messages on iPhone with 7 Helpful Solutions
 Posted by Lisa Ou / Mar 07, 2022 09:00
 Need to learn how to save audio messages on an iPhone? Perhaps someone sent you an audio message, and you want to keep it as a remembrance for reasons. Or maybe you received an audio message and you want to use it as a ringtone, voice memo, or something else. Either way, saving an audio message might be tricky because you need a solution that guarantees you a safe and secure place for them. Congratulations, because this post is the perfect answer for that. Learn 7 ways of saving audio messages on iPhone with the simplified steps below.


Guide List
- Part 1: How to Make Voice Messages Stay on iPhone Forever
- Part 2: How to Save Voice Text Messages on iPhone Manually
- Part 3: How to Save Voice Messages on iPhone with iCloud
- Part 4: How to Save Voice Messages on iPhone via Email
- Part 5: How to Save Audio Messages on iPhone to Windows Computer
- Part 6: How to Save Audio Messages on iPhone to Mac
- Part 7: How to Save Audio Messages from iPhone to Computer with FoneTrans for iOS
- Part 8: FAQs About How to Save Audio Message on iPhone
Part 1: How to Make Voice Messages Stay on iPhone Forever
Fortunately, the iPhone allows all users to adjust the expiration time. Thus they can keep voice messages forever and never delete them. This method is ideal for keeping voice messages on your iPhone for as long as you wish while keeping them. Moreover, you can keep them in the same conversation, which makes replaying it more impactful because you see which part of their origin conversation.
Steps on How to Make Voice Messages Stay on iPhone Forever:
Step 1First, open your iPhone’s Settings app and head straight to Messages.
Step 2From there, tap Expire below Audio Messages.
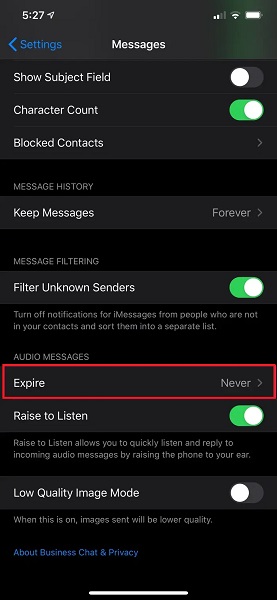
Step 3Lastly, select Never from the selection of how long voice messages should remain on your device.

This process ensures that audio messages on your Message app will never be automatically removed. Although this method will remain in their respective conversations, what if you want to save them as a voice memo on your iPhone? Moreover, you may accidentally delete a conversation thread and lose your voice messages. Behold because this post got your back.
With FoneTrans for iOS, you will enjoy freedom to transfer your data from iPhone to computer. You can not only transfer iPhone text messages to computer, but also photos, videos and contacts can be moved to PC easily.
- Transfer photos, videos, contacts, WhatsApp, and more data with ease.
- Preview data before transferring.
- iPhone, iPad and iPod touch are available.
Part 2: How to Save Voice Text Messages on iPhone Manually
For a much safer solution, it would be better to save voice messages on your iPhone manually. Moreover, you may want to save those voice messages locally and rename them as per the message it says. And, saving it will be much more efficient for replays because you no longer have to go through your conversations. Before proceeding with this method, please note that this may not work for you if you use iOS 12 or a later version.
Steps on How to Save Voice Text Messages on iPhone Manually:
Step 1Firstly, open the Messages app on your iPhone.
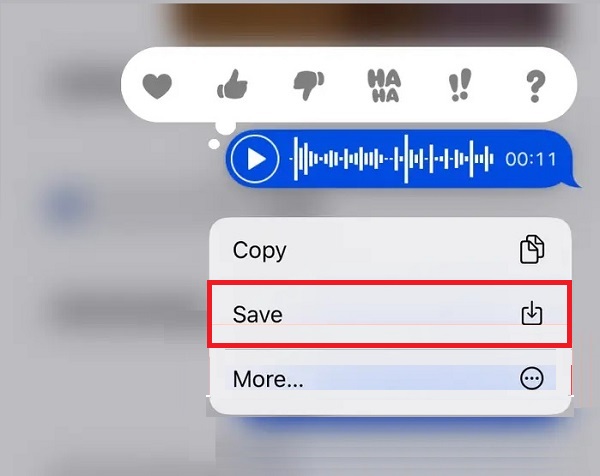
Step 2Secondly, navigate the audio message you want to save and then long-press it.
Step 3Thirdly, select Save from the pop-up menu that will appear.
As this method has some limitations, it may not be the practice for everyone. Conversely, it would be best not to worry because it is another way to save an iPhone's voice messages.
With FoneTrans for iOS, you will enjoy freedom to transfer your data from iPhone to computer. You can not only transfer iPhone text messages to computer, but also photos, videos and contacts can be moved to PC easily.
- Transfer photos, videos, contacts, WhatsApp, and more data with ease.
- Preview data before transferring.
- iPhone, iPad and iPod touch are available.
Part 3: How to Save Voice Messages on iPhone with iCloud
Saving your voice messages in cloud storage is a brilliant idea. That is because you can secure your voice messages, plus you can access them on other Apple devices as well. For that, iCloud is the best option. This claim is valid because iCloud is Apple's cloud storage and computing service. This fact means it perfectly works with the iPhone and all its data, including your message attachments.
Steps on How to Save Voice Messages on iPhone with iCloud:
Step 1To begin, go to the Settings app on your iPhone and head to your Apple ID.
Step 2Go to iCloud right away.
Step 3Lastly, toggle on Messages to ensure this app and all data are saved on iCloud.
In addition to saving audio messages, you might also want to send them to someone else. On that note, here is how you can send and save an audio message from an iPhone elsewhere.
Part 4: How to Save Voice Messages on iPhone via Email
Forwarding or sending voice messages to Email is undoubtedly possible. And as for the sender, the voice message will remain on the conversation thread unless deliberately deleted. On the other hand, it will be saved on the recipient of the Email’s Inbox or their phone’s local storage if they save it.
Steps on How to Save Voice Messages on iPhone via Email:
Step 1To begin, open your iPhone’s Messages app and look for the audio message that you want to send and save.
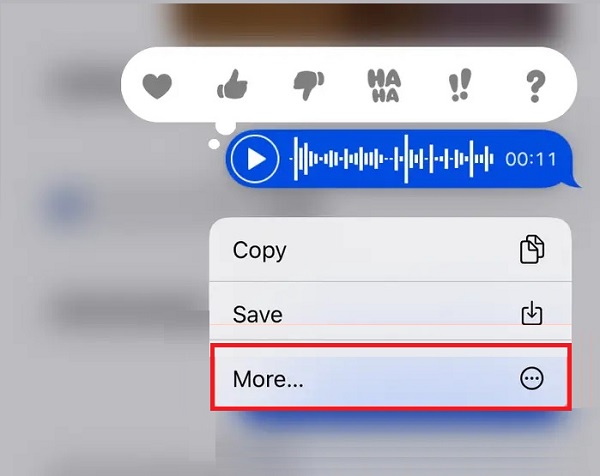
Step 2Long press the audio message and select More from the pop-up menu. After that, tap the Arrow or Share icon from the lower-right corner of your screen.
Step 3Shortly, you will be redirected to a new text message page. From there, you can type the recipient's email address rather than a phone number.
Step 4Lastly, tap tap Send icon to send the attached voice memo via Email.
As you proceed with this method, make sure you are connected to Wi-Fi or have mobile data. Alternatively, you can also save audio messages from an iPhone onto a computer.
Part 5: How to Save Audio Messages on iPhone to Windows Computer
Suppose you wish to save audio messages from your iPhone onto your computer. In that case, iTunes is the first method you can consider. Apple's iTunes is a program that was meant as a media player and library, store for clients, and last but not least, a mobile data manager. SMS and iMessages are among the data backed up by iTunes. Hence, you can use iTunes to save your audio messages to a Windows computer.
With FoneTrans for iOS, you will enjoy freedom to transfer your data from iPhone to computer. You can not only transfer iPhone text messages to computer, but also photos, videos and contacts can be moved to PC easily.
- Transfer photos, videos, contacts, WhatsApp, and more data with ease.
- Preview data before transferring.
- iPhone, iPad and iPod touch are available.
This method can also serve as your backup if you accidentally delete your message threads or the voice message itself.
Steps on How to Save Audio Messages on iPhone to Windows Computer:
Step 1With a USB cable, connect your iPhone to your computer. Subsequently, open iTunes.
Step 2From the sidebar panel of iTunes, click your iPhone’s name.
Step 3After that, tick This Computer and click Backup Now. Lastly, click Done.
Suppose you use a Mac computer and save your iPhone audio messages. In that case, the following method is for you.
Part 6: How to Save Audio Messages on iPhone to Mac
Unlike iTunes, using Finder allows you to wirelessly save your audio messages on your Mac. As you may know, you can access all messages from your iPhone on your Mac, as long as iCloud is enabled for your Messages app. See how easy and quick it is.
Steps on How to Save Audio Messages on iPhone on Mac:
Step 1First, enable iCloud to back up the Messages app on your iPhone. This step will allow your message conversations to appear on your Mac’s Messages app.
Step 2Meanwhile, open the Messages app on your Mac and navigate the audio message you want to save.
Step 3After that, right-click the audio message, then click Services from the drop-down menu.
Step 4Subsequently, click Show in Finder. Subsequently, you will be redirected to the Transfer folder of Mac. Finally, drag and drop the audio message file to your desired destination folder.
However, as these 3 storage are synced with each other, if you delete them in one place, your audio messages will automatically be deleted on the others as well. That is why it is highly recommended to use a transfer tool that will not put your voice messages at risk of being lost.
Part 7: How to Save Audio Messages from iPhone to Computer with FoneTrans for iOS
You can use FoneTrans for iOS, a transfer tool to transfer your messages from your iPhone onto your computer. FoneTrans for iOS is a powerful tool in transferring all data among and between iOS devices and computers. It is a fool-proof solution that will surely exceed your expectations from its superb performance. With this tool, you can transfer your messages quickly with a few clicks.
FoneTrans for iOS lets you transfer all iOS data, including messages and attachments, selectively or all at once quickly. Above all, this tool is available on both Mac and Windows. Thus, it is a helpful tool because you can reach out to it whenever you need to transfer data from your iPhone onto your computer or other devices regardless of your computer's OS.
With FoneTrans for iOS, you will enjoy freedom to transfer your data from iPhone to computer. You can not only transfer iPhone text messages to computer, but also photos, videos and contacts can be moved to PC easily.
- Transfer photos, videos, contacts, WhatsApp, and more data with ease.
- Preview data before transferring.
- iPhone, iPad and iPod touch are available.
Steps on How to Save Audio Messages from iPhone to Computer with FoneTrans for iOS:
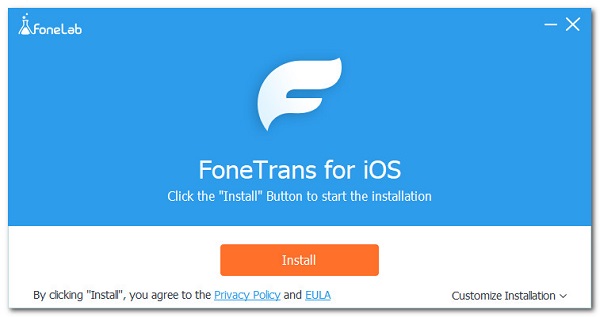
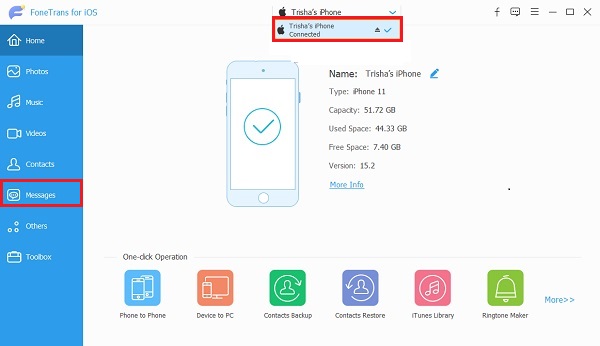
Step 1Firstly, install and run FoneTrans for iOS on your computer. Then, use a USB cord to connect your iPhone to it.
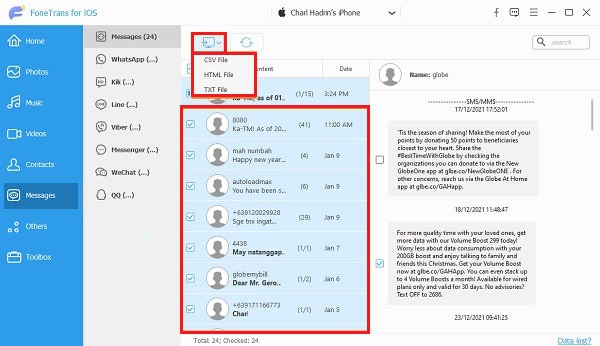
Step 2econdly, select Messages from the menu at the left part of the program.
Step 3Thirdly, select all messages that you want to transfer, then click the Export icon to save your message to your computer finally.
This method is an impressive way of transferring iOS data because there is an available preview panel that greatly helps as you select which data to transfer.
Part 8: FAQs About How to Save Audio Message on iPhone
Where do saved audio messages go on iPhone?
Depending on the method you used to save audio messages, their location might differ. But no matter how you saved them, they will remain on your iMessage conversation unless they are deleted.
Can someone see if you replay their audio message?
Fortunately, the sender of the audio message is not notified when you replay or save a voice message.
Why do audio messages expire?
Audio messages are designed to expire within a period for confidentiality purposes. Fortunately, you can remove or extend the expiration period of audio messages on your device from the Settings app.
To summarize, there are various ways of saving audio messages on your iPhone and computer. There are easy and quick procedures, while some require more processes than others. Above all, backing up your audio messages is the best solution in saving them. Efficiency and effectiveness must be combined to determine which method is best to transfer your audio messages or other data. On that note, FoneTrans for iOS undoubtedly is surely the best option. This tool surely stands out among the rest of the given solutions. That is true because they give you the most secure and effective way of saving iPhone audio messages.
With FoneTrans for iOS, you will enjoy freedom to transfer your data from iPhone to computer. You can not only transfer iPhone text messages to computer, but also photos, videos and contacts can be moved to PC easily.
- Transfer photos, videos, contacts, WhatsApp, and more data with ease.
- Preview data before transferring.
- iPhone, iPad and iPod touch are available.