- Empty Trash
- Delete Mail App
- Clear Cache on Mac
- Get More Storage on Mac
- Make Chrome Use Less RAM
- Where is Disk Utility on Mac
- Check History on Mac
- Control + Alt + Delete on Mac
- Check Memory on Mac
- Check History on Mac
- Delete An App on Mac
- Clear Cache Chrome on Mac
- Check Storage on Mac
- Clear Browser Cache on Mac
- Delete Favorite on Mac
- Check RAM on Mac
- Delete Browsing History on Mac
Proper Guide to Lock Photos on iPhone Using Easy Ways
 Updated by Lisa Ou / Nov 27, 2023 09:15
Good day! My little cousins are coming over this weekend, and they always borrow my iPhone whenever they're here. The thing is, I have important photos to protect, so I can't let them use my device unless I can find a way to lock and secure my pictures. Hence, can anyone tell me a strategy on how to lock my photos on iPhone? It would be a great help.
Locking the Photos app or its content is not as common as the other processes on an iPhone. However, it is helpful and sometimes even necessary for some users who must protect their photos. If you are among them, you are extremely lucky, as you have entered the appropriate article discussing the proper ways for locking pictures on an iPhone.
You may be looking for ways to lock your photos as you're experiencing a situation like the scenario above. Or you may have personal pictures you don't feel comfortable sharing with others. Hence, you wish to lock them to prevent people from seeing the photos while using your device. That said, scan the convenient guidelines below to solve your concern quickly.


Guide List
Part 1. How to Lock Photos on iPhone via Hidden Photos
Since the Photos app stores your iPhone pictures, it is also among the methods where you can lock them. If you have explored the app, you may have seen the Hidden Photos folder in the Albums section. The good news is there is an option to lock the Hidden Photos album; thus, you only have to hide the photos from your Library and set up the lock on Settings.
Comply with the painless guidelines underneath to hide pictures and master how to lock hidden photos on iPhone:
Step 1Go to your Photos app on the iPhone, and on the Library section, select the image you desire to lock. You are also allowed to select multiple items for a quicker process. Afterward, click the Share symbol at the screen’s bottom section and tap the Hide tab.
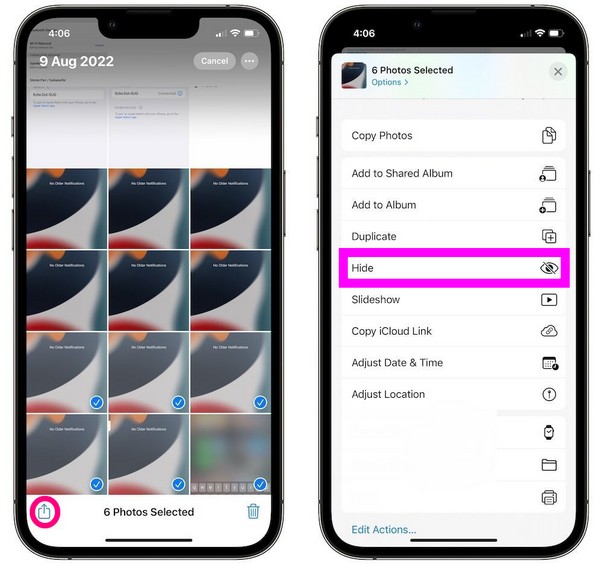
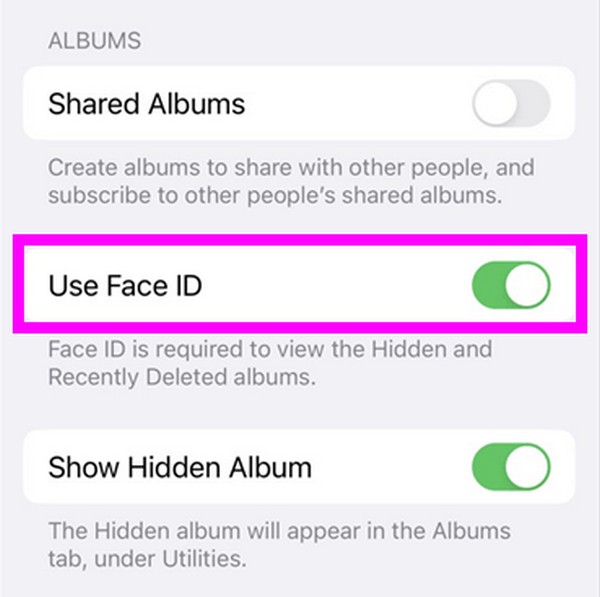
Step 2When your photos are saved in the Hidden album, move to the Settings app and tap Photos from the options. Enable the Use Face ID slider on the following screen and set it up to lock your pictures. For more security, you may also turn off the Show Hidden Album slider to hide the album on the Photos app. Enable it again if you need to view the photos.
The process is painless but may be more time-consuming than the other methods. That’s because it requires navigating Settings and Photos, so you have to take time to process the guidelines on both apps. But if you’d like to try a quicker method, see the following parts.
Part 2. How to Lock Photos on iPhone through Notes App
Another app where you can lock your iPhone photos is the Notes app. Most people see and know this app for writing notes, reminders, checklists, and more, but that’s not all it can do. It also has a feature that allows you to hide and lock photos from people’s prying eyes. So, if you have personal or confidential images, the Notes app is a reliable location to store them with security. All you have to do is save your photos on a note, then secure it with a lock.
Act according to the straightforward steps below to lock photos on iPhone using the Notes app:
Step 1Choose Settings on your iPhone Home screen and tap Notes to manage the lock option. Next, select Password > iCloud/On My iPhone, then set up your desired password.
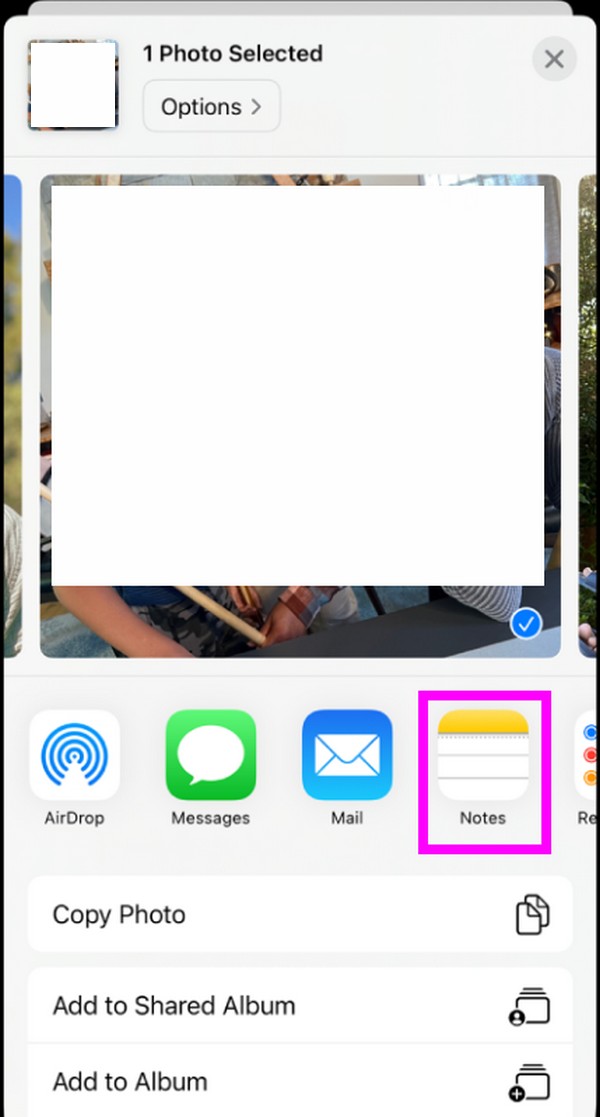
Step 2Return to the Home screen and tap the Photos app to access and view the Library section. From there, locate the pictures you plan to lock and check them after tapping the Select button. Next, tap the Share icon and pick the Notes app from the options.
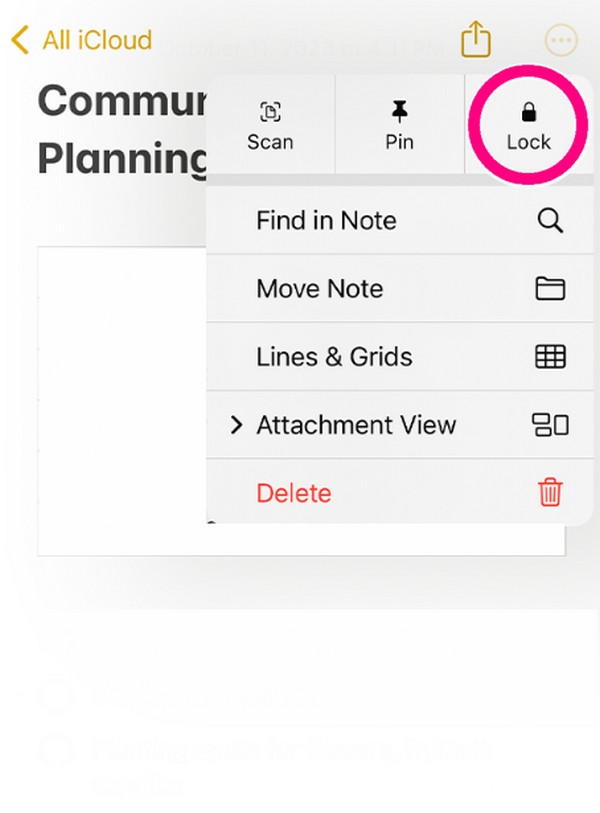
Step 3Once the photos you have shared are on the Notes interface, tap the three-dotted symbol at the top of the screen. Then, choose Lock to lock the note containing your photos.
You may have noticed the first 2 methods require an additional app to lock photos. The first part needs the Photos and Settings apps, while the second needs the Settings, Photos, and Notes app. If you’d like to lock the photos on your Mac instead, proceed below.
Part 3. How to Lock Photos on Mac with FoneLab Mac Sweep
FoneLab Mac Sweep is a specialized third-party program for Mac users. It fronts as a cleaning tool, but if you explore its interface, you will discover its advantageous features that can cater to several of your Mac concerns. It includes the Hide feature located in the ToolKit section. This feature offers an encryption option where you can set up a password to hide and protect the photos you intend to lock. Hence, it prevents unwanted or unauthorized access to your chosen images from people who use or borrow your Mac.
Meanwhile, FoneLab Mac Sweep can also eliminate unneeded files from the computer. Hence, you can use it to clean your Mac by erasing its system junk, iTunes junk, trash, large and old files, duplicated photos, and more. It also offers an uninstaller that lets you remove unessential apps within minutes, especially those that take up too much space. Also, its Status section is available so you will know when it’s time you manage your Mac condition.

With FoneLab Mac Sweep, you will Clear system, email, photo, iTunes junk files to free up space on Mac.
- Manage similar photos and dulplicate files.
- Show you the detailed status of Mac with ease.
- Empty trash bin to get more storage.
Gather the trouble-free process underneath as a model of how to lock photos on Mac with FoneLab Mac Sweep:
Step 1Free Download the FoneLab Mac Sweep installer on its official site, and once the file is saved, open it and proceed with the installation. Then, drag the cleaner’s icon to the Applications folder when required to launch the tool shortly.

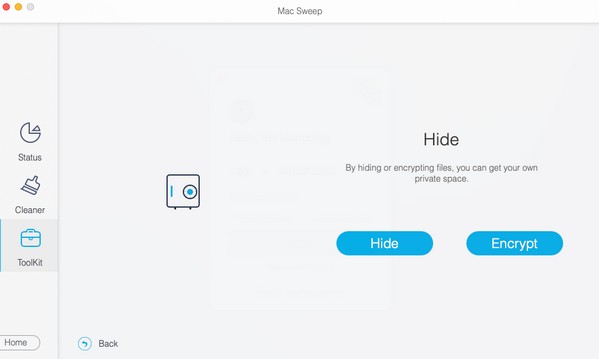
Step 2Select the ToolKit feature on the main interface to direct immediately to the other functions. Next, choose the Hide box on the lower section, then select the Encrypt tab on the following interface. When prompted, set up your desired password, and the program will bring you to the last interface afterward.
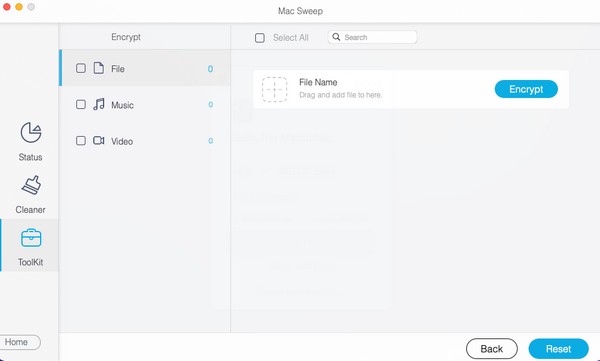
Step 3Finally, click the plus icon on the next screen’s File section to select and import the photo you wish to lock into the program. Then, hit Encrypt to lock the picture and prevent others from accessing it on your Mac.
With FoneLab Mac Sweep, you will Clear system, email, photo, iTunes junk files to free up space on Mac.
- Manage similar photos and dulplicate files.
- Show you the detailed status of Mac with ease.
- Empty trash bin to get more storage.
Part 4. FAQs about How to Lock Photos on iPhone
1. How to unlock hidden photos on iPhone?
If you performed the Part 1 method in this article and successfully locked your Hidden album, you're probably wondering how to open it. Hence, access the Photos app and proceed to the Albums section. When you see the Hidden Albums option, tap it, then use your Face or Touch ID, depending on the lock you have set up on Settings. Afterward, the album will be unlocked.
2. Can I password-lock my iPhone photos?
Yes, you can. If you prefer locking your photos using a password instead of a Face or Touch ID, kindly refer to this article's Part 2 and 3 methods. They let you choose your preferred password accordingly.
Obtain the knowledge above, and it is guaranteed you will successfully lock the photos you wish to protect and secure on your iPhone. Thus, check the procedures now.
Below is a video tutorial for reference.

With FoneLab Mac Sweep, you will Clear system, email, photo, iTunes junk files to free up space on Mac.
- Manage similar photos and dulplicate files.
- Show you the detailed status of Mac with ease.
- Empty trash bin to get more storage.