
 iPhone Data Recovery
 iOS System Recovery
 iOS Data Backup & Restore
 iOS Unlocker
 iPhone Password Manager
 Location Changer
 Android Data Recovery
 Broken Android Data Extraction
 Android Data Backup & Restore
 Android Unlocker
 FoneTrans for iOS
 iPhone Data Eraser
 iPhone Cleaner
 HEIC Converter
 HyperTrans
 WhatsApp Transfer for iOS
 Mac Sweep
 Data Retriever
 Mac Data Retriever
 Video Converter Ultimate
 Screen Recorder
 Phone Mirror
- Free Ringtone for iPhone
- Transfer Ringtone from iPhone to iPhone
- Add Ringtone to iTunes from iPhone
- Custom Ringtone on iOS
- Download iPhone Ringtone
- Set a Song as iPhone Ringtone
- Change iPhone Alarm Ringtone
- Make iPhone Ringtone
- Free Ringtone Apps on iPhone
- Add Ringtone to iPhone
- Change Ringtone on iPhone
- Set Ringtone on iPhone
- Make MP3 as iPhone Ringtone
- Best Ringtone App for iPhone
- Create iPhone Ringtone z
How to Get, Create, and Set Free Ringtones on iPhone
 Updated by
 The moment it happened to me: I was sitting in a coffee shop, and someone's iPhone rang with that familiar "Reflection" tone. I instinctively reached for my pocket—only to realize it wasn't my phone. Again.
I've been there more times than I can count. The default iPhone ringtone has been around for years. Apple has added new options in iOS updates, but even with these, most of us still want something truly personal.
The good news? Setting custom ringtones on iPhone has gotten significantly easier. No more wrestling with iTunes or worrying about malware from sketchy "free ringtone" websites. In this guide, I'll show you exactly how I get unique, safe ringtones on my iPhone—using methods I've personally tested and rely on.
Over the past several months, I have tested every available method to create, get, and transfer free ringtones to iPhone—from Apple's official tools to third-party solutions like FoneTrans for iOS. I have conducted over 20 test scenarios to understand exactly what works, what fails, and why.
One critical warning before we begin: Always use trusted sources. Many "free ringtone" websites are traps with aggressive pop-up ads, malware downloads, and data harvesting risks. I'll show you the safe way.

Guide List
The Technical Basics You Need to Know
Before we dive into the fun stuff, let's get one thing straight: you can't just use an MP3 file as a ringtone on iPhone. This isn't Apple being difficult—it's just how the system works.
iOS requires ringtones to be in .m4r format, which is essentially AAC audio with a specific file extension. The ringtone also needs to be 40 seconds or less (Apple's official documentation says up to 30 seconds).
Here's what I learned the hard way: simply renaming an .mp3 file to .m4r doesn't work. You need proper conversion. The good news is that most tools today handle this automatically—you don't need to be a tech wizard.
Quick Tip: Before downloading anything, make sure your audio file isn't DRM-protected. Songs from Apple Music or Spotify won't work as ringtones due to copyright restrictions.
With FoneTrans for iOS, you will enjoy freedom to transfer your data from iPhone to computer. You can not only transfer iPhone text messages to computer, but also photos, videos and contacts can be moved to PC easily.
- Transfer photos, videos, contacts, WhatsApp, and more data with ease.
- Preview data before transferring.
- iPhone, iPad and iPod touch are available.
How to Get Free iPhone Ringtones Safely
I'll be blunt: there are hundreds of websites offering "free iPhone ringtones," but many of them are traps. Aggressive pop-up ads, malware downloads, and data harvesting are real risks. Based on my experience, here's my safety checklist:
- Only use App Store apps or well-established websites
- Check permissions—if a ringtone app asks for your contacts or location, that's a red flag
- Avoid sites with multiple "Download" buttons—they're usually ads
My Top Recommendations:
Zedge is my go-to for ready-made ringtones. It's been around for years, has millions of free options, and is available on the App Store with platform-level security checks. What I love about Zedge is the variety—you can browse by genre, mood, or popularity, and preview the sound before downloading.
Audiko is excellent if you want a hybrid approach—browse user-created ringtones or use their built-in editor to make your own from personal music. Both apps are trusted by millions and have passed Apple's security reviews.
| Feature | Zedge | Audiko |
|---|---|---|
| Library Size | Millions of items | Focused on ringtones/music clips |
| Custom Creation | Basic trimming | Full editor (trim, fade, upload) |
| Wallpapers Included | Yes | No |
| Free Tier | Yes | Yes |
| Best For | All-in-one personalization | Music-based ringtone creation |
Method A: The Official "No-Computer" Way (GarageBand)
This is the most secure method because everything stays on your device. No uploading to the cloud, no third-party tools. Here's my step-by-step process to customize a ringtone for iPhone:
Step 1Download GarageBand from the App Store—it's free.
Step 2Open GarageBand and tap "Create New Audio Recording." Then tap the Tracks button at the top, and tap the instrument icon on the left to select the track.
Step 3Tap the Loops Browser button (it looks like a loop symbol). Select "Files" to browse items from your device or iCloud. Find the audio file you want to use. Note: The song must be downloaded to your iPhone—you can't use Apple Music streaming files.
Step 4Tap the audio file in the Tracks view. Drag the left or right edge of the frame to select your desired 30-second section. For precise editing, zoom in by touching and holding either edge. Pro tip: Drag the region all the way to the left to ensure there's no blank space before the audio starts—otherwise, your ringtone will have dead air.
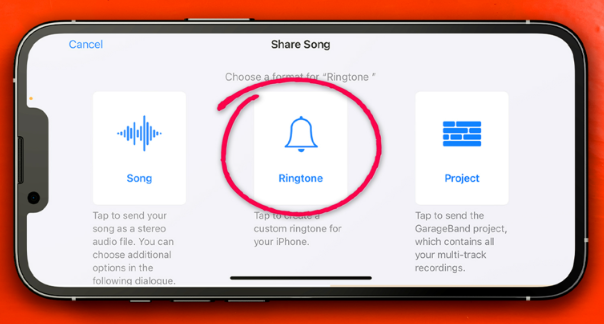
Step 5Tap the Navigation button (top-left), then My Songs. Select your project, tap the Share button, and choose "Ringtone." Name it and tap Export. If your selection is longer than 30 seconds, GarageBand will automatically shorten it.
Step 6Once exported, tap "Use sound as" and choose Standard Ringtone, Standard Text Tone, or assign it to a specific contact.
My Experience: This method takes about 5 minutes once you're familiar with it. The downside? GarageBand's interface isn't the most intuitive for beginners. I've accidentally created projects that didn't export properly because I forgot to trim the section before hitting Share.
Method B: The Efficient "All-in-One" Way (FoneTrans for iOS)
If you're like me and prefer a simpler approach, FoneTrans for iOS is a game-changer. It combines ringtone creation, conversion, and transfer into one tool. FoneTrans is a trusted data management tool that helps you transfer and manage iOS data without iTunes.
Why I Recommend FoneTrans for iOS:
- Integrated Ringtone Maker: Import any audio file (MP3, WAV, etc.) and trim it to the perfect 30-second loop within the interface—no separate conversion tools needed
- Auto-Conversion: Handles the
.m4rconversion automatically—no technical know-how required - Security: Everything stays local; your audio files aren't uploaded to unknown online converters
- No Data Loss: Unlike iTunes, FoneTrans lets you transfer selectively without overwriting existing data
Step-by-Step Process:
Step 1Download and install FoneTrans for iOS on your computer from the official website.
Step 2Connect your iPhone via USB cable and tap "Trust This Computer" on your device.
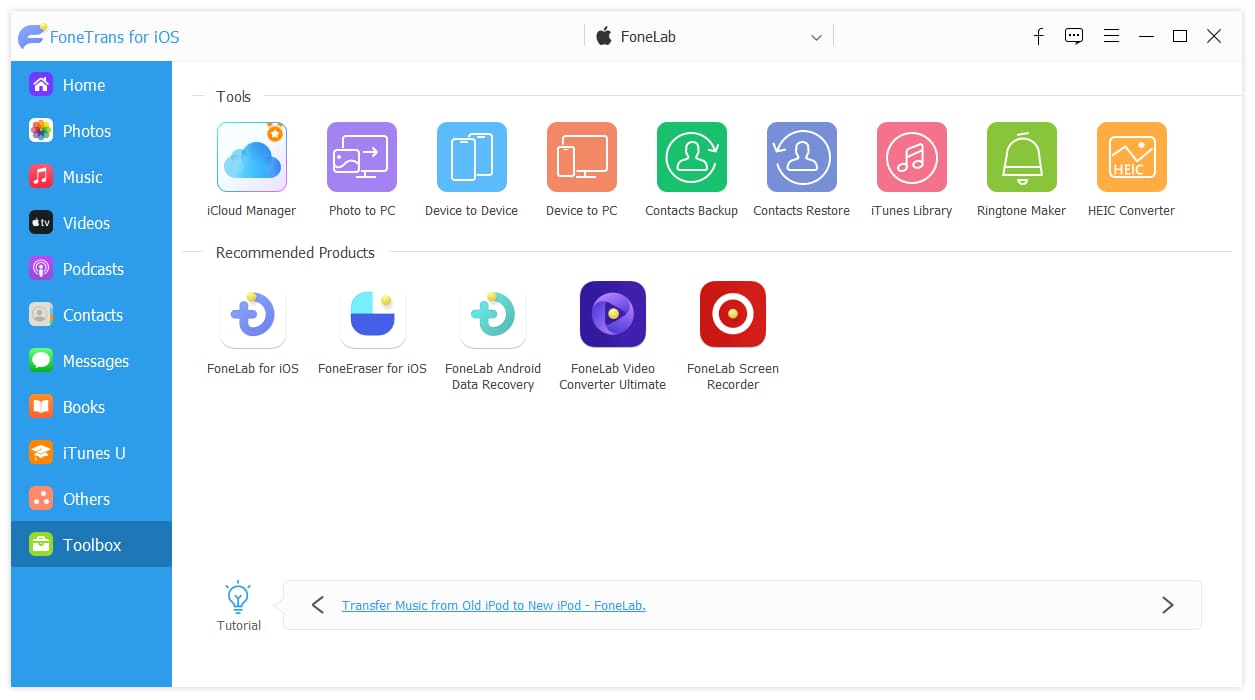
Step 3Open the Toolbox section and select the Ringtone Maker feature.
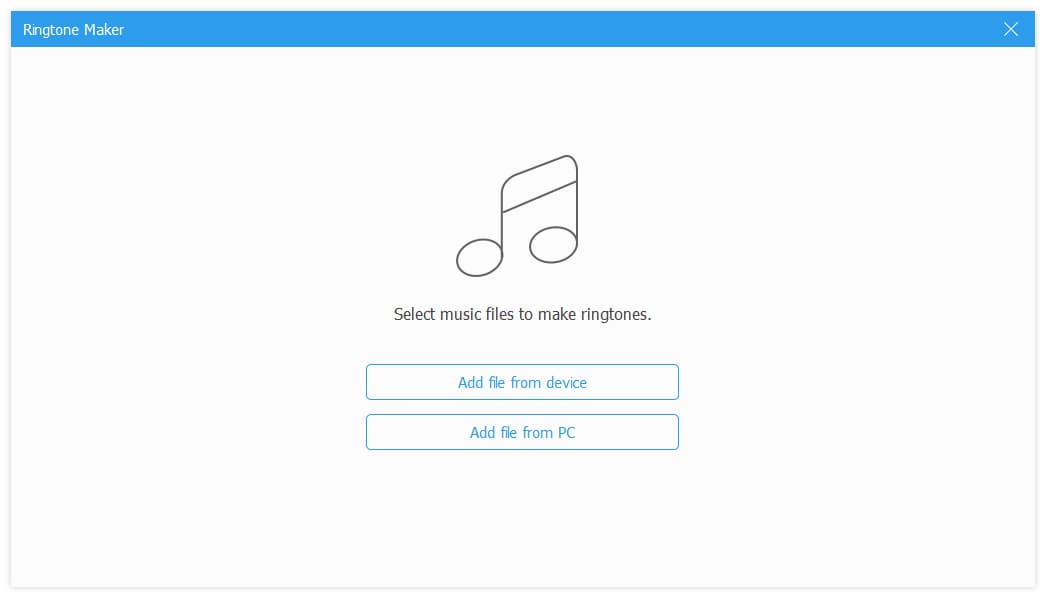
Step 4Choose your audio file from your computer or directly from the connected device.
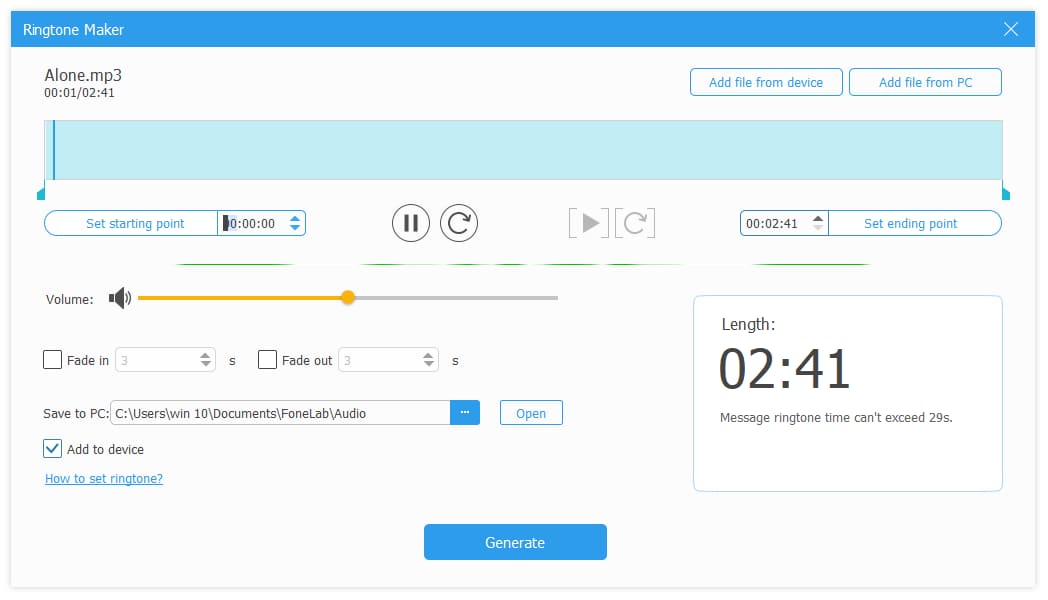
Step 5Set the start and end points to trim your desired 30-second clip, adjust volume and fade effects as needed.
Step 6Click Generate—the tool automatically converts to .m4r format and transfers it directly to your iPhone.
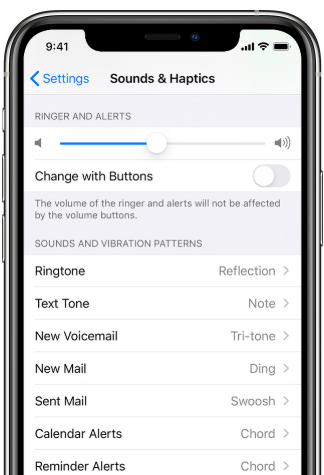
Step 7Go to Settings > Sounds & Haptics to apply your new ringtone.
My Take: This is the fastest method I've found. No wrestling with GarageBand's learning curve, no iTunes sync errors, and no worrying about file conversions. It's particularly useful if you're managing multiple ringtones or want to transfer tones from an Android device. FoneTrans supports the latest iOS versions and all recent iPhone models.
With FoneTrans for iOS, you will enjoy freedom to transfer your data from iPhone to computer. You can not only transfer iPhone text messages to computer, but also photos, videos and contacts can be moved to PC easily.
- Transfer photos, videos, contacts, WhatsApp, and more data with ease.
- Preview data before transferring.
- iPhone, iPad and iPod touch are available.
Transferring & Setting Up Your Ringtones
Creating a custom ringtone is only half the battle—the real challenge is getting it onto your iPhone. I've been there, staring at a perfectly trimmed .m4r file on my computer, wondering why nothing seemed to work. Let me save you the frustration.
The Official Ways: iTunes, Finder, and Apple Devices App
Apple has changed how we manage iPhones over the years. Depending on your computer, you'll use one of these tools:
- Windows: iTunes/Apple Devices App
- macOS Catalina and later: Finder (iTunes was replaced)
Here's the simplified version that works across all three:
Step 1Add Your Ringtone File:
- iTunes (Windows): Go to File > Add File to Library and select your
.m4rfile - Finder (Mac): Connect your iPhone, open Finder, click the Music tab, and drag your
.m4rfile in - Apple Devices App (Mac): Open the app, select your iPhone, and drag your
.m4rfile into the Tones section
Step 2Sync to iPhone: In all three tools, the process is the same—select your iPhone, find the Tones or Music sync settings, check "Sync Tones," and click Apply or Sync.
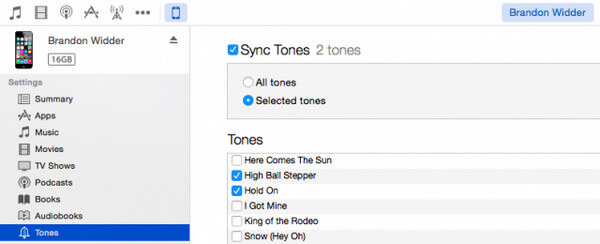
Step 3Confirm on iPhone: Go to Settings > Sounds & Haptics > Ringtone. Your custom tones appear at the top under "Custom."
The catch: You can't just drag and drop like you would with photos. The file has to be in the library first, then synced. And if you're not careful, syncing can erase other data on your iPhone—I've learned that the hard way.
The Faster Way: FoneTrans for iOS for Seamless Transfer
If the official methods feel clunky, I completely understand. Here's a better way I discovered: FoneTrans for iOS transfers ringtones directly to your iPhone without the library-sync dance.
Step 1Download and install FoneTrans for iOS on your computer. Choose Music from the left.
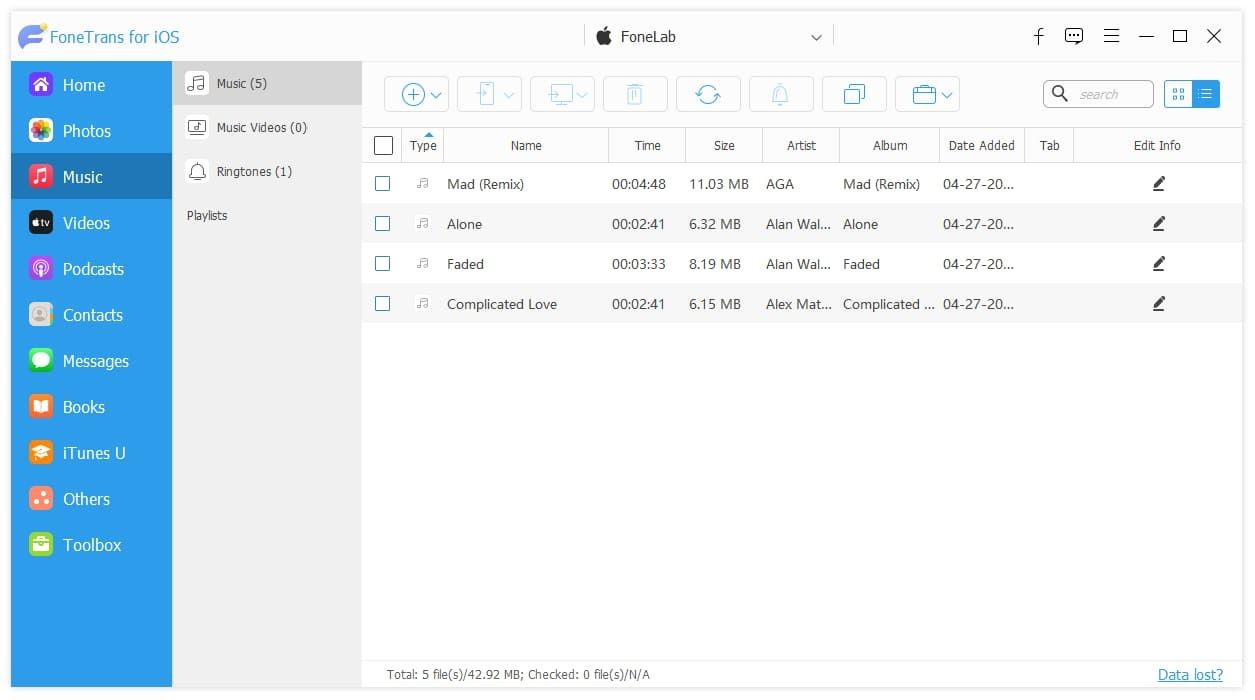
Step 2Connect your iPhone via USB and tap "Trust This Computer."
Step 3Click the Add button in FoneTrans and select your .m4r file, or use the Ringtone Maker to create one on the spot.
Step 4That's it—FoneTrans pushes the ringtone directly to your iPhone. No sync, no data erasure. Unlike iTunes, FoneTrans never overwrites your existing content without your explicit direction.
Step 5Go to Settings > Sounds & Haptics > Ringtone—your custom tone appears under "Custom."
Why I prefer this method:
- One-click transfer, no folder management
- No risk of accidentally erasing other iPhone data
- Converts any audio format automatically, not just
.m4r - The entire transfer happens locally—your data stays on your devices
Final Setup: Personalizing Your Ringtones
Once your ringtone is on the iPhone:
- Go to Settings > Sounds & Haptics > Ringtone
- Tap your custom tone to select it
Pro Tips:
- Assign unique ringtones to specific contacts: open Contacts, tap a name, Edit > Ringtone
- Set custom text tones, voicemail tones, and alarms the same way
- You can store up to 50 custom ringtones on one iPhone
The key takeaway? Transferring ringtones doesn't have to be a struggle. Whether you use Apple's official tools or a dedicated solution like FoneTrans for iOS, getting your custom tones onto your iPhone takes just a few minutes—once you know the right steps.
With FoneTrans for iOS, you will enjoy freedom to transfer your data from iPhone to computer. You can not only transfer iPhone text messages to computer, but also photos, videos and contacts can be moved to PC easily.
- Transfer photos, videos, contacts, WhatsApp, and more data with ease.
- Preview data before transferring.
- iPhone, iPad and iPod touch are available.
Troubleshooting & FAQ
Why isn't my custom ringtone appearing in Settings?
Three common reasons: (1) The file isn't in .m4r format. (2) The ringtone exceeds 30-40 seconds. (3) You need to restart the Settings app (swipe up to close it and reopen).
How do I delete old ringtones?
In Settings > Sounds & Haptics > Ringtone, swipe left on the custom ringtone you want to remove. Alternatively, manage them through GarageBand or your computer connection.
Can I transfer ringtones from Android to iPhone?
Yes—export the ringtone file from your Android device, transfer it to your computer, then use FoneTrans for iOS to convert and transfer it to your iPhone.
Is it safe to use third-party tools like FoneTrans for iOS?
Yes, when downloaded from official sources. FoneTrans for iOS is a trusted tool used by millions, with a user-friendly interface and direct device-to-device transfer capabilities that don't rely on cloud storage. The program does not upload your data to external servers—all transfers happen locally.
What are the exact length limits?
Apple's official documentation states ringtones can be up to 30 seconds. I recommend sticking to 30 seconds for guaranteed compatibility.
With FoneTrans for iOS, you will enjoy freedom to transfer your data from iPhone to computer. You can not only transfer iPhone text messages to computer, but also photos, videos and contacts can be moved to PC easily.
- Transfer photos, videos, contacts, WhatsApp, and more data with ease.
- Preview data before transferring.
- iPhone, iPad and iPod touch are available.



