
 iPhone Data Recovery
 iOS System Recovery
 iOS Data Backup & Restore
 iOS Unlocker
 iPhone Password Manager
 Location Changer
 Android Data Recovery
 Broken Android Data Extraction
 Android Data Backup & Restore
 Android Unlocker
 FoneTrans for iOS
 iPhone Data Eraser
 iPhone Cleaner
 HEIC Converter
 HyperTrans
 WhatsApp Transfer for iOS
 Mac Sweep
 Data Retriever
 Mac Data Retriever
 Video Converter Ultimate
 Screen Recorder
 Phone Mirror
- Part 1: Why Transferring iPhone Ringtones Is Tricky
- Part 2: Understanding Ringtone Types and Format Requirements
- Part 3: Method 1 – Transfer via AirDrop (The Wireless Route)
- Part 4: Method 2 – iCloud Drive or OneDrive (Cloud Sync)
- Part 5: Method 3 – Using FoneTrans for iOS (The All-in-One Solution)
- Part 6: Method 4 – Finder (macOS) or Apple Devices (Windows)
- Part 7: Method 5 – Email (For Quick, Single-Tone Transfers)
- Part 8: Why Your Ringtone Might Not Show Up (And How to Fix It)
- Part 9: Final Thoughts – Which Method Should You Use?
- Free Ringtone for iPhone
- Transfer Ringtone from iPhone to iPhone
- Add Ringtone to iTunes from iPhone
- Custom Ringtone on iOS
- Download iPhone Ringtone
- Set a Song as iPhone Ringtone
- Change iPhone Alarm Ringtone
- Make iPhone Ringtone
- Free Ringtone Apps on iPhone
- Add Ringtone to iPhone
- Change Ringtone on iPhone
- Set Ringtone on iPhone
- Make MP3 as iPhone Ringtone
- Best Ringtone App for iPhone
- Create iPhone Ringtone
How to Transfer Ringtones from iPhone to iPhone: 5 Working Methods
 Posted by
 Transferring ringtones between iPhones is not as straightforward as it should be. I've been dealing with iOS devices since the iPhone 4, and this particular quirk has frustrated me more times than I care to admit.
Unlike Android, where you can simply share an audio file and set it as a ringtone, Apple has built a walled garden around its ringtone system. The format matters—your ringtone needs to be in .m4r format, which is essentially an AAC audio file with a specific extension that tells iOS "this is a ringtone, not a song." And the length? Maximum 40 seconds.
Over the years, I've tested pretty much every method out there. Some worked perfectly; others left me staring at my phone wondering why Apple makes this so difficult. In this guide, I'll walk you through the five methods that actually work, based on my hands-on experience with various iOS versions and devices.

Guide List
- Part 1: Why Transferring iPhone Ringtones Is Tricky
- Part 2: Understanding Ringtone Types and Format Requirements
- Part 3: Method 1 – Transfer via AirDrop (The Wireless Route)
- Part 4: Method 2 – iCloud Drive or OneDrive (Cloud Sync)
- Part 5: Method 3 – Using FoneTrans for iOS (The All-in-One Solution)
- Part 6: Method 4 – Finder (macOS) or Apple Devices (Windows)
- Part 7: Method 5 – Email (For Quick, Single-Tone Transfers)
- Part 8: Why Your Ringtone Might Not Show Up (And How to Fix It)
- Part 9: Final Thoughts – Which Method Should You Use?
Part 1: Why Transferring iPhone Ringtones Is Tricky
Let me start with something I wish someone had told me years ago: transferring ringtones between iPhones is not as straightforward as it should be. I've been dealing with iOS devices since the iPhone 4, and this particular quirk has frustrated me more times than I care to admit.
Unlike Android, where you can simply share an audio file and set it as a ringtone, Apple has built a walled garden around its ringtone system. The format matters—your ringtone needs to be in .m4r format, which is essentially an AAC audio file with a specific extension that tells iOS "this is a ringtone, not a song." And the length? Maximum 40 seconds.
Over the years, I've tested pretty much every method out there. Some worked perfectly; others left me staring at my phone wondering why Apple makes this so difficult. In this guide, I'll walk you through the five methods that actually work, based on my hands-on experience with various iOS versions and devices.

With FoneTrans for iOS, you will enjoy freedom to transfer your data from iPhone to computer. You can not only transfer iPhone text messages to computer, but also photos, videos and contacts can be moved to PC easily.
- Transfer photos, videos, contacts, WhatsApp, and more data with ease.
- Preview data before transferring.
- iPhone, iPad and iPod touch are available.
Part 2: Understanding Ringtone Types and Format Requirements
Before diving into the methods, let's clarify two important things.
Purchased ringtones are tied to your Apple ID. If you bought them from the Tone Store, they're associated with your account and can be redownloaded on any device using the same Apple ID. Apple Support confirms that your purchased tones appear at the top of the ringtone list, and you can tap "Download All Purchased Tones" to bring them to a new device.
Custom ringtones are the tricky ones. These are tones you've created yourself—maybe from a favorite song snippet, a voice recording, or a downloaded audio file. These files exist only on your device, and Apple provides no native way to extract them directly.
The .m4r format explained: an .m4r file is technically identical to an .m4a file in its audio data structure. The only difference is the extension. Rename an .m4a file to .m4r, and you're telling Apple's software, "This is a ringtone, not a song." This simple distinction is what allows iOS to categorize the file correctly.
Part 3: Method 1 – Transfer via AirDrop (The Wireless Route)
Let's start with the method I use most often for sharing custom tones with friends. AirDrop is Apple's wireless file-sharing feature, and yes, you can use it to transfer ringtones—but there's a catch.
Can you AirDrop ringtones to iPhone? The short answer is yes—but not directly as a functioning ringtone. AirDrop transfers the .m4r file itself, which then must be manually installed on the receiving device. You can't AirDrop a ringtone and have it automatically appear in the Sound settings. This is a common point of confusion, and I've seen plenty of people frustrated by it.
Here's the step-by-step process:
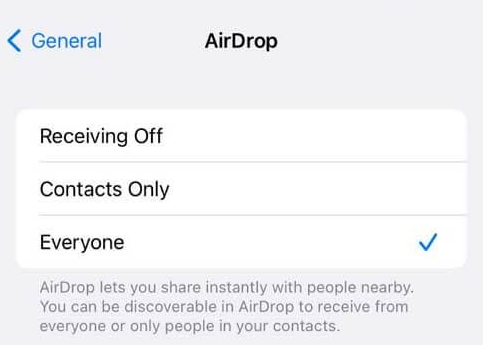
Step 1On both iPhones, turn on Wi-Fi and Bluetooth. Go to Settings > General > AirDrop and set the receiving device to "Everyone" temporarily.
Step 2On the source iPhone, open the Files app, locate your .m4r file, long press it, tap Share, then select AirDrop. Tap the target iPhone's name.
Step 3On the receiving iPhone, tap Accept. The file saves to the Files app. Locate it, long press, tap Share, and select "Use as Ringtone." If this option doesn't appear, open the file in GarageBand and export it as a ringtone.
Pro Tip: This method works best when both devices are close together. I've found that placing them side by side eliminates most transfer failures.
With FoneTrans for iOS, you will enjoy freedom to transfer your data from iPhone to computer. You can not only transfer iPhone text messages to computer, but also photos, videos and contacts can be moved to PC easily.
- Transfer photos, videos, contacts, WhatsApp, and more data with ease.
- Preview data before transferring.
- iPhone, iPad and iPod touch are available.
Part 4: Method 2 – iCloud Drive or OneDrive (Cloud Sync)
When I don't have both devices physically together, or when I'm transferring multiple tones, I use cloud storage. This method works well for custom tones and doesn't require a computer.
Step 1On the source iPhone, open the Files app, locate your .m4r file, tap Share, and select "Save to Files." Choose iCloud Drive or OneDrive as the destination.
Step 2On the receiving iPhone, open the same cloud service, find the file, and download it to the device.
Step 3Open the Files app, locate the downloaded file, and use the same "Use as Ringtone" or GarageBand method described above.
This method is particularly useful when setting up a new iPhone—you can upload all your tones at once and download them on the new device without juggling two phones simultaneously.
Part 5: Method 3 – Using FoneTrans for iOS (The All-in-One Solution)
When I'm dealing with a large collection of ringtones, or when I need to transfer tones from a device that's about to be wiped, I turn to FoneTrans for iOS. This is the tool I personally recommend after testing numerous alternatives.
Why FoneTrans for iOS?
Apple provides no native way to extract custom ringtones from an old iPhone. If you've lost the original audio files, third-party software is often the only option. FoneTrans for iOS stands out because it's an all-in-one solution that lets you transfer, manage, and even create ringtones without relying on iTunes.
With FoneTrans for iOS, you will enjoy freedom to transfer your data from iPhone to computer. You can not only transfer iPhone text messages to computer, but also photos, videos and contacts can be moved to PC easily.
- Transfer photos, videos, contacts, WhatsApp, and more data with ease.
- Preview data before transferring.
- iPhone, iPad and iPod touch are available.
Key features that make it my go-to choice:
- Transfer ringtones between iOS devices, computer, and iTunes with a few clicks
- Built-in Ringtone Maker that lets you trim any song and export it directly as an iPhone ringtone—no format conversion needed
- Preview files before transferring, so you know exactly what you're moving
- Supports iPhone, iPad, and iPod touch
- Works on both Windows and Mac systems
- Data security—the software never overwrites or modifies your data during transfer
The trial version lets you test the water before committing. According to user reviews, FoneTrans for iOS consistently receives ratings between 4.2 to 4.5 out of 5 stars on platforms like Trustpilot and CNET. Real users praise its ease of use: "FoneTrans for iOS turned my iPad into an iTunes syncing genius! My media library is always up to date, and I love it!"
Here's the step-by-step process:
Step 1Download and install FoneTrans for iOS on your computer. Launch the software after installation.
Step 2Connect both iPhone devices to the computer using USB cables. When prompted on each iPhone, tap "Trust" and enter your device passcode to establish the connection.
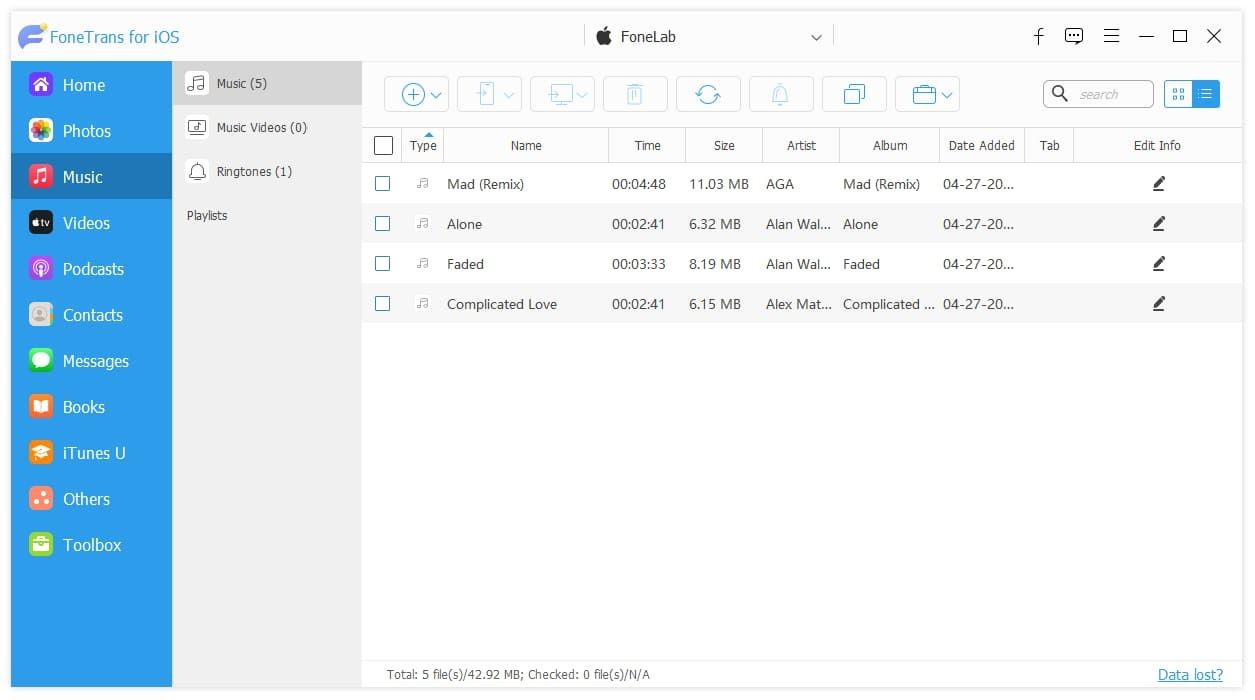
Step 3In the software interface, click the Music category, then select Ringtones. Check the items you want to transfer, click the destination device icon on the top menu, and select your target iPhone from the list. The transfer will complete in seconds.
Pro Tip: FoneTrans also includes a Ringtone Maker feature. You can add an audio file from your device or computer, trim it to your desired length (up to 29 seconds), adjust volume and fade effects, then save it directly to your iPhone as a ringtone. This is incredibly useful when you want to create new tones on the fly.
With FoneTrans for iOS, you will enjoy freedom to transfer your data from iPhone to computer. You can not only transfer iPhone text messages to computer, but also photos, videos and contacts can be moved to PC easily.
- Transfer photos, videos, contacts, WhatsApp, and more data with ease.
- Preview data before transferring.
- iPhone, iPad and iPod touch are available.
Part 6: Method 4 – Finder (macOS) or Apple Devices (Windows)
For users who prefer Apple's official tools, here's the modern approach. iTunes has been replaced on Macs (macOS Catalina and later) by Finder, and on Windows by the Apple Devices app.
For Mac Users: Using Finder
Step 1Connect your iPhone to your Mac via USB. Open a Finder window and click on your iPhone's name under "Locations" in the sidebar. If prompted on your iPhone, tap "Trust" and enter your device passcode.
Step 2In the Finder window, navigate to the General tab. Find your .m4r ringtone files on your computer.
Step 3Drag and drop the .m4r files directly onto the Finder window. You'll see a green plus sign icon when hovering over the window—that confirms you're dropping them in the right place.
Important: Syncing may replace existing media files on the iPhone. I always recommend using the "Manually manage music and videos" option to avoid accidental data loss.
For Windows Users: Using Apple Devices App
Step 1Download and install the Apple Devices app from the Microsoft Store. This is Apple's official replacement for iTunes on Windows.
Step 2Connect your iPhone to your PC via USB. Open the Apple Devices app and select your device.
Step 3Navigate to the file management section and add your .m4r files to the device.
Part 7: Method 5 – Email (For Quick, Single-Tone Transfers)
For transferring just one or two ringtones quickly, email works surprisingly well.
Step 1In the Files app on the source iPhone, locate the .m4r file. Tap Share and select the Mail app.
Step 2Enter your own email address and tap Send. The file must be under 50MB—most ringtones are well below this limit.
Step 3Open the Mail app on the receiving iPhone, find the email, and download the attachment. Save it to the Files app, then use the "Use as Ringtone" or GarageBand method to install it.
With FoneTrans for iOS, you will enjoy freedom to transfer your data from iPhone to computer. You can not only transfer iPhone text messages to computer, but also photos, videos and contacts can be moved to PC easily.
- Transfer photos, videos, contacts, WhatsApp, and more data with ease.
- Preview data before transferring.
- iPhone, iPad and iPod touch are available.
Part 8: Why Your Ringtone Might Not Show Up (And How to Fix It)
Over the years, I've encountered several common issues that prevent ringtones from appearing on the target device.
Issue 1: Wrong File Format. If your file isn't in .m4r format, iOS won't recognize it as a ringtone. If you have an .m4a file, simply rename the extension to .m4r.
Issue 2: File Too Long. iPhone ringtones have a maximum length of 40 seconds. GarageBand will automatically trim longer files to 30 seconds when exporting as a ringtone.
Issue 3: Not Properly Installed. AirDropped or emailed ringtones won't appear in the Sound settings until they've been "installed" using the "Use as Ringtone" option or GarageBand export method.
Issue 4: iTunes Version Issue. If you're using iTunes on Windows, note that version 12.7 and later removed the ability to manage ringtones. You'll need to use the Apple Devices app instead.
Part 9: Final Thoughts – Which Method Should You Use?
Based on my experience, here's my recommendation:
- For sharing a single custom tone with a friend: Use AirDrop—it's quick and wireless.
- For transferring purchased tones to a new device: Use the "Download All Purchased Tones" option in Settings.
- For moving multiple custom tones without a computer: Use iCloud Drive or OneDrive.
- For extracting tones from an old device you're about to wipe: Use FoneTrans for iOS.
- For macOS/Windows users with files on a computer: Use Finder or Apple Devices app.
The most important takeaway? Before you trade in or wipe an old iPhone, make sure you have a backup of your .m4r ringtone files safely stored in the cloud or on your computer. I've learned this lesson the hard way, and I hope you don't have to.
With FoneTrans for iOS, you will enjoy freedom to transfer your data from iPhone to computer. You can not only transfer iPhone text messages to computer, but also photos, videos and contacts can be moved to PC easily.
- Transfer photos, videos, contacts, WhatsApp, and more data with ease.
- Preview data before transferring.
- iPhone, iPad and iPod touch are available.



