
 iPhone Data Recovery
 iOS System Recovery
 iOS Data Backup & Restore
 iOS Unlocker
 iPhone Password Manager
 Location Changer
 Android Data Recovery
 Broken Android Data Extraction
 Android Data Backup & Restore
 Android Unlocker
 FoneTrans for iOS
 iPhone Data Eraser
 iPhone Cleaner
 HEIC Converter
 HyperTrans
 WhatsApp Transfer for iOS
 Mac Sweep
 Data Retriever
 Mac Data Retriever
 Video Converter Ultimate
 Screen Recorder
 Phone Mirror
- Part 1. Diagnosing the Problem – First-Hand Experience Matters
- Part 2. The Fix Tool I Recommend First – FoneLab Broken Android Data Extraction
- Part 3. When the Screen Is Broken But the Phone Turns On – Quick Workarounds
- Part 4. Software Fixes – Step-by-Step Repairs You Can Do
- Part 5. DIY Hardware Fixes – When Software Won't Cut It
- Part 6. When to Call a Professional
- Part 7. Conclusion – My Final Advice
- Android Won't Turn On
- Dead Android Internal Memory
- Black Screen Samsung
- Water Damaged Android
- Keep Restarting Samsung
- Stuck on Samsung Logo
- Virus Infected Android
- Crashed Android
- Unlock Broken Screen Android
- WhatsApp Recovery for Broken Samsung
- Recover SnapChat Photos from Broken Android
- Frozen Android
How to Fix a Broken Android Phone – A Practical Step-by-Step Guide
 Posted by
 The moment it happened to me: Last month, I was cleaning up my Samsung Galaxy S21 and accidentally triggered a system update that went wrong. The phone got stuck in a bootloop – Samsung logo flashing endlessly, vibrating every few seconds. No matter what I did, it wouldn't go past the logo screen.
My first instinct was panic. I hadn't backed up my photos from the past two weeks, and there were important work messages I needed. After a few deep breaths, I realized I had seen this before – and most "broken" Android phones just need a software fix.
Over the next few hours, I tried multiple recovery methods. I tested safe mode, cache wipes, factory resets, and eventually used a dedicated repair tool. I recovered everything. This guide is exactly what I learned – and what you should try first, regardless of what Android phone you use.

Guide List
- Part 1. Diagnosing the Problem – First-Hand Experience Matters
- Part 2. The Fix Tool I Recommend First – FoneLab Broken Android Data Extraction
- Part 3. When the Screen Is Broken But the Phone Turns On – Quick Workarounds
- Part 4. Software Fixes – Step-by-Step Repairs You Can Do
- Part 5. DIY Hardware Fixes – When Software Won't Cut It
- Part 6. When to Call a Professional
- Part 7. Conclusion – My Final Advice
Part 1. Diagnosing the Problem – First-Hand Experience Matters
Before you touch anything, you need to understand what's actually wrong. I can't tell you how many times I've seen people jump straight to factory resets when a simple cache wipe would have solved everything.
The Boot Process – Where Things Go Wrong
Here's what happens when you press that power button:
- Boot ROM – Hardware-level initialization.
- Bootloader – Loads the kernel.
- Linux Kernel – Initializes drivers and mounts partitions.
- Init Process – Starts system services.
- Android System Server – Launches the UI.
- Home Screen – Ready to use.
If your phone gets stuck at any point, you now know where to start looking.
Common Symptoms and What They Mean
| Symptom | Likely Cause | What To Do First |
|---|---|---|
| Bootloop (stuck on logo) | Corrupted system files or bad OTA update | Force restart → wipe cache partition. |
| Black screen but vibrates | System crash or display driver failure | Force restart → try Safe Mode. |
| Boots only to Recovery | Damaged OS partitions | Reflash firmware. |
| No power at all | Hardware issue (battery or motherboard) | Charge 30 min → force restart → professional help. |
| Screen broken but phone turns on | Physical damage | OTG mouse → HDMI mirroring → professional repair. |
Force Restart – The First Thing to Try
Before you do anything else, try a force restart on Android. This is different from a normal reboot – it forces the hardware to reset, which can clear temporary glitches that prevent booting.
Step 1Press and hold the Power and Volume Down buttons together (some models use Volume Up instead).
Step 2Hold for 15–30 seconds.
Step 3Release when the device vibrates and the manufacturer logo appears.
According to Samsung's official support documentation, a force restart does not erase any data – it simply forces the device to reboot from a hardware level.
If the device is completely unresponsive:
Step 1Plug the phone into a certified wall charger for at least 30 minutes.
Step 2Check the USB port for lint or debris before plugging in – compressed air can help clean it out.
Step 3Try the force restart again.
In my experience, about 25% of "dead" Android phones come back to life with just a force restart and a good charge. It's always worth trying first.
Safe Mode – The Diagnostic Shortcut I Always Use
Here's a trick that's saved me hours: booting into Safe Mode. When you boot into Safe Mode, Android disables all third-party apps. If your phone works fine in Safe Mode but crashes in normal mode, you've got a rogue app, not a system problem.
Step 1Press and hold the Power button until the power menu appears.
Step 2Press and hold the "Power Off" option on the screen.
Step 3Tap "OK" when prompted to reboot into Safe Mode.
If Safe Mode works, go to Settings > Apps and uninstall anything you added recently. Reboot normally and test again.
Recovery Mode – When the OS Won't Load
If the operating system is corrupt and you can't boot normally, Recovery Mode is your gateway to system-level fixes. It's a minimal environment that runs separately from the main OS.
Step 1Turn off the phone completely.
Step 2Press and hold the Power + Volume Down buttons (varies by manufacturer – Samsung uses Power + Volume Up + Bixby/Home).
Step 3Navigate to Recovery Mode using volume keys.
From Recovery Mode, you can:
- Wipe cache partition – no data loss, often fixes bootloops.
- Factory reset – erases all data, last resort.
- Apply update from ADB – sideload firmware without wiping data.
Part 2. The Fix Tool I Recommend First – FoneLab Broken Android Data Extraction
Golden rule: Extract your data before you do anything destructive. Once you factory reset or reflash firmware, your photos, messages, and contacts are gone forever.
From my experience fixing dozens of Android phones, I've found that the best fix tools also handle data extraction. Running two separate pieces of software wastes time and increases the chance of something going wrong.

Fix your frozen, crashed, black-screen or screen-locked Android system to normal or Recover data from broken Android phone or SD card.
- Fix your Android disabled problems and recover data from phone.
- Extract Contacts, Messages, WhatsApp, Photos, etc. from broken android device or memory card.
- Android phone and SD card data are available.
FoneLab Broken Android Data Extraction – My Go-To Fix Tool
I've tested FoneLab Broken Android Data Extraction on multiple Samsung devices – including a bootlooping Galaxy S21 and a black-screened Note 20. Here's why it's the first tool I reach for:
| Capability | What It Does |
|---|---|
| Fixes Android system issues | One-click repair for bootloops, black screens, system crashes. Reinstalls firmware without wiping data. |
| Extracts data from broken devices | Pulls contacts, messages, WhatsApp chats, photos from inaccessible devices – including those with broken screens. |
| No technical expertise needed | No command line, no ODIN, no risk of flashing wrong files. |
What makes it stand out:
First, it's a fix tool first. The primary job is getting your phone back to working order. Data extraction is built in as a safety net – you recover what you need, then fix the system, all from one interface.
Second, data preservation is automatic. Unlike ODIN where you have to remember to use HOME_CSC, FoneLab's system repair preserves your data by default.
Third, it's Samsung-friendly. Official support covers Galaxy S series, Note series, and Galaxy Tab models. Support for other brands is limited, so check compatibility first.
Key limitation: The tool works best when the device is still detectable via USB. If the phone has no power at all, you're looking at professional hardware repair.
Technical Specifications
| Parameter | Detail |
|---|---|
| Supported OS | Windows 11/10/8.1/8/7 |
| Android versions | Android 5.0 to latest |
| Hardware requirements | 1GHz Intel/AMD CPU, 1GB RAM, 200MB+ disk space |
| Device compatibility | Primarily Samsung devices |
How to Use FoneLab – Official Steps
Fix your frozen, crashed, black-screen or screen-locked Android system to normal or Recover data from broken Android phone or SD card.
- Fix your Android disabled problems and recover data from phone.
- Extract Contacts, Messages, WhatsApp, Photos, etc. from broken android device or memory card.
- Android phone and SD card data are available.
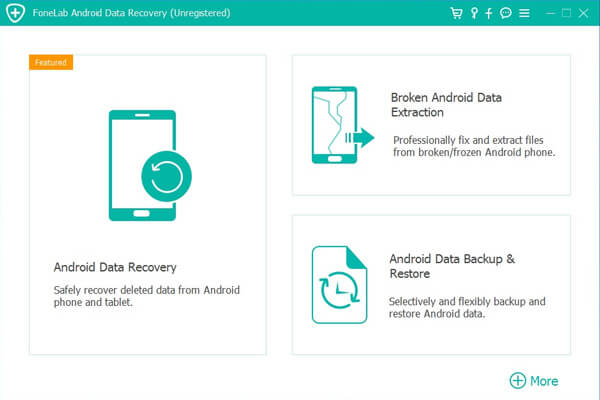
Step 1Download, install, and launch the program on your PC. Connect your Samsung device via USB cable. Select "Broken Android Phone Data Extraction" from the main interface.
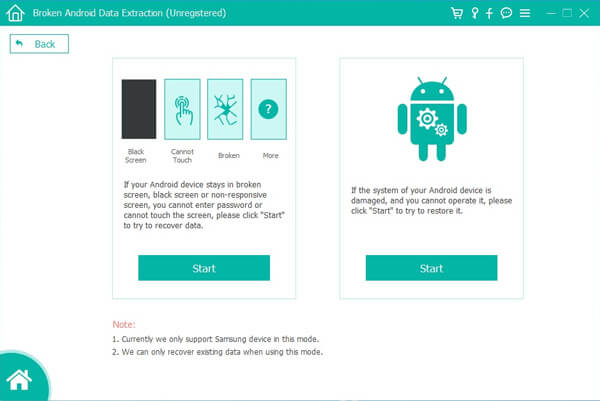
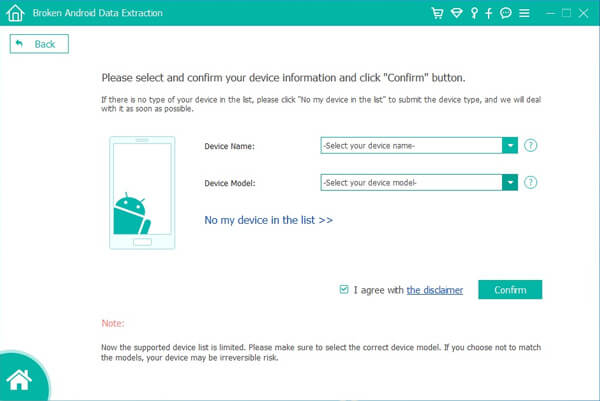
Step 2Choose which situation your device is in and click the Start button to move on. Select your device name and model correctly from the list. If your model isn't listed, you can enter it manually. Click Confirm.
Step 3Follow the on-screen instructions to enter Download Mode: power off the phone – press and hold Volume Down + Home + Power together – press Volume Up to confirm – then click Start to begin the scanning process.
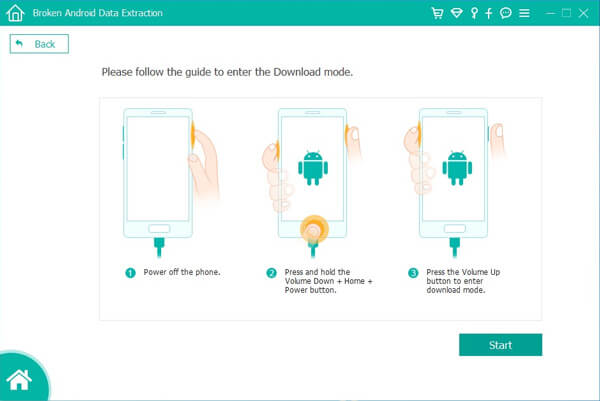
Step 4The program will download the matching recovery package (approximately 2.8GB) and repair the Android system. Once complete, preview and mark the items you want to recover, then click Recover to save them to your computer.
Total time: Usually 15–20 minutes from start to finish.
Free trial: You can scan and preview files for free before deciding to purchase.
Fix your frozen, crashed, black-screen or screen-locked Android system to normal or Recover data from broken Android phone or SD card.
- Fix your Android disabled problems and recover data from phone.
- Extract Contacts, Messages, WhatsApp, Photos, etc. from broken android device or memory card.
- Android phone and SD card data are available.
Part 3. When the Screen Is Broken But the Phone Turns On – Quick Workarounds
This is a situation I've encountered more times than I'd like to admit. The phone is alive – you can feel it vibrate, hear notifications – but the screen is black, cracked, or completely unresponsive. Before you reach for professional repair (or FoneLab, which we covered in Part 2), here are two quick workarounds to access your data.
Use an OTG Cable with a Mouse
This is one of the cleverest tricks I've learned. As confirmed by users in Spiceworks forum discussions, plugging a USB mouse into your phone using a USB OTG (On-The-Go) adapter allows you to navigate the UI and enter your PIN or pattern, even with a broken screen.
What you need:
- USB OTG adapter (usually under $10 on Amazon).
- Any USB mouse.
Step 1Connect the OTG adapter to your phone's USB-C or Micro-USB port.
Step 2Plug the USB mouse into the adapter.
Step 3A cursor will appear on your phone's screen (even if the screen is cracked).
Step 4Use the mouse to unlock your phone, enable USB debugging, or back up your data.
I've used this method to recover data from three different Android phones with shattered screens. It's inexpensive, requires no technical skills, and works on almost every Android device.
HDMI Mirroring with USB-C Hub
If your device supports video output (like Samsung Galaxy phones with DeX or newer Google Pixels), connecting a USB-C Hub with an HDMI port lets you view your phone's screen on a TV or monitor.
What you need:
- USB-C hub with HDMI output.
- HDMI cable.
- TV or monitor with HDMI input.
Step 1Connect the USB-C hub to your phone.
Step 2Connect an HDMI cable from the hub to your monitor.
Step 3Connect a USB mouse to the hub.
Step 4Your phone's screen appears on the monitor.
Step 5Use the mouse to unlock and transfer files.
Samsung's DeX mode makes this particularly smooth – but even without DeX, most modern Android phones will mirror their display when connected via HDMI.
Important: If these workarounds don't work for your device, return to Part 2 and use FoneLab Broken Android Data Extraction, which can extract data from broken-screen devices as long as they're detectable via USB.
Fix your frozen, crashed, black-screen or screen-locked Android system to normal or Recover data from broken Android phone or SD card.
- Fix your Android disabled problems and recover data from phone.
- Extract Contacts, Messages, WhatsApp, Photos, etc. from broken android device or memory card.
- Android phone and SD card data are available.
Part 4. Software Fixes – Step-by-Step Repairs You Can Do
Now that your data is safe, let's fix the device.
Fix 1: Wipe Cache Partition (No Data Loss)
This is always my first move. It's safe, fast, and often works.
Step 1Power off the device.
Step 2Enter Recovery Mode:
- Most Android: Power + Volume Up.
- Samsung: Power + Volume Up + Bixby/Home.
- Google Pixel: Power + Volume Down → select Recovery Mode.
Step 3Use volume keys to navigate to "Wipe cache partition."
Step 4Press Power to select and confirm.
Step 5After completion, select "Reboot system now."
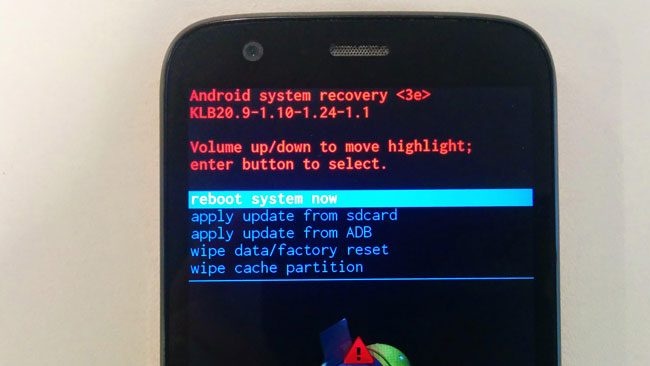
Why it works: The cache partition stores temporary system files. If they're corrupted, the system can't boot. Wiping them forces the system to rebuild fresh caches – and your data stays intact.
Fix your frozen, crashed, black-screen or screen-locked Android system to normal or Recover data from broken Android phone or SD card.
- Fix your Android disabled problems and recover data from phone.
- Extract Contacts, Messages, WhatsApp, Photos, etc. from broken android device or memory card.
- Android phone and SD card data are available.
Fix 2: Factory Reset via Recovery Mode
Warning: This erases everything. Only do this if:
- You've already extracted your data.
- The cache wipe didn't work.
- You're out of other options.
Step 1Enter Recovery Mode (same as above).
Step 2Navigate to "Wipe data/factory reset."
Step 3Confirm "Yes – delete all user data."
Step 4Wait for completion.
Step 5Select "Reboot system now."
Fix 3: Reflash Firmware (The Nuclear Option)
If the reset didn't work, the system partition itself is corrupted. You need to reinstall the operating system.
For Samsung users – ODIN method (what I've used successfully):
Step 1Download the correct firmware for your exact model (check region/carrier).
Step 2Boot to Download Mode (Power + Volume Down + Volume Up).
Step 3Open ODIN on your PC.
Step 4Load the firmware files:
- BL → bootloader.
- AP → system (large file, takes a while to load).
- CP → modem/baseband.
- CSC → Use HOME_CSC to preserve data (if available).
Step 5Click Start and wait for the flash to complete.
Part 5. DIY Hardware Fixes – When Software Won't Cut It
Not all problems are software. Here's what you can reasonably fix yourself.
Battery Replacement
If your phone dies quickly or won't charge, battery replacement is often straightforward. I've done this on several Android phones.
What I've learned:
- Heat is your friend. Use a hair dryer or heat gun on the back cover for 30–60 seconds to soften adhesive.
- Take it slow. Use a suction cup to create a gap, then slide a plastic tool around the edges.
- Watch for hidden cables. Many Android phones hide flex cables under batteries – don't yank anything.
- Isopropyl alcohol helps. Apply small drops to weaken stubborn adhesive.
Tools you'll need:
- Precision screwdrivers (check screw types – Samsung uses Phillips, Google uses different screws).
- Plastic opening tools.
- Suction cup.
- Heat gun or hair dryer.
Cleaning the Charging Port
This is the easiest fix you'll ever do.
Step 1Power off the phone.
Step 2Use a can of compressed air to blow out dust.
Step 3If needed, gently use a blunt toothpick to work loose compacted lint.
Step 4Be careful not to scratch or push the pins in the center of the port.
One thing to avoid: Never use metal tools in the charging port – you'll short the pins.
Fix your frozen, crashed, black-screen or screen-locked Android system to normal or Recover data from broken Android phone or SD card.
- Fix your Android disabled problems and recover data from phone.
- Extract Contacts, Messages, WhatsApp, Photos, etc. from broken android device or memory card.
- Android phone and SD card data are available.
Part 6. When to Call a Professional
Some problems aren't worth DIY-ing. Here's when I hand it over to an expert.
Signs You Need Professional Help
- Water damage – DIY attempts usually make corrosion worse.
- Motherboard issues – micro-soldering requires specialized equipment and training.
- No power after charging – could be power IC or charging port damage.
- EDL flash failed – if Qualcomm EDL mode flashing didn't work, you're in JTAG territory.
The Android Repair Conundrum
Here's something repair shops won't always tell you: Android phones often cost more to fix than they're worth.
OLED screens for Android phones can cost more than buying a used replacement. A used Pixel 2 in good condition goes for around $125 on marketplaces – a replacement screen for that same phone might run you just as much.
My advice:
- Check the cost of a used replacement before authorizing a repair.
- For budget phones, replacement often makes more financial sense.
- For flagship phones (Galaxy S, Pixel), repair is usually worth it.
Finding a Good Repair Shop
If you do go pro, look for:
- Transparent pricing (they should quote before starting).
- Warranty on work.
- Experience with your specific brand.
- Reviews that mention trust and communication.
Part 7. Conclusion – My Final Advice
After years of fixing Android phones (and breaking a few along the way), here's what I want you to remember:
- Diagnose before you panic. Most issues are software, not hardware. Safe Mode and cache wipes solve more problems than you'd expect.
- Data first, repair second. Extract your data before doing anything destructive. I recommend FoneLab Broken Android Data Extraction for Samsung users – it's worked well in my testing.
- Try the quick fixes first. Force restart, charge for 30 minutes, and clean the charging port. These solve about 30% of issues with zero effort.
- Know your phone's value. If a repair costs more than a used replacement, do the math.
- Be realistic about DIY. Batteries and charging ports are good beginner projects. Motherboard repair is not.
Your Android phone is more repairable than you think – but knowing when to DIY and when to hand it over is the real skill. Start with the software fixes, use the right tools, and don't skip the data recovery step. That's how you fix a broken phone without losing what matters.
Fix your frozen, crashed, black-screen or screen-locked Android system to normal or Recover data from broken Android phone or SD card.
- Fix your Android disabled problems and recover data from phone.
- Extract Contacts, Messages, WhatsApp, Photos, etc. from broken android device or memory card.
- Android phone and SD card data are available.



