- Empty Trash
- Delete Mail App
- Clear Cache on Mac
- Get More Storage on Mac
- Make Chrome Use Less RAM
- Where is Disk Utility on Mac
- Check History on Mac
- Control + Alt + Delete on Mac
- Check Memory on Mac
- Check History on Mac
- Delete An App on Mac
- Clear Cache Chrome on Mac
- Check Storage on Mac
- Clear Browser Cache on Mac
- Delete Favorite on Mac
- Check RAM on Mac
- Delete Browsing History on Mac
How to View Clipboard History on Mac Using Top Methods
 Updated by Lisa Ou / Sept 22, 2023 09:15
Do you often copy and paste texts on your Mac? If so, the clipboard must be very useful for you. Clipboard is a feature on Mac, Windows, iPhone, Android, and other devices that has been around for several years. It lets you copy various texts, such as websites, notes, and information you want to save. More details about this will be viewed later in the article, so stay tuned. But now that you have some idea about Clipboard, you must be curious about how to view Clipboard history on Mac. It is often used on various devices, but have you ever found where it can be displayed on macOS? Well, you no longer have to agonize about it.
Allow this article to feed you helpful information about viewing your clipboard history on a Mac. This way, you can utilize its function and know the benefits it can give while operating tasks and processes on your macOS. Whether you prefer a default or third-party method, the strategies below are flexible enough to perform according to your preferences. Moreover, an in-demand cleaning program will also be incorporated in the later part as a bonus. Hence, expect this article to provide the techniques for handling your clipboard history and cleaning your Mac data and its other components. Kindly move ahead to start acquiring information.


Guide List
Part 1. What is Clipboard on Mac
Clipboard is a function that people use to copy or move information across Mac apps, websites, utilities, etc. For instance, if you wish to move or copy a website page to another browser, you only have to select the website address and press Command + C or Command + X to save it to the clipboard. Afterward, proceed to the browser where you wish to move it, then press Command + V to paste and enter it. Hence, the clipboard is a helpful feature for copying or moving information on Mac.

With FoneLab Mac Sweep, you will Clear system, email, photo, iTunes junk files to free up space on Mac.
- Manage similar photos and dulplicate files.
- Show you the detailed status of Mac with ease.
- Empty trash bin to get more storage.
Part 2. How to View Clipboard History Mac
You now know that the clipboard contains the information you have last copied or moved. However, if you have forgotten the last item you saved, you must want to check it first by viewing your clipboard history. Below, we prepared the leading techniques to help you view the clipboard history on your Mac.
Method 1. Finder
Finder is the official place to access the clipboard on a Mac. With the Edit tab, Finder will show your clipboard containing the text you have last copied or cut. However, it doesn’t include the ones before that. Thus, you will only see the one item you saved last time, as it uses little memory, inhibiting you from revisiting the previous ones.
Imitate the direct instructions underneath to view clipboard history on Mac Finder:
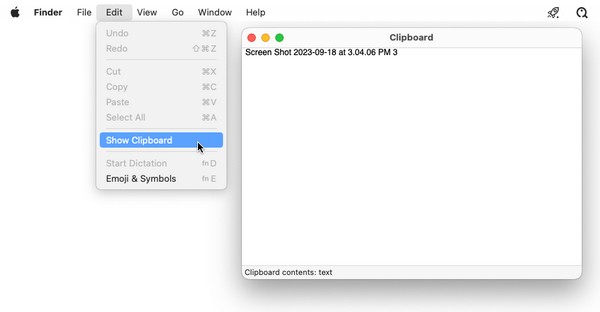
Step 1See the Finder icon on the Mac Dock, usually on the leftmost side, then click it. Its interface will be displayed on the desktop, but ignore it and proceed immediately to the Edit tab. It is located in the uppermost section along with the other options.
Step 2A pop-up menu list will appear once you click Edit, so browse the options and choose Show Clipboard when you see it. After that, your clipboard will finally be viewed, containing the last items you have saved on your Mac.
We understand that Mac’s native clipboard restricts you from saving multiple items to copy and paste. If you prefer viewing a longer list of the information you have cut or copied, kindly proceed with the third-party tool below.
With FoneLab Mac Sweep, you will Clear system, email, photo, iTunes junk files to free up space on Mac.
- Manage similar photos and dulplicate files.
- Show you the detailed status of Mac with ease.
- Empty trash bin to get more storage.
Method 2. Third-party Tool
Since the method above only lets you view the one last saved item, you may want to try a third-party tool like Jumpcut. This clipboard program enables you to see multiple of your clipboard history. It doesn’t only show the one item you have saved last, but also the previous ones. You can install it on your Mac for free by navigating the web only for a few minutes. Then, it will help you on your Mac for a long time.
Observe the unchallenging process below to grasp how to view clipboard history on Mac using the third-party tool Jumpcut:
Step 1Find the official downloading site of Jumpcut on a browser to save the installer on your Mac. Afterward, save it directly on your Applications, then launch the program.
Step 2When the Security and Privacy window appears, you must hit Open Anyway to let the app run on your Mac. When done, the scissor icon will display on the menu bar. The list of items you copied will show up once you click it.

Part 3. Clear Junk on Mac with FoneLab Mac Sweep
As we’ve said in the beginning, a bonus tool will be introduced, which is FoneLab Mac Sweep. When you’re done handling your clipboard, try installing this cleaning tool on your Mac to eliminate junk and unwanted files. This way, you can better navigate the apps, tasks, and processes on your Mac since removing data frees up space, making your macOS run smoother. It provides cleaning functions, such as emptying the Trash folder, removing similar photos, clearing system junk, and more. Additionally, its ToolKit section lets you use the Uninstall function that cleans and permanently deletes the unused apps on your Mac.
With FoneLab Mac Sweep, you will Clear system, email, photo, iTunes junk files to free up space on Mac.
- Manage similar photos and dulplicate files.
- Show you the detailed status of Mac with ease.
- Empty trash bin to get more storage.
Accept the untroubling instructions below as an exemplification of how to clear various junk on your Mac with FoneLab Mac Sweep:
Step 1View the official FoneLab Mac Sweep page by hitting your Mac browser and entering the tool’s website. When the orange Free Download button beside the Apple symbol appears below the features list, click it to save the installer. The download process will only take seconds, so put the file inside the Applications folder afterward, then run it on the Mac.

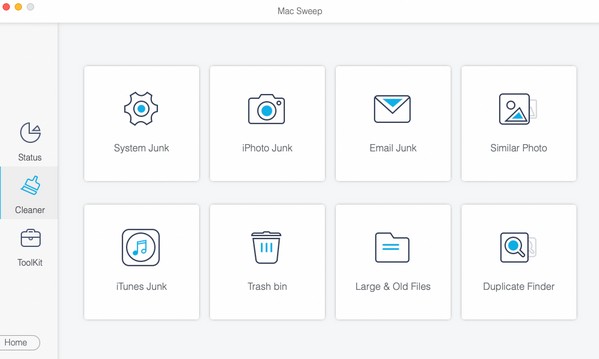
Step 2Features, including Status, Cleaner, and ToolKit, will be on the main interface. You may check your Mac status first, then choose Cleaner afterward to view the cleaning tools. Next, pick the data box you prefer to clear first on the following interface, like the System Junk, iPhoto Junk, and more. After that, click Scan for the tool to browse your chosen data type within seconds. Then, hit View to reveal them next.
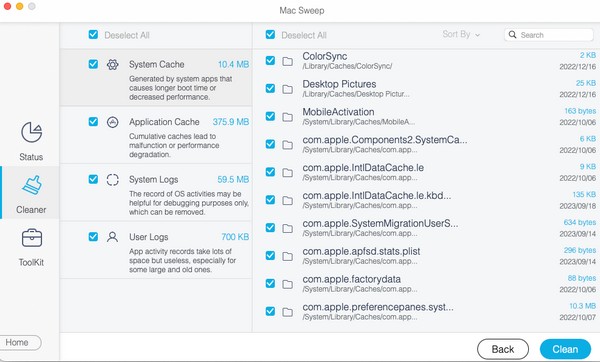
Step 3Once your data is on the screen, find the files or junk you don’t need and tick their checkboxes. Finally, hit the bottom Clean tab when you have selected everything you wish to eliminate. The program will then begin erasing them from your Mac.
Part 4. FAQs about How to View Clipboard History Mac
1. Can you recover the clipboard history on Mac?
Unfortunately, you can't. Like the other data on a Mac, there's no easy way to return your clipboard history. If the item you copied has disappeared from the clipboard, you can no longer access it unless you use a third-party tool. It won't be easy, but you can scan the web to see if a program can help you.
2. Why can't I see clipboard history on my Mac?
You may have restarted your Mac. Know that the clipboard automatically clears whenever you shut down or restart the Mac, preventing you from seeing your clipboard history.
Thanks for viewing your clipboard history on Mac using the strategies we included in this article. Come by the FoneLab Mac Sweep site if you encounter more troubles with your Mac.
With FoneLab Mac Sweep, you will Clear system, email, photo, iTunes junk files to free up space on Mac.
- Manage similar photos and dulplicate files.
- Show you the detailed status of Mac with ease.
- Empty trash bin to get more storage.