- Empty Trash
- Delete Mail App
- Clear Cache on Mac
- Get More Storage on Mac
- Make Chrome Use Less RAM
- Where is Disk Utility on Mac
- Check History on Mac
- Control + Alt + Delete on Mac
- Check Memory on Mac
- Check History on Mac
- Delete An App on Mac
- Clear Cache Chrome on Mac
- Check Storage on Mac
- Clear Browser Cache on Mac
- Delete Favorite on Mac
- Check RAM on Mac
- Delete Browsing History on Mac
Trustworthy Guide on How to Uninstall Chrome on A Mac
 Updated by Lisa Ou / Oct 12, 2023 09:15
Chrome is among the world's most-used browsers in line with the other popular browsing apps like Safari and Firefox. However, it doesn't mean you prefer it over the others, so you may want to remove it from your Mac. For instance, a friend of yours borrowed your macOS and installed Chrome, but as they gave it back, you wish to erase it since Safari is your preferred default browser. On the other hand, you may like using Chrome, but an issue has occurred, so you plan to remove it first and reinstall it later to refresh the browser. This way, the browser settings will return to their defaults. But learn first to uninstall Chrome on Mac.
Numerous uninstalling strategies can be searched online for this concern, but waste no more time. You can now rest from browsing the web, as this article will finally tackle the details you need for uninstalling the Chrome browser from your Mac. See them below to ensure to perform the proper instructions in each method.


Guide List
Part 1. How to Uninstall Chrome on Mac through Finder
The apps on your Mac, including Chrome, are stored in the Applications folder on Finder. Once you find the browsing app in the folder, you can quickly remove it by clicking and navigating a few options. Removing apps like Chrome from Finder is fast, but unfortunately, doing this alone won’t completely erase the browser from your Mac. All the files you delete from Finder, including the apps, automatically move to the Trash folder. Hence, you are still required to open the Trash and empty it in order for Chrome to be permanently eliminated from the Mac. But no worries, since the additional process on Trash can be done quickly.
Pay attention to the convenient procedure underneath to learn how to uninstall Chrome on Mac completely through Finder:
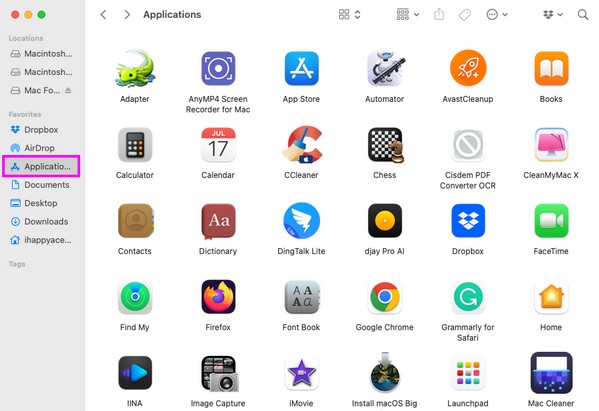
Step 1Get in the Finder app using its icon on the leftmost side of the Dock. When its interface is shown on your Mac desktop, you will see the options on the left panel, which includes the Applications tab. Click it to open the folder and for the apps installed on your Mac to be displayed on the Finder interface.
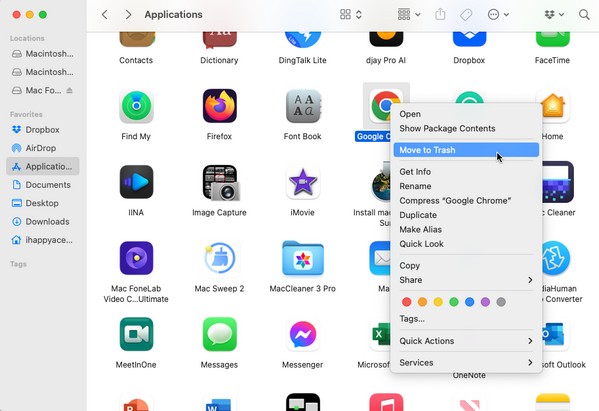
Step 2Once your Mac apps are exhibited in the folder, find the Chrome icon by scrolling manually through the screen. When found, right-click the app to view the shortcut menu. Click the Move to Trash tab on the list to remove Chrome from Finder.
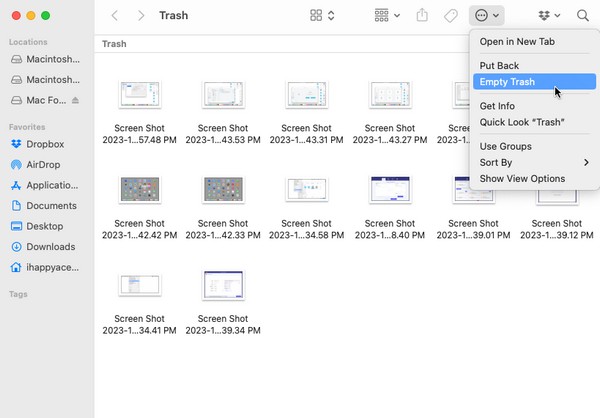
Step 3After your Chrome browser is moved to Trash, click the Trash icon on the Dock’s right side to open the folder. Click the three-dotted icon on the window’s upper section, and when the pop-up menu shows up, click Empty Trash to uninstall it permanently on Mac.

With FoneLab Mac Sweep, you will Clear system, email, photo, iTunes junk files to free up space on Mac.
- Manage similar photos and dulplicate files.
- Show you the detailed status of Mac with ease.
- Empty trash bin to get more storage.
Part 2. How to Uninstall Chrome on Mac via Launchpad
The previous method on Finder is the official procedure for uninstalling apps like Chrome. But if you’re in a hurry and need to erase the Chrome browser more quickly, you can also uninstall it on Launchpad. Launchpad is the section on Mac where you can view and open the installed apps on the computer. Besides that, it also offers an option to delete them by making the apps jiggle on the screen. However, the problem with this strategy is that you can’t guarantee the complete deletion of your Chrome data since it’s the shortcut method.
Heed to the comfortable guidelines below to uninstall Google Chrome on Mac via Launchpad:
Step 1Hit on the Launchpad icon at the lowermost section of your Mac desktop. It is usually found on the left side of the Dock, letting you find it easily. Once the apps are on the screen, find the Chrome icon by sliding your finger or using the search field on the uppermost part.
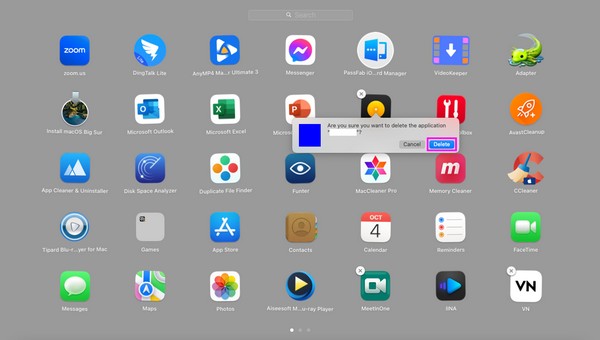
Step 2Once you have a sight of the Chrome app, long-click it until all the apps on the screen jiggle. The x icons will also be shown on each deletable app, so click the one on the Chrome icon to reveal the deletion option. Afterward, select Delete to erase it from your Mac.
Part 3. How to Uninstall Chrome on Mac Using FoneLab Mac Sweep
We understand that both uninstallation procedures above have their disadvantages. That’s why we included another technique that can provide more advantages than drawbacks. FoneLab Mac Sweep is a secure cleaning program that has the ability to eliminate unused data on a Mac, like your browsing apps. Hence, you can expect it to help uninstall the Chrome browser on your Mac. Simply navigate its simple interface; its specialized uninstaller will do most of the work for you.
With FoneLab Mac Sweep, you will Clear system, email, photo, iTunes junk files to free up space on Mac.
- Manage similar photos and dulplicate files.
- Show you the detailed status of Mac with ease.
- Empty trash bin to get more storage.
Check out the easy guidelines underneath as a pattern of how to uninstall Google Chrome on a Mac with FoneLab Mac Sweep;
Step 1Explore your Mac browser to search for and access the FoneLab Mac Sweep website. You will see the Free Download tab once its page is exhibited on the screen, so click it for the program file to be kept on your Mac. The download typically lasts less than a minute. Thus, feel free to explore the page further before moving the file to the Applications folder and running it.

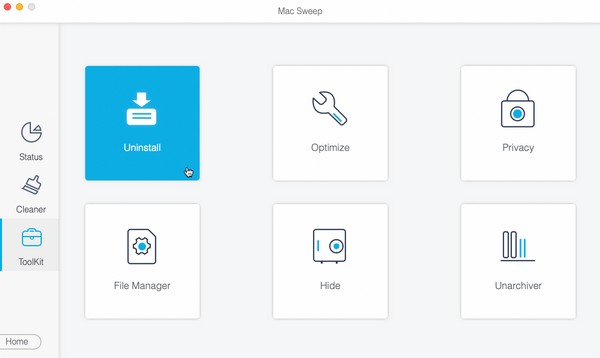
Step 2The tool’s features will be presented as soon as its main interface launches. Click the ToolKit box on the right side, and you will see more features on the screen, such as Uninstall, Privacy, File Manager, etc. Pick the Uninstall function, then hit Scan on the next interface to let the cleaner skim through your apps. Afterward, press the View button to move on.
Step 3Your apps will be on the interface’s left area, while the specific data they contain will be on the right. Locate the Chrome app by scrolling through the apps list, then tick its checkbox afterward. Finally, hit the Clear tab on the downmost area to uninstall the Chrome browser on your Mac. You may also uninstall the other apps if you want with the same procedure.

As you can see, FoneLab Mac Sweep can also help you clear browsing history, remove system data, and more within a few clicks.
With FoneLab Mac Sweep, you will Clear system, email, photo, iTunes junk files to free up space on Mac.
- Manage similar photos and dulplicate files.
- Show you the detailed status of Mac with ease.
- Empty trash bin to get more storage.
Part 4. FAQs about How to Uninstall Chrome on Mac
1. Why can't I delete the Chrome browser on my Mac?
Chrome may still be running in the background. No matter what app you try to uninstall, you will likely fail to do so if they're still running on your Mac. Thus, you must close or force quit it first by long-clicking its icon on the Dock, then choosing Force Close from the pop-up options to close the Chrome browser. Then, try uninstalling the app again and see it get erased successfully.
2. How do I uninstall and reinstall the Chrome app on my Mac?
Refer to this article's content in Parts 1, 2, and 3 to learn the methods to uninstall the Chrome browser. Afterward, proceed to the App Store and enter Chrome on the search bar to access the app, then hit Get to reinstall it on your Mac.
We hope you're satisfied with the methods and assistance we have given in this article. Kindly explore the FoneLab Mac Sweep web page once you encounter more concerns about your Mac or other devices.
With FoneLab Mac Sweep, you will Clear system, email, photo, iTunes junk files to free up space on Mac.
- Manage similar photos and dulplicate files.
- Show you the detailed status of Mac with ease.
- Empty trash bin to get more storage.