- Empty Trash
- Delete Mail App
- Clear Cache on Mac
- Get More Storage on Mac
- Make Chrome Use Less RAM
- Where is Disk Utility on Mac
- Check History on Mac
- Control + Alt + Delete on Mac
- Check Memory on Mac
- Check History on Mac
- Delete An App on Mac
- Clear Cache Chrome on Mac
- Check Storage on Mac
- Clear Browser Cache on Mac
- Delete Favorite on Mac
- Check RAM on Mac
- Delete Browsing History on Mac
How to Do Split Screen on Mac with A Remarkable Guide
 Updated by Lisa Ou / Nov 09, 2023 09:15
How do you split screen on Mac? Hi, I will watch a movie that will be released later on a popular streaming platform. But the thing is, I want to chat with my friends and share my thoughts on social media while watching, but I only have my Mac to use. Thus, I searched for a solution and learned about the split screen feature. It would greatly help my situation, so if anyone could help.
Is this your first time encountering the split view feature on Mac? If so, you are missing a lot, but don't worry. This article will prepare you to utilize the function and experience its benefits properly. Knowing how to use the split screen feature on Mac is a great help, especially in multi-tasking, so if you have to perform 2 tasks at once, it is the perfect solution to learn. Hence, we have the strategies and guidelines you may need ready in this article, and details about this feature will also be explained, letting you understand the processes better.


Guide List
Part 1. What is Split View on Mac
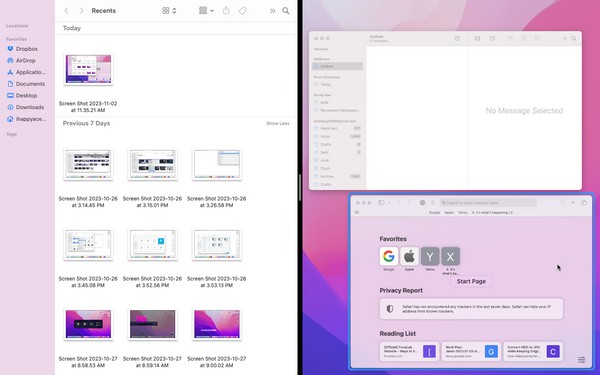
The Split View on Mac, as the feature name suggests, splits your Mac screen into two. Thus, you can open and work on two programs simultaneously. They will be shown side by side, so it’s not a problem if you’d like to share your thoughts on social media while watching, create projects on a document while having a convo with your friends through chat, etc.
The possibilities are endless if you optimize the feature’s usage. Several Mac apps support the Split View feature, but not all apps you install have the ability to do it. Despite that, you will still find it helpful since you don’t need to open and minimize the windows you use repeatedly. They will be displayed at once on the screen, allowing you to work efficiently.
Part 2. How to Split Screen on Mac
2 techniques are available for splitting your screen on Mac. You can either use the fullscreen button or access Mission Control, depending on what’s more convenient for you. Both methods are quick and painless to process, so expect not to encounter confusion or complications while performing the procedures.

With FoneLab Mac Sweep, you will Clear system, email, photo, iTunes junk files to free up space on Mac.
- Manage similar photos and dulplicate files.
- Show you the detailed status of Mac with ease.
- Empty trash bin to get more storage.
Option 1. Split Screen on Mac Using The Fullscreen Button
The first and primary technique to split your Mac screen is the fullscreen button. It is the green icon on the top left of the windows you open. You may only know it as the button for showing a program on the entire screen but be informed that you can also use it for splitting the screen. If the app or program you open supports the split view feature, the option to split your screen can be easily found by clicking the mentioned button.
Bear in mind the safe guidelines below to master how to make split screen on Mac using the full-screen button:
Step 1Click the icon of the apps you wish to open on the split screen to display their windows. Once shown, point and keep the cursor on the fullscreen button on the top right to view the options automatically.
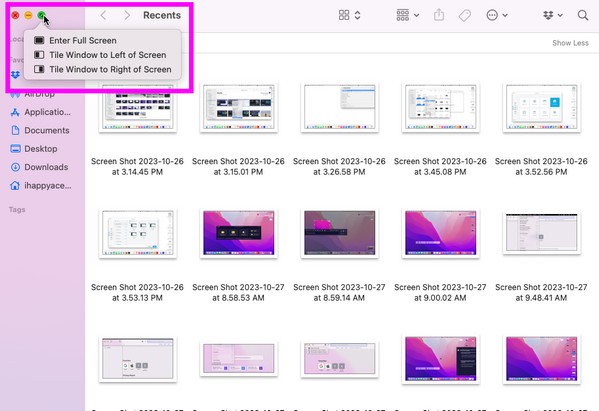
Step 2Then, select Tile Window to Left of Screen or Tile Window to Right of Screen to pin the program on your chosen side. The other supported active windows will be on the other side. From there, select the app you’d like to open on the other half of the split screen.
Option 2. Split Screen on Mac via Mission Control
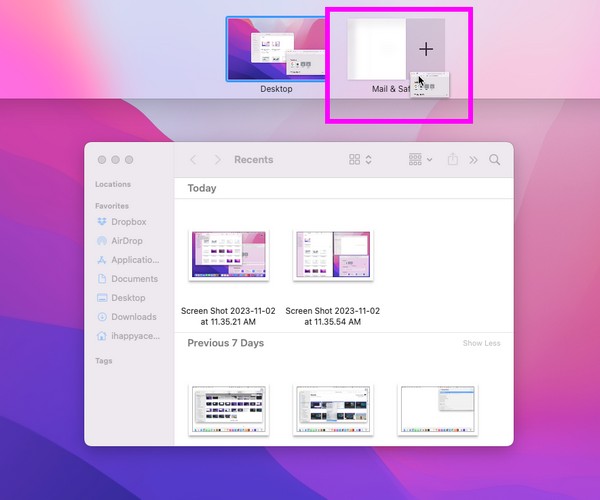
Another way to utilize the split view or split screen feature on Mac is through Mission Control. It is a feature on Mac that lets you view or move between apps effortlessly. It helps you handle the active apps more efficiently, and one of its capabilities is putting your apps or programs in split view.
Mimic the undemanding steps underneath to split screen on MacBook or Mac via Mission Control:
Step 1Slide four of your fingers on the trackpad to view the Mission Control interface. Next, add a desktop at the top and ensure one of the apps you wish to open is on it in full screen.
Step 2Meanwhile, drag the other app you want to open onto the desktop, and they will automatically be viewed in a split screen.
Part 3. What to Do If You Can't Enter Split View
If the split view is not working on your Mac, ensure the programs you are trying to display support the feature. But if it still doesn’t function correctly, it may be because of a certain issue, like a lack of storage. If you have insufficient space, you will most likely experience malfunctions on the Mac apps. That’s because your Mac storage can no longer handle the activities you are trying to perform, preventing you from entering the split view.
In this case, installing FoneLab Mac Sweep is highly recommended. This tool is a cleaner that can help you quickly erase the files you no longer need on the Mac. If you have large and old files, duplicated photos, or even apps you desire to delete, using this program will smoothly eliminate them for you. Besides, you can also remove your system junk with no problem, giving you more space and improving your Mac performance.
With FoneLab Mac Sweep, you will Clear system, email, photo, iTunes junk files to free up space on Mac.
- Manage similar photos and dulplicate files.
- Show you the detailed status of Mac with ease.
- Empty trash bin to get more storage.
View below succeeding instructions as an example for cleaning your Mac with FoneLab Mac Sweep if you can’t enter the Apple Split Screen:
Step 1Acquire the FoneLab Mac Sweep installer on its official using the Free Download button. Once the file downloads on your Mac, open it and complete the tool installation by moving its icon to the Applications folder. Then, launch the cleaning tool.
Step 2The program’s cleaning features will be presented once you click Cleaner at the main interface’s center. From there, hit the box of the data or junk you wish to delete first. Then, click Scan once its details are displayed on the screen. Afterward, click View.
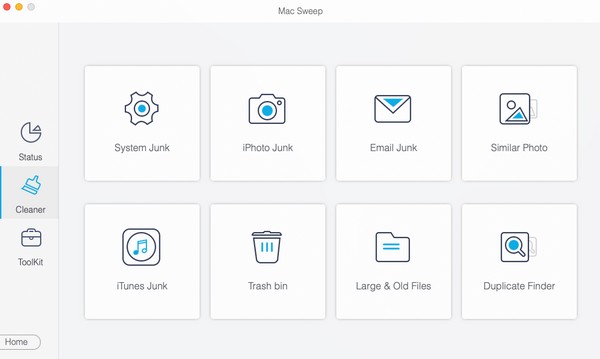
Step 3Listed on the following interface are classifications and specific files of the data type you have chosen. Select the items you will erase by checking the small boxes beside each file, or you may also click Select All. Later, hit Clean to delete the files from your Mac.

Part 4. FAQs about How to Split Screen on Mac
1. What is the Mac split screen shortcut?
The shortcut to split your screen on Mac has the same steps as the Mission Control method. The only difference is that you're using a keyboard shortcut. For instance, open your app and press Ctrl + Cmd + F to view it on full screen. After that, slide your four fingers on the trackpad and drag the other app on the desktop once the Mission Control appears. For a more detailed guideline, see this article's Part 2 Option 2.
2. Does Chrome support split screen on Mac?
Yes, it does. You can use the guidelines above to put your Chrome window on a split screen. Both recommended methods will work, so choose whichever you like.
We appreciate the time you have spent in understanding and performing the techniques in this article to split your screen on Mac. Please come by again for more concerns.
With FoneLab Mac Sweep, you will Clear system, email, photo, iTunes junk files to free up space on Mac.
- Manage similar photos and dulplicate files.
- Show you the detailed status of Mac with ease.
- Empty trash bin to get more storage.