- Empty Trash
- Delete Mail App
- Clear Cache on Mac
- Get More Storage on Mac
- Make Chrome Use Less RAM
- Where is Disk Utility on Mac
- Check History on Mac
- Control + Alt + Delete on Mac
- Check Memory on Mac
- Check History on Mac
- Delete An App on Mac
- Clear Cache Chrome on Mac
- Check Storage on Mac
- Clear Browser Cache on Mac
- Delete Favorite on Mac
- Check RAM on Mac
- Delete Browsing History on Mac
How to Forget WiFi Network on Mac Using Matchless Guide
 Updated by Lisa Ou / Sept 21, 2023 09:15
Are the unused WiFi networks still saved on your Mac? If so, you must be interested to learn how to remove a WiFi network from Mac. As weeks, months, and years pass in using your macOS, you can't prevent it from having different networks connected. You probably have linked it to your classmate's home when doing a school project, your friends' when playing games and surfing the internet, and more. Once done using their WiFi, it's not usual for many people to disconnect immediately. If this is also the case for you, several networks are still likely saved to your Mac, even if they're no longer available or you no longer use them.
Therefore, we prepared efficient strategies in this post to forget a network on a Mac. This way, the list of WiFi networks on your Mac will look more organized. Besides, you will no longer click the other unavailable networks by mistake caused by the untidy-looking WiFi networks list. Each part and method below will also provide detailed guidelines to assist you in doing the procedures correctly. Hence, expect a smooth and successful network removal process with various advantages. Kindly stay and read ahead to gain the information below.


Guide List
Part 1. How to Forget A Network on Mac
Section 1. How to Forget A Network on Mac Network Preferences
No matter where you go online, all platforms discussing this matter insinuate that the Network Preferences is the primary method for forgetting a network on Mac. It is an option on the macOS Network Settings that manages the WiFi networks saved on the Mac. Hence, you can access it to forget the unused or unwanted networks you wish to remove. It also displays the networks’ information so you can examine them before disconnecting permanently from your Mac. Since it is a default method, the process will also be convenient.
Stick to the no-hassle directions underneath to forget network on Mac on Mac Network Preferences:
Step 1Click the Apple menu symbol at the top of your Mac desktop to reveal the options list. From there, hit the System Preferences tab, and its window will appear. From there, choose the Network icon, then select the WiFi tab in the following interface’s left column.
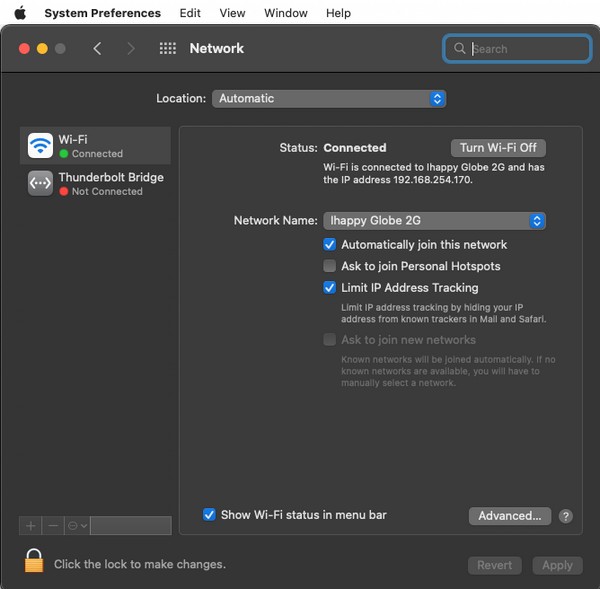
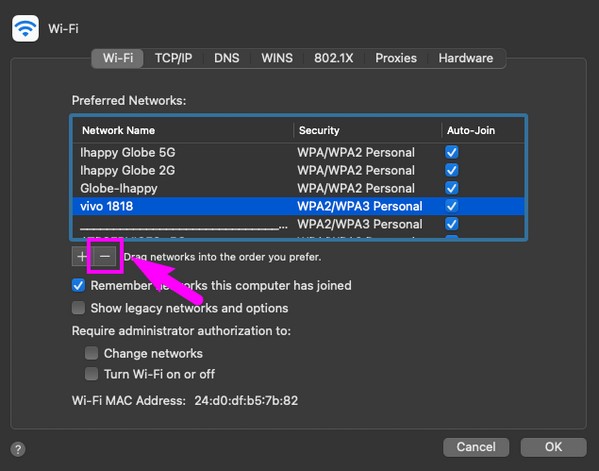
Step 2The WiFi network where you’re connected and its info will then display. On the lower right section, hit the Advanced tab and a dialogue box containing the networks you have previously connected to will appear. Click the WiFi network you will remove, then hit the Remove (-) icon below the Preferred Networks box to forget and remove it from your Mac.

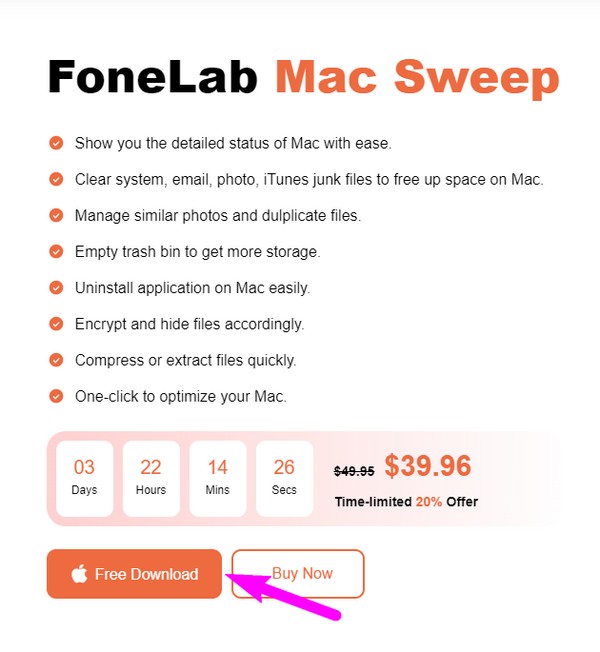
With FoneLab Mac Sweep, you will Clear system, email, photo, iTunes junk files to free up space on Mac.
- Manage similar photos and dulplicate files.
- Show you the detailed status of Mac with ease.
- Empty trash bin to get more storage.
Section 2. How to Forget A Network on Mac through Deleting Network Files
Meanwhile, you can also forget a network by deleting the network files on a Mac. No matter what method you use below, trust the step-by-step instructions and ensure you perform them correctly to forget the unwanted WiFi networks on your Mac successfully.
Option 1. On Finder
As mentioned above, the default deletion method for files is performed on Finder. Whether you’re erasing network files or regular data types like images, audio files, videos, apps, documents, etc., you only have to proceed to Finder to eliminate them. Deleting the network files will remove all the data and information regarding the network that is saved on the Mac. Hence, this causes your macOS to forget the network, as its files are already eliminated.
Heed the reliable guidelines below to grasp how to forget network on Mac Finder:
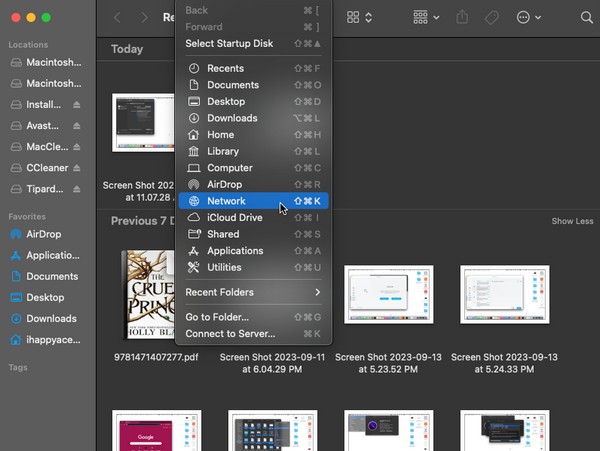
Step 1Choose Finder on the Dock to view various files stored on your Mac. Afterward, click Go at the top of the screen to view the list of folders and locations. Then, hit Network.
Step 2Once your network files are exhibited in the folder, select the files of the network you wish to forget. Lastly, click the three-dotted icon beside the down arrow and pick Move to Trash from the selections.
Option 2. Empty Trash
Once you remove the network files on Finder doesn’t mean they no longer exist on your Mac. Like the other data types, they automatically move to the Trash folder once you delete them. Hence, you must still direct to the folder and empty it to permanently remove the network files from your macOS.
Comply with the proper instructions below to understand how to delete WiFi network on Mac by emptying Trash:
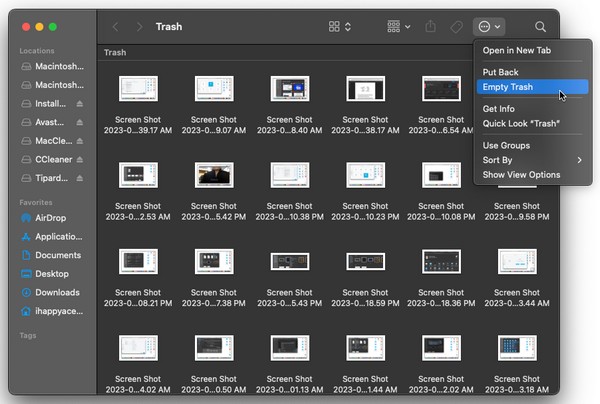
Step 1Get into the Trash folder by clicking its icon on the rightmost side of the Mac Dock. Your deleted data, including the network files, will be viewed on the window.
Step 2Select the encircled three-dotted icon on the topmost section, and when the options appear, pick the Empty Trash tab under Put Back to permanently erase them from the Mac.
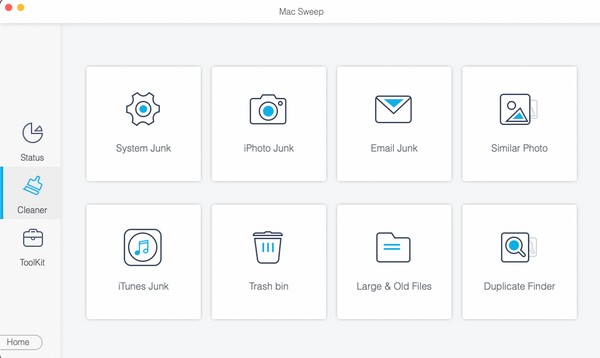
Part 2. Clean Mac with FoneLab Mac Sweep
Since you’d like to see your WiFi networks more organized, consider cleaning your Mac further with tools like FoneLab Mac Sweep. Installing it on your Mac will help you clean various computer components, like the large and old files stored on Finder. But unlike the official deletion method, this program doesn’t require emptying Trash folder, as it directly erases the files without transferring them to it. Once you’ve successfully deleted them, you can utilize the other FoneLab Mac Sweep functions like its uninstaller, junk cleaner, and the feature to erase duplicated photos. This way, your WiFi networks won’t be the only ones that look organized. Your other data will also look cleaner.
With FoneLab Mac Sweep, you will Clear system, email, photo, iTunes junk files to free up space on Mac.
- Manage similar photos and dulplicate files.
- Show you the detailed status of Mac with ease.
- Empty trash bin to get more storage.
Acquire the step-by-step procedure below as a model of how to clean your Mac from unnecessary data with FoneLab Mac Sweep:
Step 1Click Safari or any of your browsers and use the address bar to enter the official FoneLab Mac Sweep site. Below the program descriptions on the page, hit Free Download, and its file will be saved shortly on your Mac. Next, keep it inside the Applications folder to launch the tool afterward.
Step 2You must enter the Cleaner box on the tool’s initial interface to view the junk and data it supports for cleaning. From there, click the Large & Old Files box or any data you prefer to eliminate first. Then, select Scan before hitting the View tab to proceed.
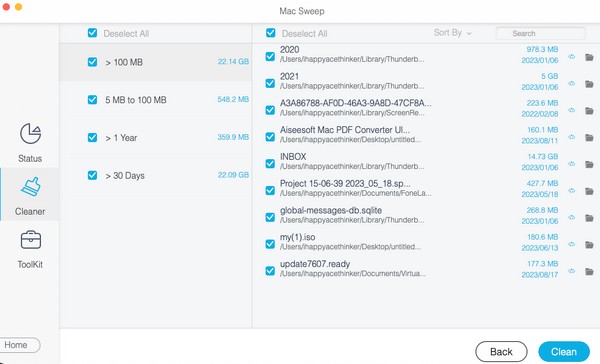
Step 3The next interface will show you the data category on the left while the specific files are on the right. Select the junk, files, or other data type accordingly, then hit Clean at the bottom. The data you have checked will then permanently disappear from your Mac.
Part 3. FAQs about How to Forget A Network on Mac
1. Why can't I forget a WiFi network on my Mac?
You may not be connected to it. If you display the networks on your Mac, the other active networks nearby will also appear. If that's what you're trying to remove, unfortunately, you won't be able to forget it, as you can only forget the ones already connected to your Mac.
2. Why won't my Mac connect to a WiFi network?
If you're trying to reconnect to a forgotten WiFi network but have failed, the problem may be due to limited range. Ensure your Mac is near enough to the network you're trying to connect to. This way, it will pick up the signal and connect successfully.
We assure you that your Mac will efficiently forget the network you remove once you properly perform our suggested methods above.
With FoneLab Mac Sweep, you will Clear system, email, photo, iTunes junk files to free up space on Mac.
- Manage similar photos and dulplicate files.
- Show you the detailed status of Mac with ease.
- Empty trash bin to get more storage.