Recover the lost/deleted iPhone data including photos, contacts, videos, files, call log and more data from your SD card or device.
Rooting Android with PingPong Root: What You Need to Know
 Updated by Lisa Ou / April 20, 2023 09:00
Rooting your Android phone can provide many benefits, such as accessing system files and customizing your device. Rooting allows you to remove pre-installed applications and install custom ROMs to your device, among other things. However, rooting can also have drawbacks, such as voiding your device's warranty and potentially bricking your device. It is important to understand the risks and benefits before proceeding with rooting.


Guide List
Part 1. Understanding Rooting: What It Means for Your Android Device
Rooting your Android phone can provide many benefits, such as accessing system files and customizing your device. Rooting allows you to remove pre-installed applications and install custom ROMs to your device, among other things. However, rooting can also have drawbacks, such as voiding your device's warranty and potentially bricking your device. It is important to understand the risks and benefits before proceeding with rooting.
Part 2. Preparing Your Android Device for Rooting
Before you root your Android device, there are a few important steps to take:
Backup your data: Rooting your device can potentially erase all of your data, so it's important to back up any important files, photos, and contacts.
Enable USB Debugging: You will need to enable USB debugging on your device in order to connect it to your computer.
Charge your device: Make sure your device is fully charged before starting the rooting process.
Unlock your bootloader: You will need to unlock your device's bootloader before you can root it. This process can vary depending on your device, so be sure to research how to do this specific to your device.
Part 3. Rooting Your Android Phone Using PingPong Root on Your Computer and Phone
PingPong Root is a popular rooting tool that allows you to root your device with just one click. Here are the steps to rooting your Android phone using PingPong Root on your computer and phone:
Rooting Your Android Phone Using PingPong Root on Your Computer
Step 1Download PingPong Root to your computer.
Step 2Connect your phone to your computer using a USB cable and open PingPong Root.
Step 3Follow the on-screen instructions to enable USB debugging on your device.
Step 4Once your device is connected, click Start in PingPong Root.
Step 5Wait for the rooting process to complete.
Step 6Disconnect your phone from your computer and restart your device.
Step 7Your device should now be rooted!
Rooting Your Android Phone Using PingPong Root on Your Phone
Step 1Download PingPong Root APK First, you need to download the PingPong Root APK file. You can find it on the PingPong Root website or other trusted sources online.
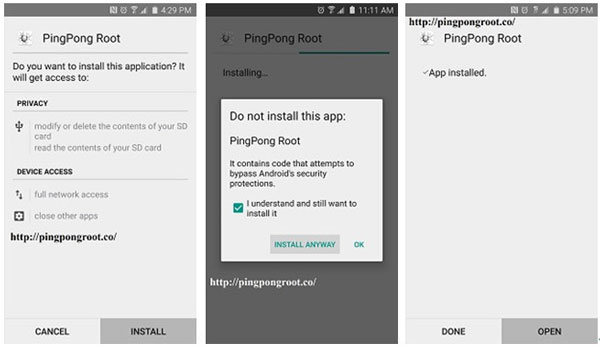
Step 2Enable installation from unknown sources Before installing the PingPong Root APK, you need to enable installation from unknown sources. To do this, go to your device's settings and then to the Security section. Look for the option that says Unknown sources and enable it.
Step 3Install the PingPong Root APK Once you have downloaded the PingPong Root APK file and enabled installation from unknown sources, you can install the app. Open the APK file and follow the prompts to install it on your device.
Step 4Launch the PingPong Root app After installing the PingPong Root APK, launch the app on your device. You will see a message asking for superuser permissions. Grant these permissions to proceed.
Step Start the rooting process Once you have granted superuser permissions, you can start the rooting process. Click the Get Root! button in the PingPong Root app to begin rooting your device.

Step 5Wait for the rooting process to complete The rooting process may take some time to complete. Do not turn off your device or exit the app until the process is finished.
Step 6Reboot your device Once the rooting process is complete, reboot your device. You should now have root access to your Android device.
Part 4. Rooting Your Android Phone Using PingPong Root on Your Mac
The process for rooting your Android phone using PingPong Root on your Mac is similar to the process on a Windows computer. Here are the steps:
Step 1Download the Mac version of PingPong Root.
Step 2Connect your phone to your Mac using a USB cable and open PingPong Root.
Step 3Follow the on-screen instructions to enable USB debugging on your device.
Step 4Once your device is connected, click Start in PingPong Root.
Step 5Wait for the rooting process to complete.
Step 6Disconnect your phone from your Mac and restart your device.
Step 7Your device should now be rooted!
In conclusion, rooting your Android phone can be a useful way to customize your device and access new features. However, it is important to understand the risks and benefits before proceeding with rooting. If you choose to root your device, be sure to follow the preparation steps carefully and research the specific rooting tool you plan to use.