Recover the lost/deleted iPhone data including photos, contacts, videos, files, call log and more data from your SD card or device.
How to Root Your Android Phone with iRoot: A Comprehensive Guide
 Updated by Lisa Ou / April 20, 2023 09:00
If you are an Android user, you might have heard the term root being thrown around in discussions about customizing and modifying Android devices. But what does root actually mean? And what do you need to know before rooting your Android phone? In this article, we will explore these questions and provide you with a step-by-step guide on how to root your Android phone using iRoot.


Guide List
Part 1. What does the term Root mean
In the world of Android, root refers to the highest level of access to your device's operating system. When you root your Android device, you gain administrative privileges that allow you to customize and modify your device in ways that are not normally possible.
Part 2. What precautions should you take before rooting your Android phone
Before rooting your Android phone, there are a few precautions you should take to ensure that the process goes smoothly and without any hiccups. Firstly, make sure to back up all your important data and files as the rooting process can sometimes result in data loss. Additionally, make sure your phone's battery is charged up to at least 50% to avoid any issues with the rooting process.
It's also important to note that rooting your Android phone will void its warranty. So, proceed with caution and make sure you understand the risks involved before deciding to root your device.
Part 3. What are the steps for rooting an Android phone using iRoot
Steps for Rooting an Android Phone using iRoot on Phone:
Step 1Download iRoot apk file on your Android phone.
Step 2Go to Settings > Security > Unknown sources and toggle on to enable installation from unknown sources.
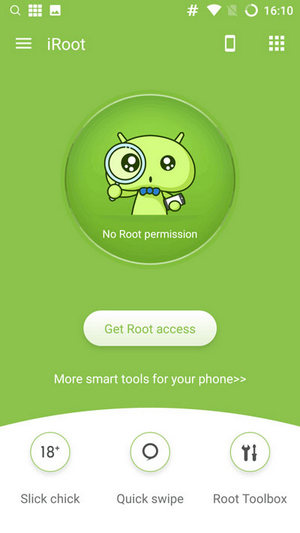
Step 3Install iRoot on your Android phone.
Step 4Launch iRoot and click on Get Root access Step 5: Wait for the rooting process to complete Step 6: Your Android phone is now rooted
Note: The steps for rooting your Android phone using iRoot on the phone may vary slightly depending on the device and Android version you have.
Steps for Rooting an Android Phone using iRoot on Computer:
Step 1Download iRoot on your computer and install it.
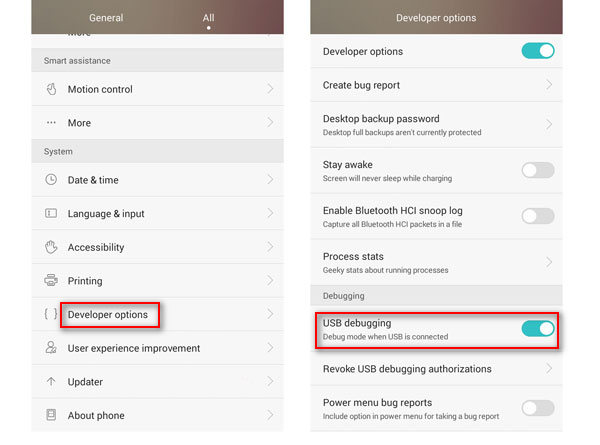
Step 2Enable USB Debugging on your Android phone by going to Settings > Developer options > USB debugging and toggling it on.
Step 3Connect your Android phone to the computer using a USB cable.

Step 4Launch iRoot and click on Connect device.
Step 5Wait for the software to detect your phone and click on Root.
Step 6Wait for the rooting process to complete.
Step 7Your Android phone is now rooted
Part 4. How to use iRoot to root an Android phone on a Mac
If you are a Mac user, you can still use iRoot to root your Android device. Here's how you can do it:
Step 1Download and install a virtual machine like VirtualBox or VMware Fusion on your Mac.
Step 2Install Windows on the virtual machine.
Step 3Download and install iRoot on the virtual Windows machine.
Step 4Enable USB debugging mode on your Android device.
Step 5Connect your Android device to your Mac using a USB cable.
Step 6Launch iRoot on the virtual Windows machine and click on the Root button.
Step 7Wait for the rooting process to complete.
Step 8Reboot your Android device
In conclusion, rooting your Android phone can be a great way to customize and personalize your device. However, it's important to take the necessary precautions and understand the risks involved before proceeding with the process. With iRoot, rooting your Android device can be a quick and easy process that anyone can do.