Introduction
FoneLab for iOS is a professional program with a highly intuitive interface for iOS devices users. You don't need to be a techie to use it. It can easily recover the data lost due to jailbreak, iOS upgrade, system crash, etc. Designed by the trusted developer, the tool is very safe to download and assures the recovery of photos, videos, Safari bookmarks, messages, documents, messages, contacts, notes, calendar information, photos, etc., from iPhone, iPad, iTunes, and iCloud. So, you don't need to worry about losing data! The Recover from iOS Device supports recovering data directly from iPhone 17 Pro Max/17 Pro/Air/17, iPhone 16/16 Pro/16 Pro Max, iPhone 15/15 Pro/15 Pro Max, iPhone 14/14 Pro/14 Pro Max, iPhone 13 Pro Max/13 Pro/13 mini/13, iPhone 12 Pro Max/12 Pro/12 mini/12/iPhone 11/X/8 Plus/8/7 Plus/7/SE/6s Plus/6s/6/6 Plus/5s/5c/5/4S/4/3GS/3G, all iPads and iPod touch 6/5/4. The Recover from iTunes Backup File can check the iTunes backup files of multiple devices you have ever synced. The Recover from iCloud Backup File can recover data from iCloud backup file through a computer. FoneLab for iOS also fixes iOS System issues and bring the broken/crashed/frozen/stuck in blue/white/black screen iPhone/iPad/iPod system back to order. The newly-released iOS Data Backup & Restore enables you to backup various files from iPhone/iPad/iPod with ease, including contacts, messages, videos, photos, WhatsApp data, Safari bookmark, etc. With this all-in-one program, you can do whatever you want to your iOS devices.
1. System Requirement
OS Supported: Windows XP, Windows 7, Windows 8, Windows 8.1, Windows 10, Windows 11,
Mac OS X 10.7, macOS Sierra, macOS High Sierra or above.
iOS version: iOS 26, iOS 27 Beta and earlier
CPU: 1GHz Intel/AMD CPU or above
RAM: 1GB RAM or more
2. Key Functions
- For iPhone 17 Pro Max/17 Pro/Air/17, iPhone 16/16 Pro/16 Pro Max, iPhone 15/15 Pro/15 Pro Max, iPhone 14/14 Pro/14 Pro Max, iPhone 13/12 Pro Max/12 Pro/12 mini/12, iPhone 11 Pro Max/11 Pro/11, iPhone X, iPhone 8, iPhone 8 Plus, iPhone 7 Plus, iPhone 7, iPhone SE, iPhone 6s Plus, iPhone 6s, iPhone 6, iPhone 6 Plus, iPhone 5s, iPhone 5c, iPhone 5, iPhone 4S, iPad Air, iPad mini 2, iPad 4, iPad mini, The New iPad, iPad 2 and iPod touch 5: Recover 8 types of deleted data directly from iOS devices, including Contacts, Messages, Call History, Calendar, Notes, Reminders, Safari bookmark and WhatsApp. Meanwhile, it can scan and recognize other files still on your device such as Camera Roll, Photo Library, Photo Stream, App Photos, App Videos, App Audio, Message Attachments, WhatsApp Attachments, App Document, Voice Memos and Voicemail.
- For iPhone 4, iPhone 3GS, iPad 1 and iPod touch 4: Retrieve 19 types of deleted data from iOS devices, including Contacts, Messages, Call History, Calendar, Notes, Reminders, Safari bookmark, WhatsApp and App Document, Camera Roll, Photo Library, Photo Stream, App Photos, App Videos, App Audio, Message Attachments, WhatsApp Attachments, Voice Memos and Voicemail.
- Get the lost data back from iTunes backup, like Contacts, Messages, Call History, Calendar, Notes, Reminders, Safari Bookmark and WhatsApp. Simultaneously, it can scan and recognize other data in backup file, like Camera Roll, Photo Library, Photo Stream, App Photos, App Videos, App Audio, Message Attachments, WhatsApp Attachments, App Document, Voice Memos and Voicemail.
- Retrieve files from iCloud Backup including Contacts, Messages, Call History, Calendar, Notes, Reminders and Safari Bookmark. Simultaneously, it can scan and recognize other data in backup file, like Camera Roll, Photo Library, Photo Stream, App Photos, App Videos, App Audio, Message Attachments, Voice Memos and Voicemail.
- Fix iOS system issues.
- Preview files before recovery, including the existing and deleted files on device.
- Individually export specific files as needed.
- Preview picture at full size as needed with rotation options.
- Backup and restore iPhone/iPad/iPod data.
Supported Formats and Devices
1. iOS Data Recovery
Recover from iOS device
| Supported Devices |
Supported Data |
| iPhone 4/3GS, iPad 1 and iPod touch 4 |
Recover All Deleted Data (19 types): Contacts, Messages, Call history, Calendar, Notes, Reminders, Safari bookmark, WhatsApp, App Document, Camera Roll, Photo Library, Photo Stream, App Photos, App Videos, App Audio, Message Attachments, WhatsApp Attachments, Voice Memos, Voicemail. |
| iPhone 17 Pro Max/17 Pro/Air/17, iPhone 16/16 Pro/16 Pro Max, iPhone 15/15 Pro/15 Pro Max, iPhone 14/14 Pro/14 Pro Max, iPhone 13 Pro Max/13 Pro/13 mini/13, iPhone 12 Pro Max/12 Pro/12 mini/12, iPhone 11 Pro Max/11 Pro/11, iPhone X/8/8Plus/7/7Plus/6/6Plus/5s/5c/5/4S, iPad 4/3/2/Air, iPad mini/mini 2 and iPod touch 5 |
Recover Deleted Data (8 types): Contacts, Messages, Call history, Calendar, Notes, Reminders, Safari bookmark, WhatsApp
Backup Existing Data (11 types): App Document, Camera Roll, Photo Library, Photo Stream, App Photos, App Videos, App Audio, Message Attachments, WhatsApp Attachments, Voice Memos, Voicemail. |
Recover from iTunes backup file
Recover Deleted Data (8 types): Contacts, Messages, Call history, Calendar, Notes, Reminders, Safari bookmark, WhatsApp
Extract Data from Backup (11 types): App Document, Camera Roll, Photo Library, Photo Stream, App Photos, App Videos, App Audio, Message Attachments, WhatsApp Attachments, Voice Memos, Voicemail.
Recover from iCloud backup file
Backup Deleted Data (7 types): Contacts, Messages, Call history, Calendar, Notes, Reminders, Safari bookmark
Extract Data from Backup (9 types): App Document, Camera Roll, Photo Library, App Photos, App Videos, App Audio, Message Attachments, Voice Memos, Voicemail.
2. iOS System Recovery
iOS System Recovery fixes:
- iPhone/iPad/iPod is stuck in iTunes logo or Recovery mode.
- iPhone/iPad/iPod can't exit DFU mode.
- iPhone/iPad/iPod turns into white screen of death or white Apple logo screen.
- iPhone/iPad/iPod turns to be black screen, red or blue screen.
- iPhone/iPad/iPod restarts again and again.
- iPhone/iPad/iPod gets frozen and has no response.
- iPhone/iPad/iPod won't slide to unlock or slide to power off.
3. iOS Data Backup & Restore
iOS Data Backup & Restore can:
- Backup various files from iPhone/iPad/iPod.
- Restore data from backup to iPhone/iPad/iPod or to PC.
Register & Update & Uninstall
1. Register
Click Register on the upper right corner of the main interface or in the Help menu to open the registration window, then input the two fields listed below and click OK to finish registration.
Registration for iPhone Data Recovery:

Registration for iOS System Recovery:

Registration for iOS Data Backup & Restore:

Registration WhatsApp for iOS:

NOTE:
A registration code will be sent to your email that you filled in the purchase order list.
Email Address: The email to receive the registration code.
Registration Code: A string of characters marked as Activation key, license code or KEYCODE(S) in the purchasing confirmation letter.
2. Update File
Go to Menu > Preferences to get the latest software or click Check Update in the menu to access update manually.
But most of the time, if there is an updated version, a pop up a window will notify you to update the program.
3. Uninstall the Program
Method One:
Click Windows Start menu then go to All Programs and locate FoneLab for iOS, and click Uninstall.
Method Two:
Windows XP: Start > Settings > Control Panel > Add or Uninstall Programs > FoneLab for iOS > Uninstall.
Windows 7: Start > Control Panel > Programs and Features > FoneLab for iOS > Uninstall
Windows 8:Settings > Control Panel > Programs > FoneLab for iOS > Uninstall.
Set Up Preferences
1. General
You can set up the following fields for a better program performance:
Click Menu > Preferences to enter the Preferences Window
Click Menu > Preferences to enter the Preferences Window
2. Output:
Select a storage location to save folder and check the corresponding option to open the output folder automatically after recovery.
3.Update Settings:
you can set the program to spontaneously inspect updates and the intervening update time (Every Day/Every Week/Every Month).
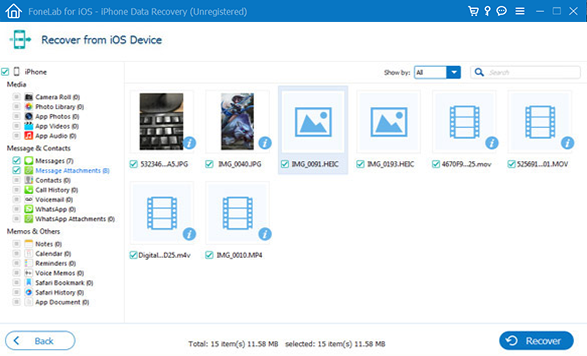
Recover Files from iOS Devices
FoneLab can not only recover the deleted files from devices including Contacts, Messages, Call History, Calendar, Notes, Reminders, Safari bookmark and WhatsApp, but also scan and recognize other existing files on the device like Camera Roll, Photo Library, Photo Stream, App Photos, App Videos, App Audio, Message Attachments, WhatsApp Attachments, App Document, Voice Memos and Voicemail.
Step 1. Launch the software, select iPhone Data Recovery > Recover from iOS Device and connect your device. Once detected, the device name will be displayed on the interface of program.
Step 2. Select the category file you want to restore and click Start to begin scanning your device.
Step 3. After that, the category files (included the deleted file number) will be listed in the left sidebar. you can double-click to preview the file (e.g. photo) found on your device.
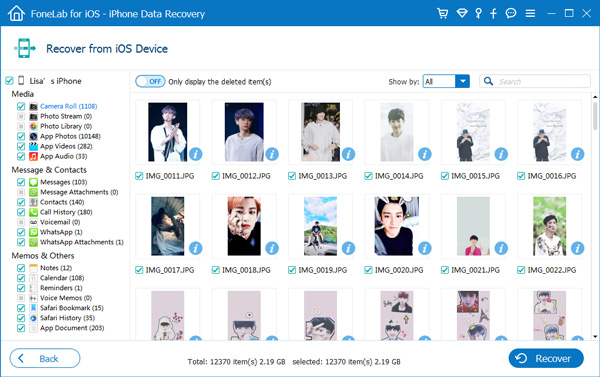
Step 4. Select the files you want to regain, click Recover to get back and save your data on the computer.
Tips:
- Ensure you've installed the latest version iTunes on your computer.
- Do not open iTunes when recovering data, in case the deleted data overwritten.
- Do not use your device when data is lost because it could produce new data to overwrite the lost data and decrease the accuracy of data recovery.
- If your device has never been synced with iTunes and is password protected, you will be prompted for passcode. Please enter passcode to unlock your device and click "Start Scan" button again.
- For the content of Contacts, Messages, Call History, Calendar, Notes, Reminders, Safari bookmark and WhatsApp, the scan result including the deleted and existing data are distinguished by different color. Turn the Only display the deleted item(s) button on to show the deleted data only.
2. For iPhone 4, iPhone 3GS, iPad 1 and iPod touch 4
This program provides two modes for iPhone 4, iPhone 3GS, iPad 1 and iPod touch 4: the standard mode and the advance one. While Under standard mode, you can only find the deleted files, such as Messages, Contacts, Call History, etc., under the advanced mode, you can recover photos, videos and other data even when you forget the passcode or the system is inaccessible. But it takes more steps and time.
Step 1. Open the program, select iPhone Data Recovery > Recover from iOS Device and connect your device to your computer. Here are two modes available to scan your devices: Standard Mode & Advanced Mode.
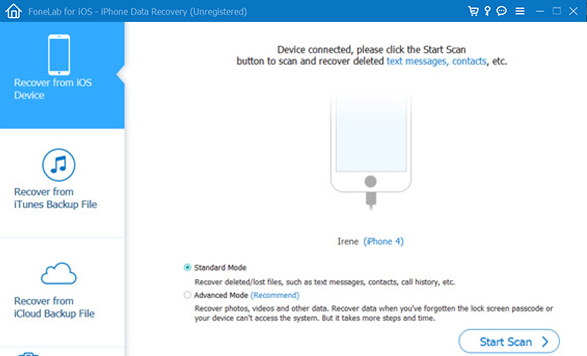
Step 2. Select a mode as your will and click Start Scan.
For Advanced Mode, you will need to download a plugin to enter the device scanning mode.
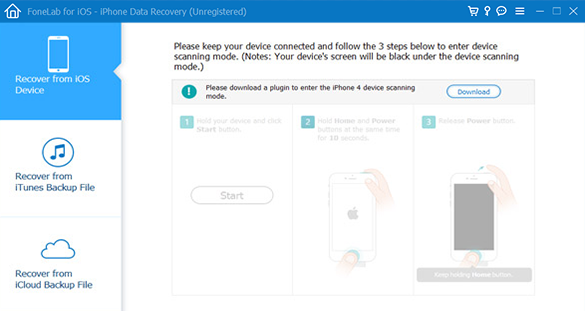
Step 3. Please click Download to download and install the corresponding plug-in according to the prompt before the scanning.
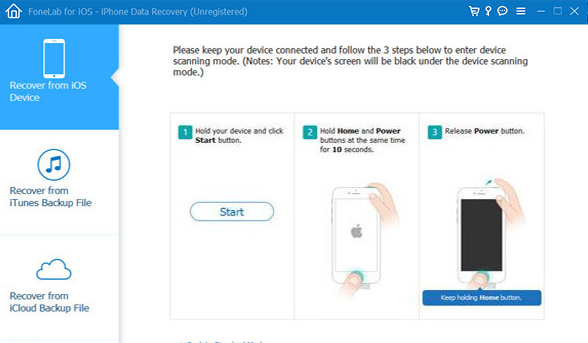
Step 4. After installing the plug-in, please follow the steps below to enter scanning mode.
- Hold your iOS device and click the Start button.
- Press and hold the Power and the Home buttons at the same time for 10 seconds.
- Let go the Power button but keep holding the Home button.
After the scanning done, you can preview all data found on your device in the scan result. The category of files including the deleted file number will be listed in the left sidebar.
Step 5. Select the files you want to retrieve, click Recover to regain and save your data in local disc.
Step 6. Click Exit Scanning Mode button or directly close the software to launch your device into normal mode.
Tips:
- Please strictly follow the three steps displayed on the interface. Both overtime and incorrect operation will cause a failure to enter the device scanning mode.
- When you are in scanning mode your device screen will be completely black and no operation is allowed. Click Exit Scanning Mode button or directly close the software to launch your device into normal mode.
- If your device is in abnormal mode, for instance, an iTunes logo appears on your device screen, you can restart the program and boot your device into normal mode according to the prompt.
- Don't use your device when data is lost because it could produce new data overwritten and loss and decrease the accuracy of data recovery.
- The scan result including the deleted and existing data are distinguished by different color. Turn the Only display the deleted item(s) button on to show the deleted data only.
Recover from iTunes Backup File
FoneLab also lets you get the lost data back from iTunes backup file, like Contacts, Messages, Call History, Calendar, Notes, Reminders, Safari Bookmark and WhatsApp. If you get a new iPhone you can do a restore using iTunes in minutes. If you change to an Android device, your photos and videos can be easily retrieved from your computer. It can scan and recognize other data in backup file, like Camera Roll, Photo Library, Photo Stream, App Photos, App Videos, App Audio, Message Attachments, WhatsApp Attachments, App Document, Voice Memos and Voicemail.
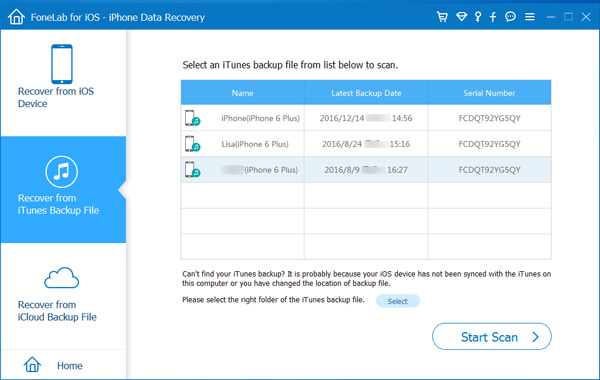
Step 1. Run the software, select Recover from iTunes Backup File mode.
Step 2. All iTunes backup files will be listed on the screen including information about device name and the Latest backup date.
Step 3. Select the backup file you want to recover from and then click Start Scan to flip scanning.
Step 4. After that, the category of files will be listed in the left sidebar. You can double-click the file (e.g. photos) that found on your device to preview.
Step 5. Select the files you want to retrieve, click Recover to regain and save your data in an easily accessible location on the computer.
Step 6Click Exit Scanning Mode button or directly close the software to launch your device into normal mode.
Tips:
- Please strictly follow the three steps displayed on the interface. Both overtime and incorrect operation will cause a failure to enter the device scanning mode.
- When you are in scanning mode your device screen will be completely black and no operation is allowed. Click Exit Scanning Mode button or directly close the software to launch your device into normal mode.
- If your device is in abnormal mode, for instance, an iTunes logo appears on your device screen, you can restart the program and boot your device into normal mode according to the prompt.
- Don't use your device when data is lost because it could produce new data overwritten and loss and decrease the accuracy of data recovery.
- The scan result including the deleted and existing data are distinguished by different color. Turn the Only display the deleted item(s) button on to show the deleted data only.
Recover from iCloud Backup File
FoneLab as a reliable data recovery software, that helps users in recovering data from iCluod backup file with a broad range of data types, such as Contacts, Messages, Call History, Calendar, Notes, Reminders and Safari Bookmark, App Photos, App Videos, App Audio, Message Attachments, Voice Memos and Voicemail, etc.
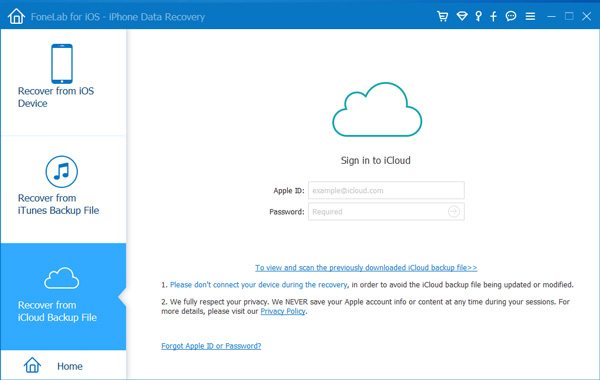
Step 1. Run the software, select Recover from iCloud Backup File.
Step 2. Sign in your iCloud, then click Download to download the iCloud backup file to your computer. After that, the program will scan automatically.
Step 3. Then the category files will be listed in the left side panel and you can double-click on a file (e.g. photo) to preview.
Step 4. Select the files you want to retrieve, click Recover to regain and save your data in the computer.
Tips:
- Please make sure you've installed iTunes on your computer and it's the latest version.
- Do not connect your device during recovery to avoid the backup file being updated or modified.
- If you forgot your Apple ID or password, please click the Forgot Apple ID or Password on the bottom of the program to get it back.
iOS System Recovery
FoneLab for iOS is an excellent iOS system recovery software as well. Its operational simplicity, high efficiency, full compatibility and absolute safety make it stand out. By using it, your iPhone/iPad/iPod touch can back to normal soon without data loss. It is ideal enough to help repair more than 30 kinds of iOS issues, including iPhone stuck in DFU mode, recovery mode, headphone mode, spinning circle, iPhone keeps turning off, iPhone activation error, update failure, iPad frozen, etc. More than that, FoneLab for iOS also additionally offers a free option to allow you to enter/exit recovery mode with one click, requiring no manual step-by-step operation. Besides, it's compatible with all iOS versions (iOS 26, iOS 27 Beta included) and iOS models with no problem.
- iPhone/iPad/iPod is stuck in iTunes logo or Recovery mode.
- iPhone/iPad/iPod can't exit DFU mode.
- iPhone/iPad/iPod turns into white screen of death or white Apple logo screen.
- iPhone/iPad/iPod turns to be black screen, red or blue screen.
- iPhone/iPad/iPod restarts again and again.
- iPhone/iPad/iPod gets frozen and has no response.
- iPhone/iPad/iPod won't slide to unlock or slide to power off.
- Other iOS system issues.
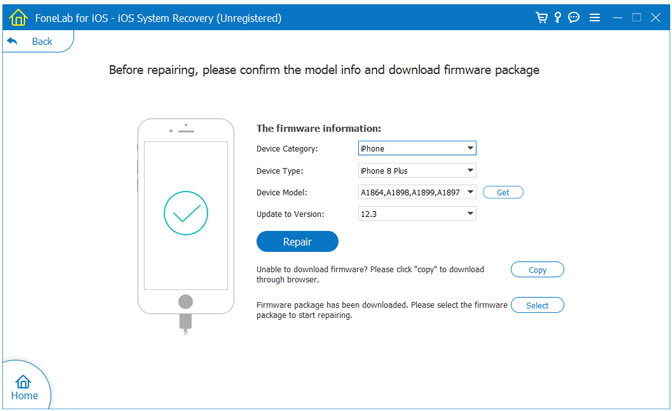
Step 1. Launch the program on your Windows PC and select iOS System Recovery in the main interface.
Step 2. Click Start then program will detect what abnormal state your device is.
Step 3. Confirm fix in the way of Standard Mode or Advanced Mode then click Optimize.

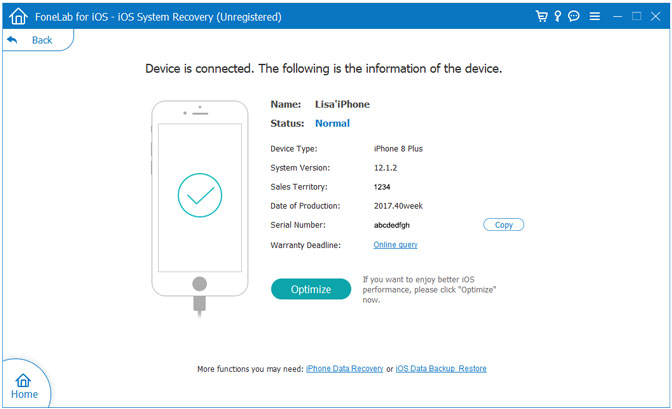
Step 4. Confirm the model info and click Repair to start the process.
iOS Data Backup and Restore
1. Back up your iPhone/iPad/iPod data
iOS Data Backup & Restore enables you to safely and selectively back up your iPhone/iPad/iPod data. Following the backup steps below will mean you can lose your iPhone/iPad/iPod and still have everything you need backed up. Even if you lose your iPhone and your computer, you still have everything automatically backed up online. With this approach your iPhone becomes part of your overall backup plan and you enjoy the highest level of protection.
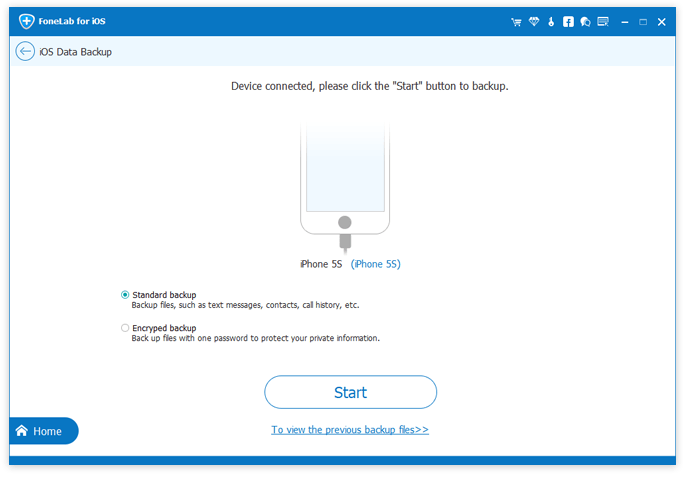
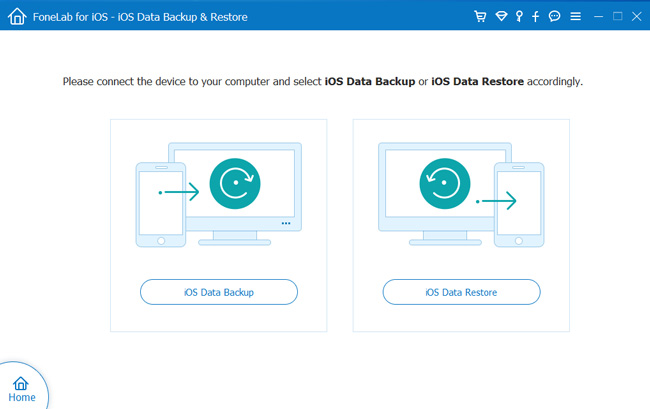
Step 1. Install and launch the program and choose iOS Data Backup & Restore to enter the main interface then click Start.
Step 2. Select iOS Data Backup and connect your iOS device with computer.
Step 3. Select backup mode. There are two modes are available: Standard backup and Encrypted backup.
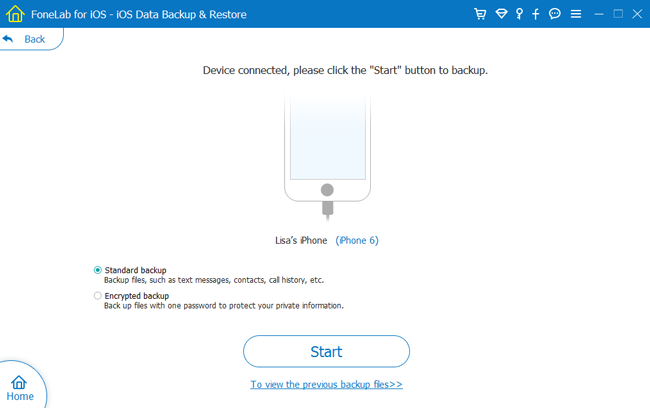
For Encrypted backup, you'll first set a password for your backup and use it to restore data from the encrypted backup file.
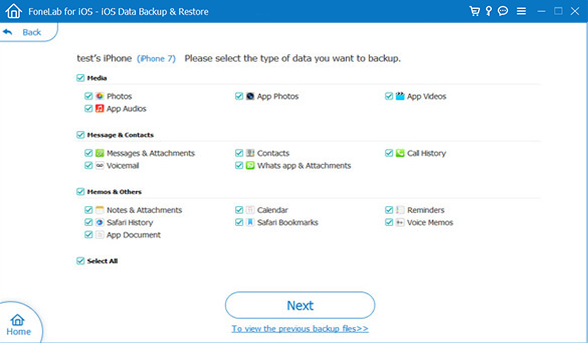
Step 4. Choose the file types you want to backup and click Next and choose a folder to save the backup.
2. Restore iOS data from the backup to iOS or to PC
You are not allowed to restore data from the backup to iOS device with free-trial version, but you can free restore data from backup to PC for 3 chances.
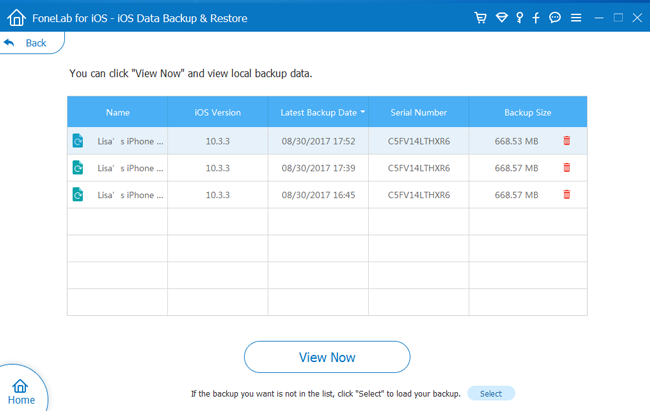
Step 1. Choose iOS Data Backup & Restore and select iOS Data Restore.
Step 2. Choose the file and click the View Now to view the content.
Step 3. Select content that you want to restore.
Step 4. Click Restore to Device to restore data to your iOS device or click the Restore to PC To restore data to your PC, and choose the folder to save the backup data then press Restore.

Notes: While there is no recover limitation for Restore to PC, Restore to Device can only restore contacts and notes.
WhatsApp Transfer for iOS
Step 1. Download, install and launch this software on your computer. And then connect your iOS device to the computer. Choose WhatsApp Transfer for iOS on the interface.
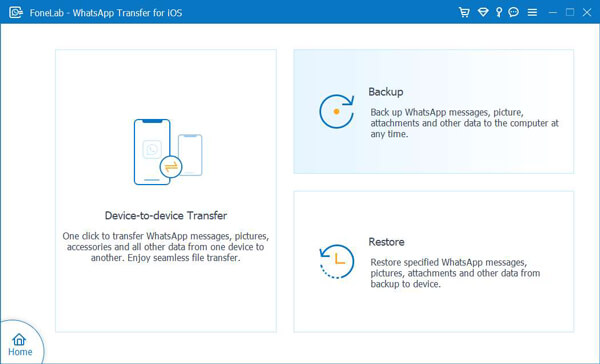
Step 2. Choose Device-to-Device, Backup or Restore from the three options.
Step 3. Choose data from the interface.
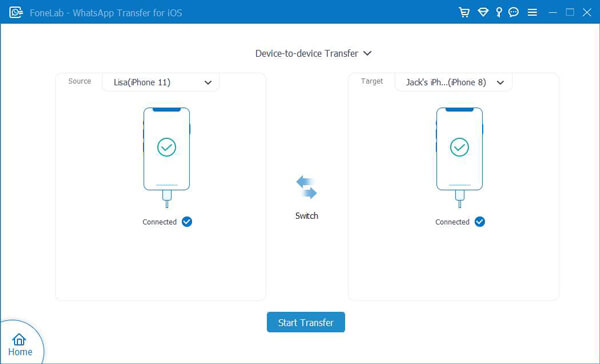
Step 4. Choose locations, then click Start Transfer button.
Contact Us
If you have any questions and suggestions, please feel free to contact our support team at: support@fonelab.com.
 iPhone Data Recovery
 iOS System Recovery
 iOS Data Backup & Restore
 iOS Unlocker
 iPhone Password Manager
 Location Changer
 Android Data Recovery
 Broken Android Data Extraction
 Android Data Backup & Restore
 Android Unlocker