How to Sync iMessage from iPhone to Mac: The Quick and Easy Guide
 Updated by Lisa Ou / March 03, 2022 15:40
Do you have an important iMessage that you want to keep or be available on both iPhone and Mac? Well, there are indeed these messages that we always want to preserve on our devices because we might need them in the future. Whether it is a text message or iMessage, whatever it is. And so, the safest place to save or back up these is on the Mac. If you are an iPhone user and desire to store your iMessage to your Mac but don't know how to do it, cheer up! We have provided here 3 easy and quick ways to do it. Continue reading this post until you see what suits your needs.


Guide List
Part 1. How to Sync iMessage from iPhone to Mac using iCloud
Having your messages synced on your iCloud allows them to be kept up to date on all your devices. It also enables you to delete them from one device to all of your devices. And you can use iCloud on your iPhone, iPad, iPod Touch, Apple Watch, Mac, and many more. Now, try syncing your iMessage from iPhone to Mac with iCloud. Follow the given steps below.
Steps on How Sync iMessage from iPhone to Mac using iCloud:
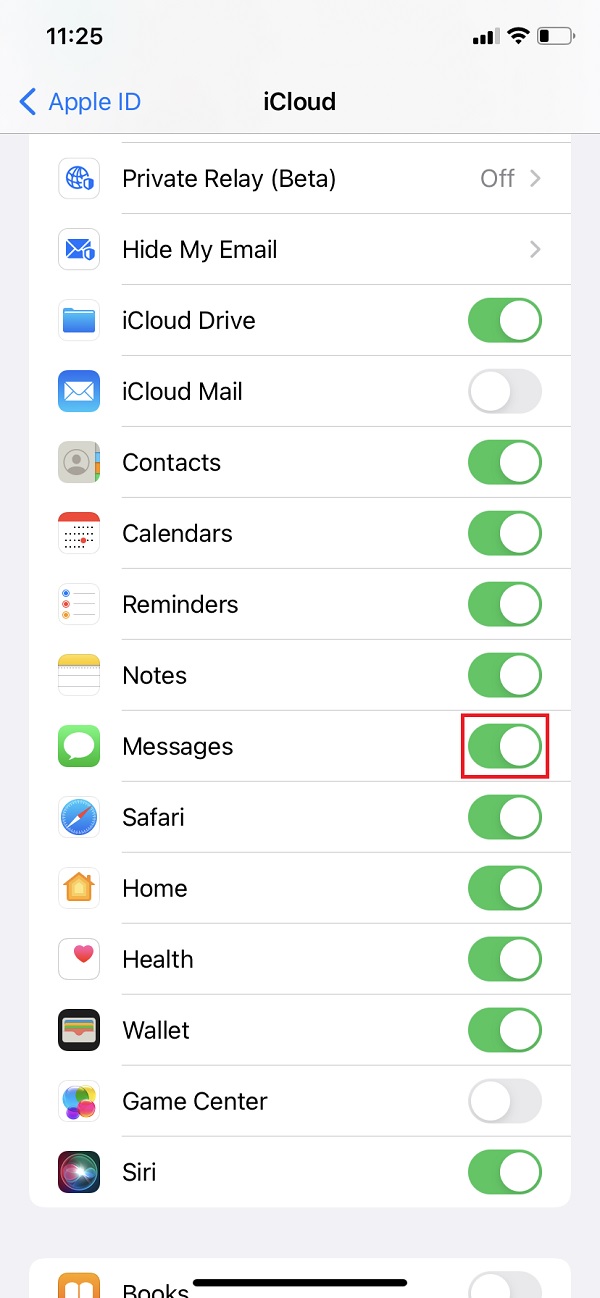
Step 1First off, go to the Settings of your iPhone.
Step 2Next, tap [your name]. Then, tap the iCloud option.
Step 3After that, scroll down until you get the Messages and turn on the toggle beside it.
That’s it! However, you have only a free 5GB of iCloud storage, and if you have a lot of data to store in your iCloud, it will not be enough unless you upgrade to the plan. Instead of using iCloud that limits you in keeping your messages, including iMessage, you can try the default app of the Mac – Finder.
With FoneTrans for iOS, you will enjoy freedom to transfer your data from iPhone to computer. You can not only transfer iPhone text messages to computer, but also photos, videos and contacts can be moved to PC easily.
- Transfer photos, videos, contacts, WhatsApp, and more data with ease.
- Preview data before transferring.
- iPhone, iPad and iPod touch are available.
Part 2. How to Sync iMessage from iPhone to Mac with Finder
One of the Apple ways to sync your iMessage from iPhone to Mac is through Finder. It is a default file manager app that have replaced iTunes in a Mac with later macOS versions. And it allows every user to access and browse their files and data from iOS devices on their Mac. Another thing is that it can perform syncing data from Apple devices to another. And there are two ways you can sync your iMessage from iPhone to Mac with or without USB cable. See the following methods as well as their steps.
1. Sync iMessage through USB Cable on Finder
The most familiar way to connect your device to the computer is using a USB cord. With it as well, you can sync data from your iPhone to Mac, and that includes your iMessage. Follow the given steps below to sync it using the Finder and USB cable.
Steps on How to Sync iMessage through USB Cable on Finder:
Step 1First and foremost, open the Finder app on your Mac.
Step 2Afterward, connect your iPhone via a USB cable. Next, select and click the device name on the left sidebar of the Finder window.
Step 3Then, if prompted, simply Trust your device. Also, you might be asked to update your device to the latest OS version.
Step 4Next, click the Backup Now button to sync all your data from your iPhone to Mac under the Backups section.
Step 5Lastly, click the Apply button at the left-bottom corner of the Finder window.

2. Sync iMessage through Wi-Fi
Using Finder, you can also sync data files with your Wi-Fi after enabling this feature. It is also a commendable feature of this method. Instead of using a USB cable, sync your iMessage wirelessly with your Wi-Fi. You can set it up first, and it will automatically sync your iMessages.
Steps on How to Sync iMessage from iPhone to Mac using Wi-Fi on Finder:
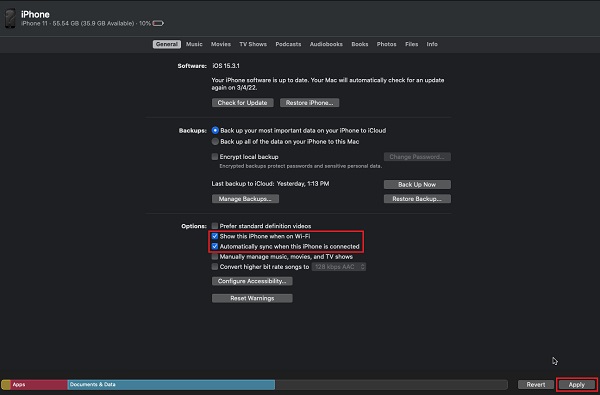
Step 1Firstly, connect your device to your Mac using a USB cable.
Step 2Then, open the Finder and select your device name on the left pane.
Step 3On the General section, click the box beside the Show this [device] when on Wi-Fi to put a checkmark on it. Same as with the Automatically sync when this [device] is connected.
Step 4Lastly, click the Apply button to save the changes you have made. That’s it!
However, you need to sync or backup all your data by this method. But, you cannot do it selectively. Also, if you find this method a bit complicated, you can try the FoneTrans for iOS instead.
Part 3. How to Sync iMessage from iPhone to Mac with FoneTrans for iOS
Although iCloud and iTunes are powerful methods in syncing data files from your device to another, there are still troubles and a lot of limitations. That is why we sincerely recommend you the best and most professional tool that can help you sync your important iMessages from your iOS devices to your computer, called FoneTrans for iOS. The program allows you to transfer your iMessages from your iPhone to Mac selectively within a few clicks. What’s more, is that you can download it for free and enjoy its full-blast features.
With FoneTrans for iOS, you will enjoy freedom to transfer your data from iPhone to computer. You can not only transfer iPhone text messages to computer, but also photos, videos and contacts can be moved to PC easily.
- Transfer photos, videos, contacts, WhatsApp, and more data with ease.
- Preview data before transferring.
- iPhone, iPad and iPod touch are available.
Steps on How to Sync iMessage from iPhone to Mac with FoneTrans for iOS:
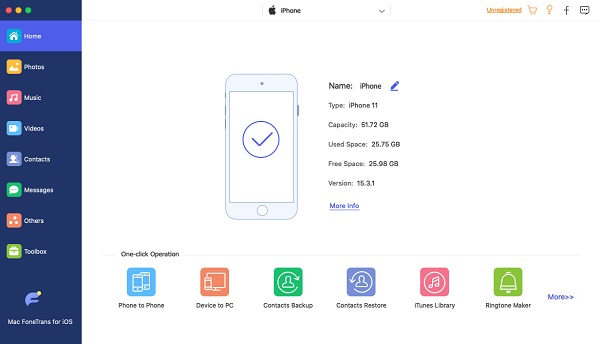
Step 1To start with, download and install FoneTrans for iOS on your Mac. And it will launch automatically after the installation process.

Step 2After which, connect your iPhone device to your computer with a USB cable. Then, the tool will immediately detect your device and show some basic information.
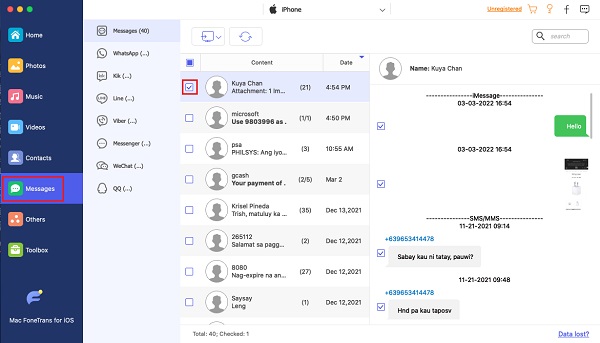
Step 3Next, click the Messages on the left sidebar of the main interface. Choose the iMessage you want to sync to your Mac by ticking the box beside the message.
Step 4Then, click the Export to icon and choose between CSV, HTML, or TXT files from the drop-down menu to save it according to your chosen file type.
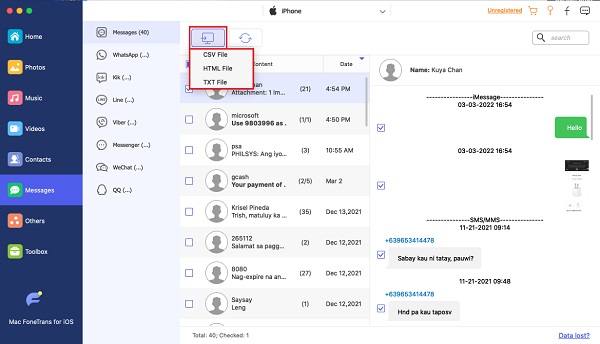
Step 5Finally, select a folder on your Mac where you want the file to be saved. Then, it will automatically begin the syncing procedure. Wait until it is done. That’s it!
Now, you have your iMessage synced on your Mac. Besides, FoneTrans for iOS supports many data types such as contacts, call logs, photos, videos, and more that you can transfer to your devices. Thus, you can use it to transfer photos from iPhone to Mac as well. If you want to try it with other data, you can do so.
Part 4. FAQs About How to Sync iMessage from iPhone to Mac
With FoneTrans for iOS, you will enjoy freedom to transfer your data from iPhone to computer. You can not only transfer iPhone text messages to computer, but also photos, videos and contacts can be moved to PC easily.
- Transfer photos, videos, contacts, WhatsApp, and more data with ease.
- Preview data before transferring.
- iPhone, iPad and iPod touch are available.
1. Some of my iMessage don't show up on my Mac; why is it like that?
It could be because the iCloud syncing feature has been accidentally turned off. Also, you have to make sure that the syncing feature is enabled on all your device. Otherwise, your iMessage from iPhone will not really show up on your Mac.
2. Can I force sync iMessage to sync on Mac with iCloud?
Of course, yes! When your iMessage is not syncing automatically, you can manually force it. To do that, open the Messages and click the Messages on the top-left corner. Then, Preferences > iMessage > Sync Now. And on the status bar, you will see if there are messages to sync. That's it!
In conclusion, you have 3 easy and quick guides now to sync your iMessage from iPhone to Mac. All of the mentioned methods above are all working and indeed helpful. Yet, we highly think that FoneTrans for iOS is the best option that you can have. All your needs are in one tool. Hence, the decision is yours.
More questions or suggestions? Leave your messages in the comment area below.