iPhone and iTunes Errors Fix
 Posted by Boey Wong / Jan 13, 2021 09:00
 iPhone is really a good gadget in modern life. People use it for work, entertainment, study, business, communicate, etc. It almost occupies the entire part of people's life.
However,
No matter how excellent the iPhone performs, it is impossible to have something that works completely perfect without any errors. So neither the iPhone is. Particularly when you are updating, restoring or downgrading your iPhone on Apple iTunes, iTunes error codes appear now and then. This could be a nightmare since they can not get over the error codes.

Guide List
For example, one of the most common iPhone errors code 3194, is an error that may occur on a jailbroken iPhone while updating your old iOS, downgrading or restoring your device.
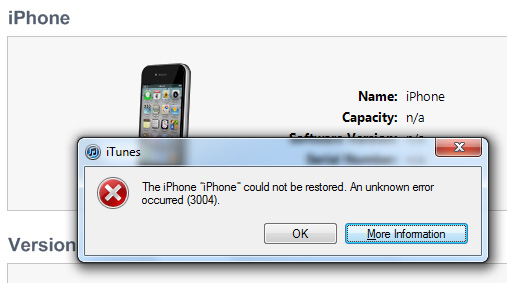
Furthermore, the iTunes error 3014, 3004, 17, etc. typically happen in the middle of an update process. It is believed that the problem is caused by a connectivity issue. There are many more errors which can stop the update or restore procedure.
Let's take a quick glimpse at those Apple errors.
Part 1. Errors that Will Occur
Errors Due to Hardware Issues
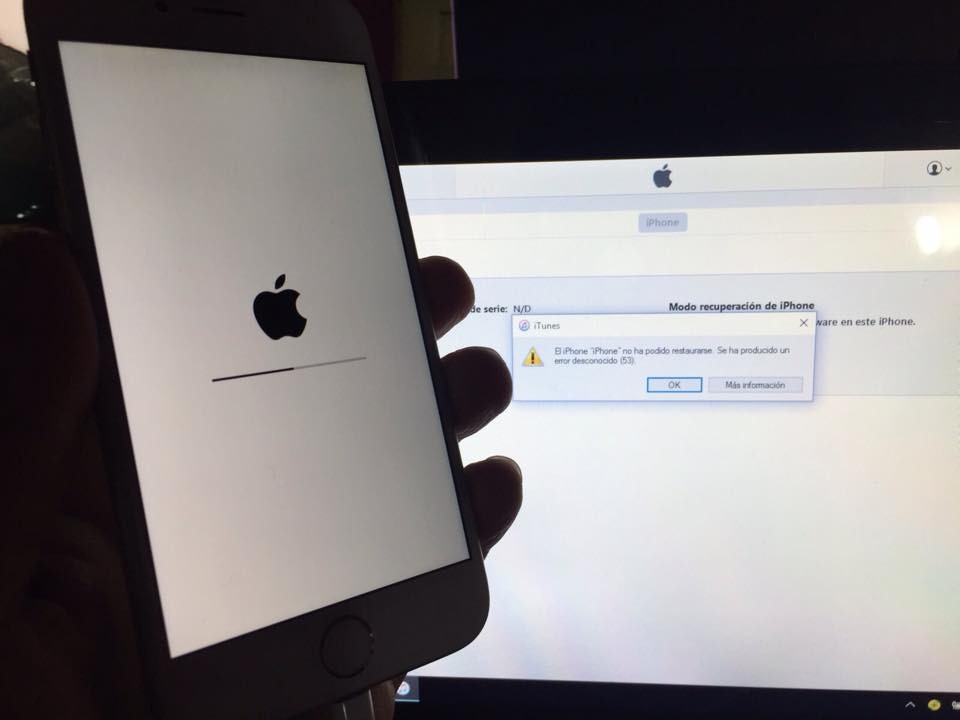
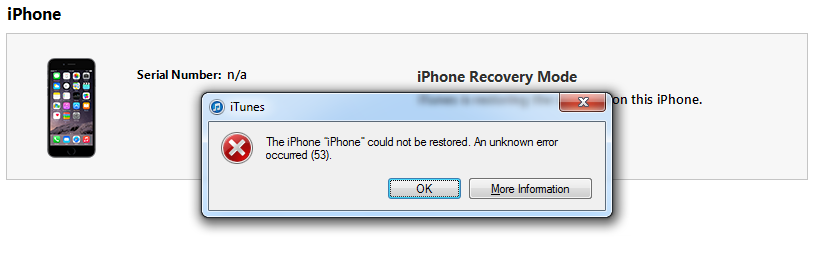
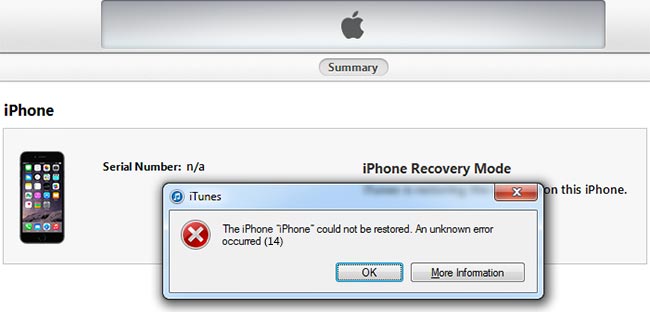
If you see the error code is one of these number: 29, 34, 35, 36, 37,1, 3, 10, 11, 12, 13, 14, 16, 20, 21, 23, 26, 27, 28, 40, 53, 56, 1002, 1004, 1011, 1012, 1014, 1667 and 1669, then the issue has something to do with the hardware of your iOS device.
At this point, you can try another computer, other internet connection, disable or remove your security software, update iTunes, restore device in DFU mode and make sure the date, time and time zone is set correctly.
# Copyright (c) 1993-2006 Microsoft Corp.
#
# This is a sample HOSTS file used by Microsoft TCP/IP for Windows.
#
# This file contains the mappings of IP addresses to host names. Each
# entry should be kept on an individual line. The IP address should
# be placed in the first column followed by the corresponding host name.
# The IP address and the host name should be separated by at least one
# space.
#
# Additionally, comments (such as these) may be inserted on individual
# lines or following the machine name denoted by a '#' symbol.
#
# For example:
#
# 102.54.94.97 rhino.acme.com # source server
# 38.25.63.10 x.acme.com # x client host
# localhost name resolution is handle within DNS itself.
# 127.0.0.1 localhost
# ::1 localhost
Please click here to learn more details if you are using Windows 7 and earlier versions.
Errors Due to Hardware Issues
The errors related to the communication issue include: error 3004, 17, 1638, 3000, 3002, 3013, 3014, 3015, 3194 and 3200. The problem occurs because of the inability of iTunes to establish a communication with the Apple servers.
In this case, you can enter this text on your host file:
Windows 8.1
Step 1Open Notepad. To do this, swipe in from the right edge of the screen, tap Search, type Notepad, and then tap the Notepad icon. Or, if you are using a mouse, point to the upper-right corner of the screen, move the mouse pointer down, click Search, type Notepad, and then click Notepad.
Step 2Copy the text on the left, and then paste the text into the file:
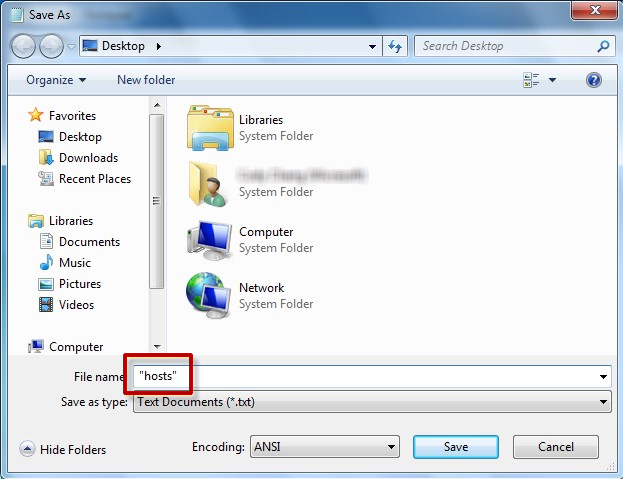
Step 3On the File menu, select Save as, type "hosts" in the File name box (as displayed in the following image), and then save the file to the desktop.
Step 4Close Notepad.
Step 5Open the
a.Swipe in from the right edge of the screen, tap Search, type run, and then tap the Run icon. Or, if you are using a mouse, point to the upper-right corner of the screen, move the mouse pointer down, select Search, type run, and then select the Run icon.
b.Type
Step 6Select the Hosts file, select Rename, and then rename the file as Hosts.old.
Step 7Copy or move the Hosts file that you created in step 3 to the
Mac
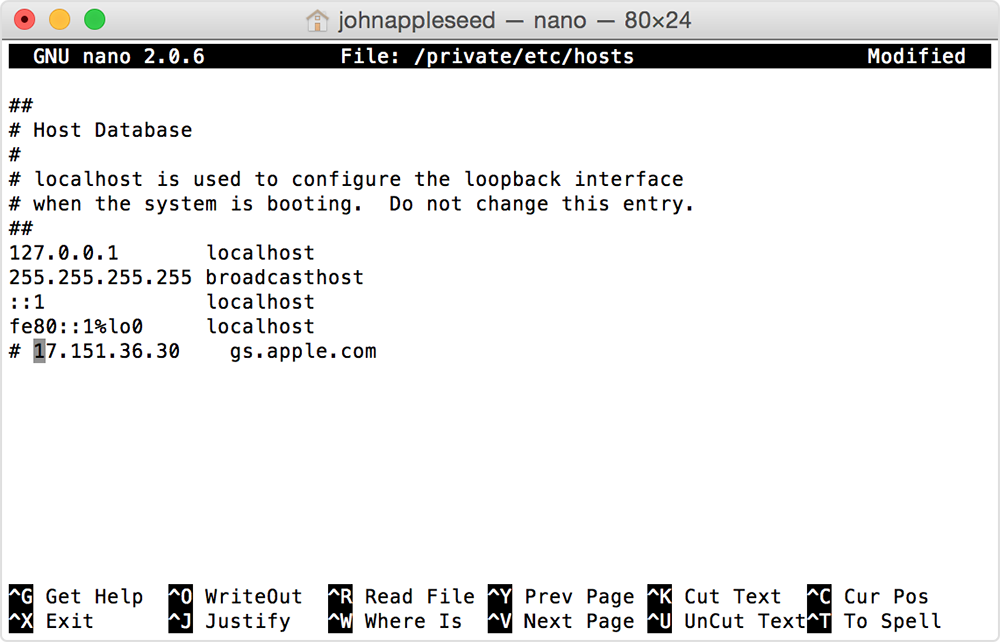
If you're using a Mac, follow these steps:
Step 1Choose Applications > Utilities in the Finder.
Step 2Open Terminal.
Step 3Type this command and press Return:
Step 4Enter the passcode to sign on to your computer and press return.
Step 5Navigate using the arrow keys and look for an entry containing gs.apple.com when terminal displays the hosts file.
Step 6Add the # and a space to the beginning of the gs.apple.com entry.
Step 7Press Control-O to save the file. Then press Return when asked for the filename.
Step 8Press Control-X to exit the editor and then restart your Mac.
Sometimes it can be caused by internet issue, don't skip this basic step. So check your internet connection by opening any website in its browser on computer and try another internet connection as well. You can also try to update iTunes if it is not the latest version, or restart your computer to take a shot.
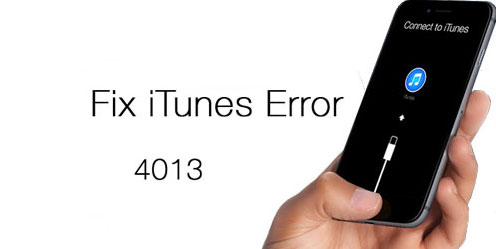
Baseband or USB Connection Issues
Error 4014, 4013, 4005, and 9 are associated with baseband and connectivity on iPhone. Update iTunes version and your computer operating system. Then restart the computer and restore your iPhone on iTunes again. It actually works sometimes. If it doesn't work, try another different computer or USB cable that is made by Apple.
Software Issues
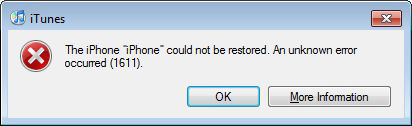
Today software is more of a problem than hardware. For instance, the security software issue. The third-party security software can block the communication between iTunes and Apple server during the restoring process. When this error happens, you will get the number 2, 4, 6, or 1611.
Therefore, in order to bypass this error, disable or remove the security software installed on your computer.
You may also be wondering:
How can you fix the iPhone error issues? Don't worry, you can solve these problems easily.
Keep reading...
Part 2. Recommended Solution for iPhone Errors Fix
Method 1. Restart iPhone
Just like restarting a computer often fixes problems, restarting your iPhone sometimes works wonders:
For iPhone 8 and earlier, you should:
Step 1Press and hold the power button.
Step 2Slide the red slider to left, then the device is turned off. Wait for a few seconds till the screen turns black.
Step 3Press and hold the power button to restart the device.

For iPhone X, you should:
Step 1Press and hold the Wake/Sleep button and either Volume button until the slider appears.
Step 2Drag the slider to turn it off.
Step 3Press and hold the Wake/Sleep button again until you see the Apple logo.
If unfortunately, you are failed to restart your iPhone with above-mentioned way, please keep moving...
Method 2. Soft Reset iPhone
Soft reset is helpful when your apps are not responding properly or it is not able to get important functions to work.
Below are the steps for how?
Step 1Press and hold the power button and home button for about 10 seconds until the Apple logo appears.
Step 2Just wait and then it will restart again in a few seconds.

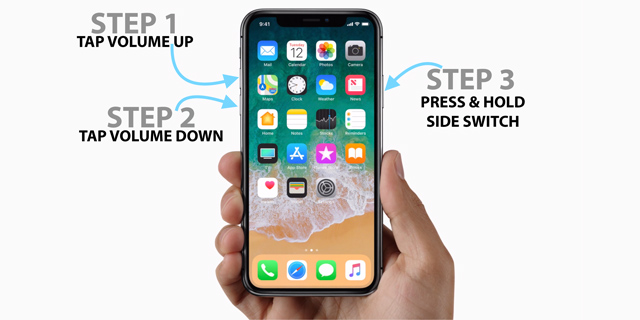
If you know well about iPhone X, you should have known that it is designed without a home button. So you should reset it with below tutorial.
Step 1Press and quickly release the Volume Up button.
Step 2Press and release the Volume Down button which is the same as the Volume Up button.
Step 3Press and hold the Power button for at least 10 seconds until you see the black screen.
Step 4Holding the Power button and release when the device restarts.
Well,
The following way is different from the one mentioned above, a hard reset totally erases all the content from your iPhone.
So you need to backup all your contacts, photos, videos, reminder and more data on your device, or you will lose them sooner than you think.
Method 3. Hard Reset iPhone
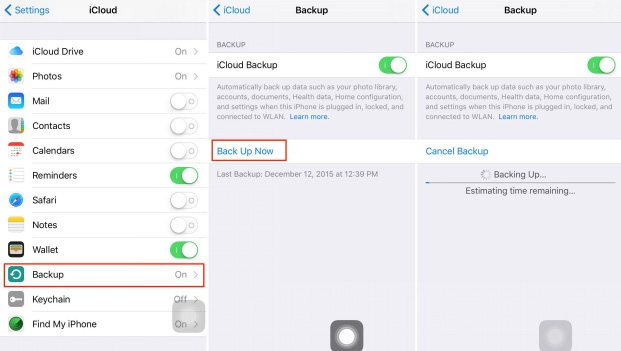
Hard reset iPhone will wipe the data on your iPhone, it will require you to backup your iPhone data if you want to restore these data back to your device after that. There are several simple methods to backup iOS data, below is a tutorial to backup iPhone data with iCloud.
Step 1Make sure that iCloud Backup is turned on in Settings > [your name] >iCloud > iCloud Backup.
Step 2Tap Back Up Now. Then it takes some time to complete according to the size of your data.
After backing up your data, you can read below steps to hard reset your iPhone. There are two methods as below, you can choose one according to your needs.
Option 1
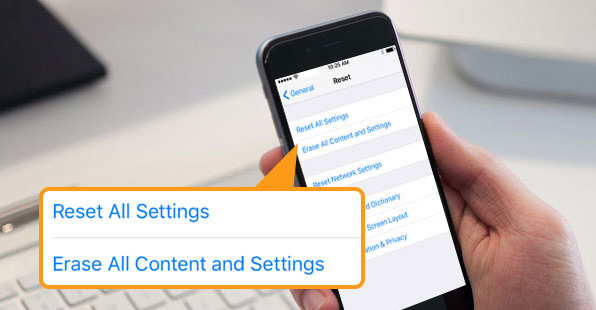
Step 1Tap General in the Settings app.
Step 2Scroll down to tap Reset. Then choose Erase All Content and Settings when you see the 6 options.
Step 3Tap Erase iPhone, then the device will begin restoring the phone to its original factory settings.
Step 4You device will be restart after the process is complete. Just follow the on-screen instruction to set up your device or restore your data.
Option 2
As mentioned in Option 1, it is a method to restore your iPhone on itself directly. If you would like to use a computer, follow the steps below.
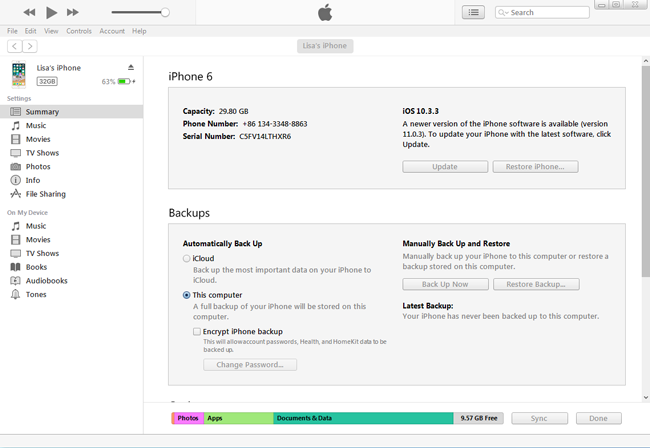
Step 1Launch iTunes on your computer and connect your device to the computer with USB cable.
Step 2Click the device icon once the device is detected.
Step 3Click Summary from the left panel, then Restore iPhone in the iPhone section.
Step 4You will be asked to backup your iPhone data after that, go ahead if you want. Then click Restore.
Step 5After the process is finished, set up your device when it restarts.
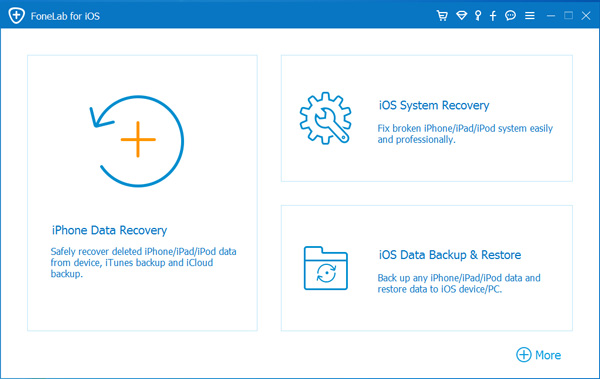
Method 4. Use FoneLab to Fix Your iPhone
There is an easy to use and comprehensive iOS system recovery tool, FoneLab iOS System Recovery which has the ability to fix all kinds of iOS system issues including iPhone stuck in recovery mode, DFU mode, or frozen on the death screen of white, black, blue or red, and more iOS abnormal situations.
You can download the software with below link to have a try.
FoneLab enables you to fix iPhone/iPad/iPod from DFU mode, recovery mode, Apple logo, headphone mode, etc. to normal state without data loss.
- Fix disabled iOS system problems.
- Extract data from disabled iOS devices without data loss.
- It is safe and easy to use.
Step 1Download and install the program to your Windows or Mac OS computer with above link accordingly.
Step 2Connect your iPhone to the computer when the installation is done. Choose iOS System Recovery feature after the software detected your device.
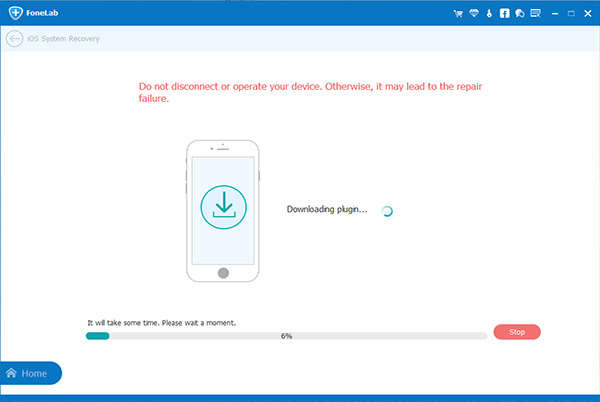
Step 3The software can detect the connected device is in abnormal state like: iPad stucks on Apple logo, Recovery mode, DFU mode, iPhone black screen, etc. and it will ask you to click the Start button to get started.

Step 4You will have to download the firmware for your device in order to make it normal. So You will be asked to confirm the information on your iPhone. Click Repair if it is correct, but if not, select the exact information manually before repair. After that, let the software complete the downloading.
FoneLab enables you to fix iPhone/iPad/iPod from DFU mode, recovery mode, Apple logo, headphone mode, etc. to normal state without data loss.
- Fix disabled iOS system problems.
- Extract data from disabled iOS devices without data loss.
- It is safe and easy to use.
This solution works effectively on iPhone, iPad and iPod. With the help of the software, you can overcome almost all iTunes errors within a few clicks. And most importantly, you will not take the risk of losing data during the repair process.