- Part 1: Transfer Contacts between iPad and iPhone via SIM Card
- Part 2: Sync Contacts from iPad to iPhone Using iCloud Settings
- Part 3: Transfer Contacts from iPhone to iPad with iCloud.com
- Part 4: Sync Contacts between iOS devices with iTunes Backup
- Part 5: Transfer Contacts from iPhone to iPad Using Gmail
- Part 6: Sync Contacts between iPhone and iPad with FoneTrans
- Part 7: FAQs about Syncing Contacts between iPhone and iPad
How to Transfer Contacts between iPad and Another iOS Device
 Posted by Somei Liam / April 16, 2021 09:00
 No matter you upgrade to a new iPad or have two iOS devices, syncing contacts between iPad and iPhone is a useful skill. Apple introduced iCloud back in 2011 and this cloud service can transfer contacts between iOS devices easily. However, it is not the only way to get contacts sync. We will share 6 ways to achieve it.


Guide List
- Part 1: Transfer Contacts between iPad and iPhone via SIM Card
- Part 2: Sync Contacts from iPad to iPhone Using iCloud Settings
- Part 3: Transfer Contacts from iPhone to iPad with iCloud.com
- Part 4: Sync Contacts between iOS devices with iTunes Backup
- Part 5: Transfer Contacts from iPhone to iPad Using Gmail
- Part 6: Sync Contacts between iPhone and iPad with FoneTrans
- Part 7: FAQs about Syncing Contacts between iPhone and iPad
1. Transfer Contacts between iPad and iPhone via SIM Card
Generally speaking, you can store contacts on both SIM card and smartphone. However, it is not available on iPad or iPhone. Apple does not allow you to save any data to SIM card. The indirect solution is an Android phone.
Step 1Open your iPad Contacts app, select a contact and tap Share Contact, choose Mail to send the contact to Android phone via your email.
Step 2Turn to Contacts app on Android, tap Import from USB storage to download the iPad contact.
Step 3Then hit Import/ Export > Export to SIM Card to copy your contact to SIM card.
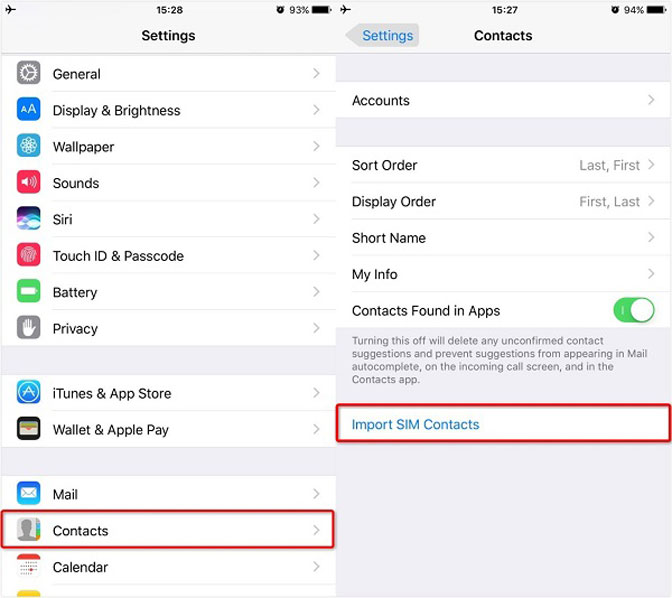
Step 4Get the SIM card out of the Android device and insert it to the target iOS device. Go to Settings -> Contacts and tap Import SIM Contacts.
Note: This way is suitable to transfer several contacts from iPad to iPhone.
2. Sync Contacts from iPad to iPhone Using iCloud Settings
iCloud is the cloud service to expand iPad and iPhone storage capacity. It is also able to sync all contacts from iPad to iPhone in batch.
Step 1Connect your iPad to a Wi-Fi network and open the Settings app.
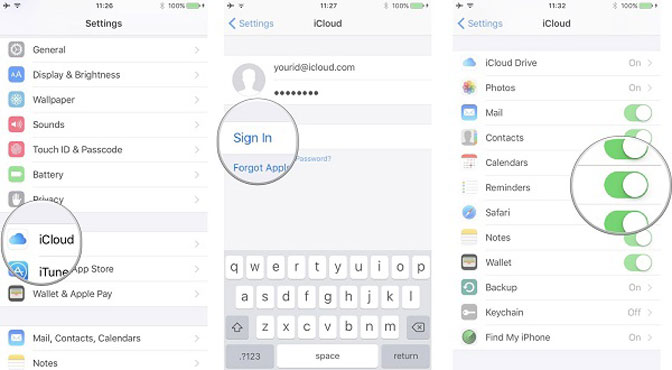
Step 2Tap on your name, head to iCloud and sign in your iCloud account. Toggle the Contacts option to On position.
Step 3Move to the target iPhone and also connect it to your network.
Step 4Head to Settings > iCloud, tap Sign Out to remove the current iCloud account. Next, tap Sign In and log in the account you used to store iPad contacts. Once enable Contacts, they will go to your iPhone Contacts app.
Note: This way is only available to sync all contacts from iPad to iPhone.
3. Transfer Contacts from iPhone to iPad with iCloud.com
If you want to use iCloud to get certain contacts between iPhone and iPad, the iCloud browser client can meet your need.
Step 1Turn on the Contacts option in Settings > iCloud on both source and target iOS devices.
Step 2Open a web browser on your computer, visit iCloud website, and sign in the iCloud account associated with the source device.
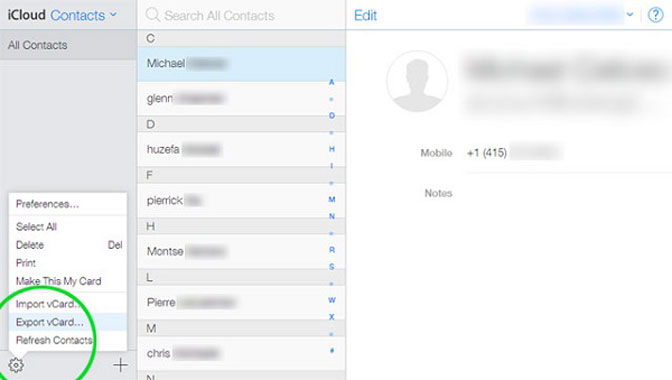
Step 3Select Contacts after the home page shows up to display all your iPad contacts. Highlight the desired contacts with your cursor. Click the Gear icon and select Export vCard to export contacts as vCard file.
Step 4Sign out the iCloud account and log in the iCloud account you used on the target device. Go to Contacts and select Import vCard from the menu list. Select the vCard file you just exported to get contacts from iPhone to iPad immediately.
4. Sync Contacts between iOS devices with iTunes Backup
iTunes backup is capable to transfer contacts from iPhone to iPad. However, it is suitable to set up a new iPad.
Step 1Connect your iPhone to your computer with a lightning cable. Open the latest iTunes and click Device icon. Go to Summary > Backups. Select This Computer and click Back Up Now to create a backup. After that, disconnect the old iPhone.
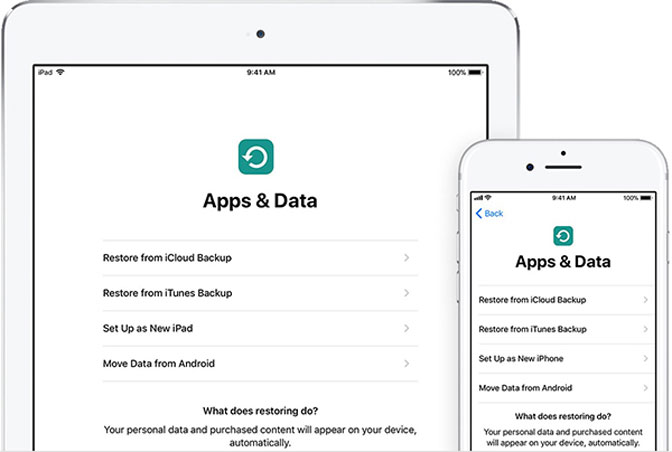
Step 2Turn on the new iPad and start setting it up until you see the Apps & Data screen.
Step 3Select Restore from iTunes Backup and plug the iPad into your computer using the lightning cable.
Step 4Follow the onscreen instructions to get contacts from iPhone to iPad.
5. Transfer Contacts from iPhone to iPad Using Gmail
Though Gmail is a Google service, many iPhone and iPad users set up it on their devices. It is also a contact transfer among iPhone and iPad.
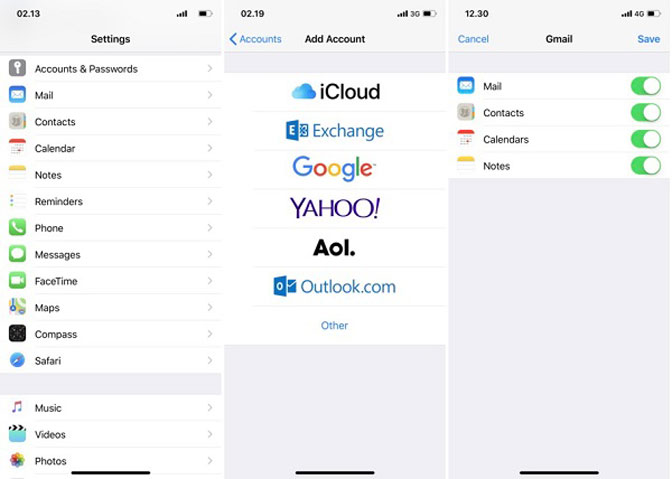
Step 1Turn on iPhone, open Settings app, tap on your name, and go to Accounts & Passwords.
Step 2Tap Add Account > Google, enter your Gmail username, tap Next, enter your password, and tap Next again.
Step 3Toggle Contacts on and tap Save to confirm it. Once your iPhone connects to the internet, your contacts will go to your Gmail.
Step 4Open the Gmail app on the target iOS device, sign in your account and you can find all contacts in corresponding folder.
Note: This way cannot transfer contacts from iPhone to iPad’s Contacts app.
6. Sync Contacts between iPhone and iPad with FoneTrans
FoneTrans for iOS is the easiest way to sync contacts between iPhone and iPad since it offers extensive benefits, such as:
- Preview all contacts for selectively syncing.
- Transfer contacts from iPhone to iPad directly.
- Keep the original quality during the process.
- No damage on existing contacts on target iPad.
How to Sync Contacts between iPhone and iPad
Step 1Install the contact transfer tool
With FoneTrans for iOS, you will enjoy freedom to transfer your data from iPhone to computer. You can not only transfer iPhone text messages to computer, but also photos, videos and contacts can be moved to PC easily.
- Transfer photos, videos, contacts, WhatsApp, and more data with ease.
- Preview data before transferring.
- iPhone, iPad and iPod touch are available.
Open the easiest contact transfer application after you install it on your computer.
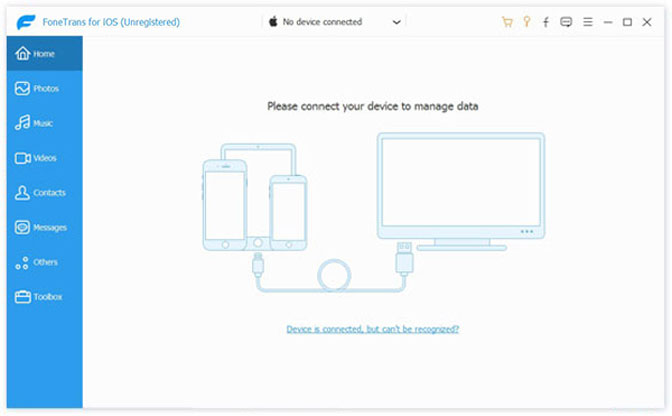
Connect both iPhone and iPad to the computer with lightning cables. Once launch the application, it will detect your devices.
Step 2Preview iPhone contacts
Select the source iPhone from the top of the window, and go to the Contacts tab from left side. Now, you can view all contacts on iPhone.
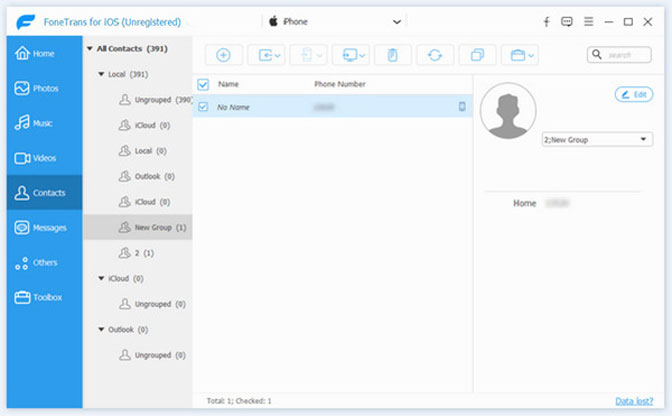
Step 3Transfer contacts from iPhone to iPad
Check all contacts you wish to sync to iPad, click the Device icon on the top ribbon and select the target iPad. A few seconds later, contacts will sync to iPad from iPhone.

7. FAQs about Syncing Contacts between iPhone and iPad
The last method you can try is to use an online website. It quires your iPhone IMEI code during the process. You can dial *#06# on your device to recover if you forgot it already.
Visit https://www.officialsimunlock.com/unlock-phone/iphone and select your iPhone SE information from the drop-down list. Then click UNLOCK IPHONE.
However, it is not complicated but takes 24 hours to finish. It is recommended to choose FoneLab iOS Unlocker to save your time.
6. FAQs of Unlocking iPhone SE
Why are my Contacts not syncing between iPhone and iPad?
If you choose iCloud to transfer iOS contacts, your iCloud storage might be full already. If you choose iTunes or other tools, you should check your account settings or computer space.
What does SIM not provisioned mean?
It means your SIM card doesn't provide or supply something. You might be encountered sim not provisioned mm#2 or SIM card not provisioned issues after transferring iOS contacts. You can reboot iPhone, insert your SIM card correctly or contact your carrier or network provider for help.
Conclusion
We have shared 6 methods to sync contacts between iPhone and iPad or transfer pictures from iPhone to iPad in various situations. What you need to do is to pick up the proper method and follow our guide to achieve it. If you have more suggestions, please write them down in the comment area.
With FoneTrans for iOS, you will enjoy freedom to transfer your data from iPhone to computer. You can not only transfer iPhone text messages to computer, but also photos, videos and contacts can be moved to PC easily.
- Transfer photos, videos, contacts, WhatsApp, and more data with ease.
- Preview data before transferring.
- iPhone, iPad and iPod touch are available.