- Part 1. Transfer Voice Memos from iPhone to Mac with FoneTrans for iOS
- Part 2. Sync Voice Memos from iPhone to Mac through Email
- Part 3. Transfer Voice Memos from iPhone to Mac by AirDrop
- Part 4. Transfer Voice Memos from iPhone to Mac Using iCloud
- Part 5. Transfer Voice Memos from iPhone to Mac Using iCloud Drive
- Part 6. Transfer Voice Memos from iPhone to Mac with iTunes
- Part 7. FAQs about Syncing Voice Memos from iPhone to Mac
Transfer Voice Memos from iPhone to Mac via 6 Methods
 Posted by Boey Wong / june 10, 2022 09:00
 I have many voice memos on iPhone, and want to save them on Mac instead to free up iPhone storage. How to export voice memos from iPhone to Mac? Thanks!
If you are one of them and have the same question about transferring voice memos from iPhone to Mac, you have come to the right place. For various reasons, such as making a backup on computer, needing them for editing, freeing up iPhone space, etc., you will search how to transfer iPhone voice memos to Mac on the internet. However, there are too many options to pick the best one from them.
Luckily, this post will introduce 6 proven and simple methods to help you sync voice memos from iPhone to Mac. Can’t wait to learn about them? Move on.
![Transfer Voice Memos from iPhone to Mac via 6 Efficient Methods [2023 Guide]](/images/ios-transfer/export-voice-memos-from-iphone-to-mac.jpg)

Guide List
- Part 1. Transfer Voice Memos from iPhone to Mac with FoneTrans for iOS
- Part 2. Sync Voice Memos from iPhone to Mac through Email
- Part 3. Transfer Voice Memos from iPhone to Mac by AirDrop
- Part 4. Transfer Voice Memos from iPhone to Mac Using iCloud
- Part 5. Transfer Voice Memos from iPhone to Mac Using iCloud Drive
- Part 6. Transfer Voice Memos from iPhone to Mac with iTunes
- Part 7. FAQs about Syncing Voice Memos from iPhone to Mac
Part 1. Transfer Voice Memos from iPhone to Mac with FoneTrans for iOS
Before diving into Apple ways, there is a powerful third-party program you should not miss. FoneTrans for iOS majors in transferring data between iOS device and computer. You can use it to transfer photos, contacts, videos, voice memos, playlist, etc. Thus, you can transfer voice memos from iPhone to Mac through simple clicks.
Below is a demonstration of how to use it.
With FoneTrans for iOS, you will enjoy freedom to transfer your data from iPhone to computer. You can not only transfer iPhone text messages to computer, but also photos, videos and contacts can be moved to PC easily.
- Transfer photos, videos, contacts, WhatsApp, and more data with ease.
- Preview data before transferring.
- iPhone, iPad and iPod touch are available.
Step 1Download and install FoneTrans on computer, then run it after that.
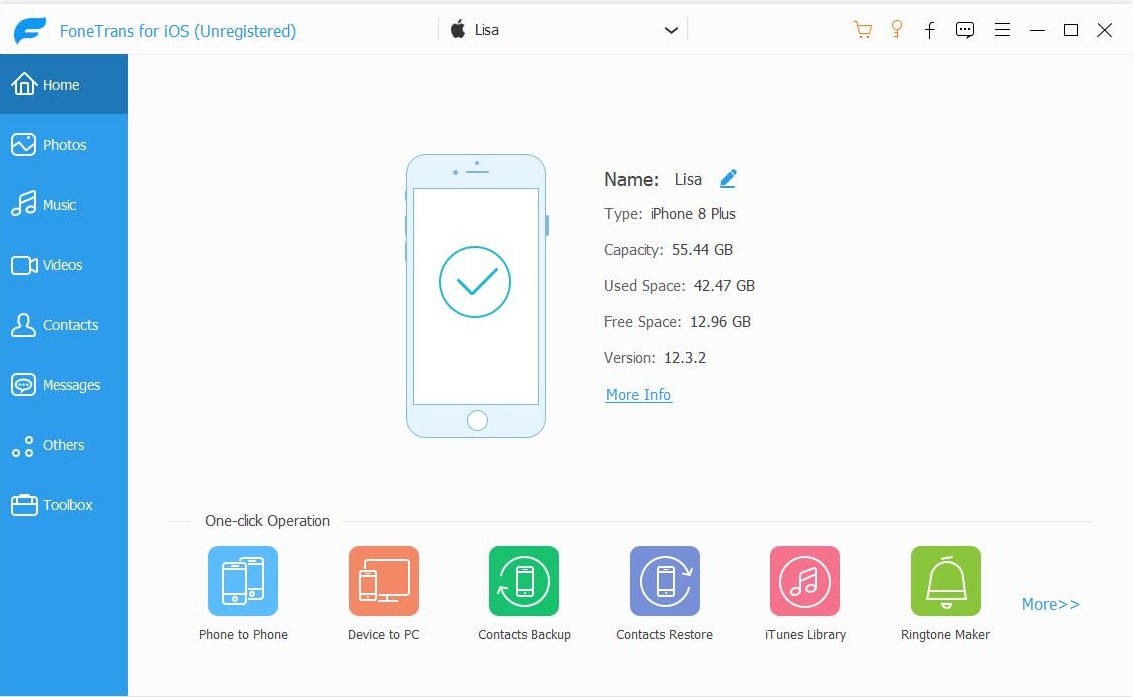
Step 2On the main interface, select Music > Voice Memos.
Step 3All available voice memos will be listed, check the items you want to transfer to Mac.
Step 4Click the third export icon and choose a local folder to save them.
That’s it. So easy, right?
Moreover, you can also use its Windows version to transfer data quickly. And it is 100% safe to use.
Part 2. Sync Voice Memos from iPhone to Mac through Email
You can send voice memos through email on iPhone. Well, it can be another way to transfer voice memos if you receive the email and save the attached voice memos on Mac.
It won’t be complicated, you can do this by following the tutorial below.
Step 1Open the Voice Memos app on iPhone, tap the Edit button on the upper-right, and select the one you want to transfer.
Step 2Tap the share icon on the bottom-left, choose Email.
Step 3Enter your email address and tap Send button.
Step 4Receive emails on Mac, click the attachment to save voice memo on Mac.
Please move the following parts if you are an Apple fan.
With FoneTrans for iOS, you will enjoy freedom to transfer your data from iPhone to computer. You can not only transfer iPhone text messages to computer, but also photos, videos and contacts can be moved to PC easily.
- Transfer photos, videos, contacts, WhatsApp, and more data with ease.
- Preview data before transferring.
- iPhone, iPad and iPod touch are available.
Part 3. Transfer Voice Memos from iPhone to Mac by AirDrop
AirDrop is a feature that allows users to transfer data between iOS, iPadOS and macOS without obstacles. If you prefer to transfer data without a USB connection, this one should be the perfect choice for you.
Here are the detailed steps for exporting voice memos from iPhone to Mac.
Step 1Open Voice Memos app on iPhone and pick one of them.
Step 2Tap the share icon, and choose AriDrop from the options.
Step 3Select your Mac and begin transferring.
For wireless tool lovers, iCloud is the one you should try to transfer any data across Apple devices.
Part 4. Transfer Voice Memos from iPhone to Mac Using iCloud
You know, Apple has an auto-sync feature to access data among devices with the same Apple ID. If you enable this feature for photos, contacts, messages, and more, you can check these data on any device.
So, you can also use it to sync voice memos from iPhone to Mac.
Step 1Enable iCloud sync feature for voice memo through Settings > [your name] > iCloud > Voice Memos. Turn it on.
Step 2Choose Apple menu > System Preferences > Apple ID > iCloud > iCloud Drive > Options > Voice Memos.
You should find that iPhone has another iCloud Drive feature that can help you easily transfer data.
With FoneTrans for iOS, you will enjoy freedom to transfer your data from iPhone to computer. You can not only transfer iPhone text messages to computer, but also photos, videos and contacts can be moved to PC easily.
- Transfer photos, videos, contacts, WhatsApp, and more data with ease.
- Preview data before transferring.
- iPhone, iPad and iPod touch are available.
Part 5. Transfer Voice Memos from iPhone to Mac Using iCloud Drive
Like Google Drive, OneDrive and others, iCloud Drive is a cloud service which is released by Apple. It can do something that others can do for you. One of the significant functions is to upload and download data wherever you want. You can use iCloud Drive to export voice memos from iPhone to Mac below.
Step 1On iPhone Voice Memos app, tap one of them. Choose the three-dot icon and tap Save to Files.
Step 2On your Mac browser, visit icloud.com and enter your account and password.
Step 3Click iCloud Drive and find your voice memos. Click to download them on Mac.
Someone might have doubts about what about iTunes? Can iTunes transfer voice memos to Mac? There are the answers in the next parts.
Part 6. Transfer Voice Memos from iPhone to Mac with iTunes
You might not miss iTunes when you talk about Apple ways as it is the original iOS data management on computer. However, you should know that the latest macOS has replaced it with new features already. It can transfer voice memos from iPhone to Mac, but is available on an earlier version of iTunes on Mac only.
Below are the clear instructions for copying iPhone voice memos to Mac.
Step 1Run iTunes and connect iPhone to Mac.
Step 2Click your device and select the Music tab. Check the Sync Music and Include voice memos under it.
Step 3Click Sync button.
If you have upgraded macOS already, you can try FoneTrans for iOS or others above in this post to transfer iPhone voice memos or other supporting data to Mac.
With FoneTrans for iOS, you will enjoy freedom to transfer your data from iPhone to computer. You can not only transfer iPhone text messages to computer, but also photos, videos and contacts can be moved to PC easily.
- Transfer photos, videos, contacts, WhatsApp, and more data with ease.
- Preview data before transferring.
- iPhone, iPad and iPod touch are available.
Part 7. FAQs about Syncing Voice Memos from iPhone to Mac
1. How to transfer voice memos from iTunes to computer?
FoneTrans for iOS allows you to transfer data from iTunes to computer. After installation, run it on computer. Then click Music > Voice Memos > export icon.
2. How to transfer voice memos from iPod to computer?
You have 2 options, using iTunes or FoneTrans for iOS. For the first one, you can't choose voice memos selectively. If you want to sync all iPhone voice memos, it can be a good choice. And the other one can help you transfer iPhone voice memos entirely or selectively.
That's all about how to transfer iPhone voice memos to Mac entirely or selectively with the most recommended methods. You can try them on computer. Why not download and enjoy their benefits now!